JC-1 Staining for Flow Cytometry: A Complete Guide for Apoptosis Detection and Mitochondrial Health Assessment
This article provides a comprehensive guide for researchers and drug development professionals on utilizing JC-1 staining in flow cytometry to detect apoptosis through mitochondrial membrane potential (ΔΨm) changes.
JC-1 Staining for Flow Cytometry: A Complete Guide for Apoptosis Detection and Mitochondrial Health Assessment
Abstract
This article provides a comprehensive guide for researchers and drug development professionals on utilizing JC-1 staining in flow cytometry to detect apoptosis through mitochondrial membrane potential (ΔΨm) changes. It covers foundational principles of JC-1 as a ratiometric probe that shifts from red J-aggregates to green monomers upon mitochondrial depolarization, a key early apoptosis event. The content delivers a detailed, step-by-step protocol for sample preparation, staining, and data acquisition, alongside robust troubleshooting for common issues like particulate formation and suboptimal fluorescence. Furthermore, it explores advanced validation techniques, including combination with Annexin V/PI staining for multiparametric analysis and the application of alternative excitation wavelengths to improve data accuracy. This integrated methodology enables rapid, comprehensive assessment of cellular health, proliferation, and death mechanisms, proving crucial for fundamental research and pre-clinical drug screening.
Understanding JC-1: The Essential Guide to Mitochondrial Membrane Potential and Early Apoptosis Detection
The Critical Role of Mitochondrial Membrane Potential in Cellular Health and Early Apoptosis
The mitochondrial membrane potential (ΔΨm) is a fundamental parameter of cellular health, generated by the separation of protons across the inner mitochondrial membrane during the process of oxidative phosphorylation. This electrochemical gradient, with the interior of the mitochondrion being electronegative, drives the production of ATP and serves as a key indicator of mitochondrial viability and function [1]. In healthy cells, maintained ΔΨm is essential for energy production, calcium homeostasis, and reactive oxygen species regulation. However, during the early stages of apoptosis, a programmed cell death process, the mitochondrial membrane undergoes depolarization, characterized by a loss of ΔΨm [2]. This depolarization is associated with the opening of mitochondrial permeability transition pores (PTP), leading to the release of apoptogenic factors such as cytochrome c, which activates caspase cascades and commits the cell to death [3]. Consequently, accurate assessment of ΔΨm provides researchers with a critical tool for evaluating cellular health, investigating mechanisms of cell death, and screening potential therapeutic compounds.
The JC-1 Dye as a Ratiometric Probe for ΔΨm
The lipophilic, cationic dye 5,5′,6,6′-tetrachloro-1,1′,3,3′-tetraethylbenzimi-dazoylcarbocyanine iodide (JC-1) has become a premier tool for monitoring ΔΨm due to its unique potential-dependent spectral properties [1]. In cells with healthy, polarized mitochondria, JC-1 accumulates in the mitochondrial matrix, where it forms red-fluorescent J-aggregates due to the high dye concentration. In apoptotic or unhealthy cells with depolarized mitochondria, the dye cannot accumulate sufficiently and remains in the monomeric form in the cytoplasm, emitting green fluorescence [4]. This concentration-dependent formation of two distinct fluorescent forms allows for ratiometric measurement, where the red/green fluorescence intensity ratio provides a quantitative assessment of ΔΨm that is independent of mitochondrial size, shape, and density [1].
Table 1: Spectral Properties of JC-1 Fluorescent Forms
| Fluorescent Form | Excitation Maximum | Emission Maximum | Associated Fluorescence Filter | Mitochondrial Status |
|---|---|---|---|---|
| Monomer | 514 nm | 529 nm (Green) | FITC | Depolarized/Low ΔΨm |
| J-Aggregate | 585 nm | 590 nm (Red) | PE/TRITC | Polarized/High ΔΨm |
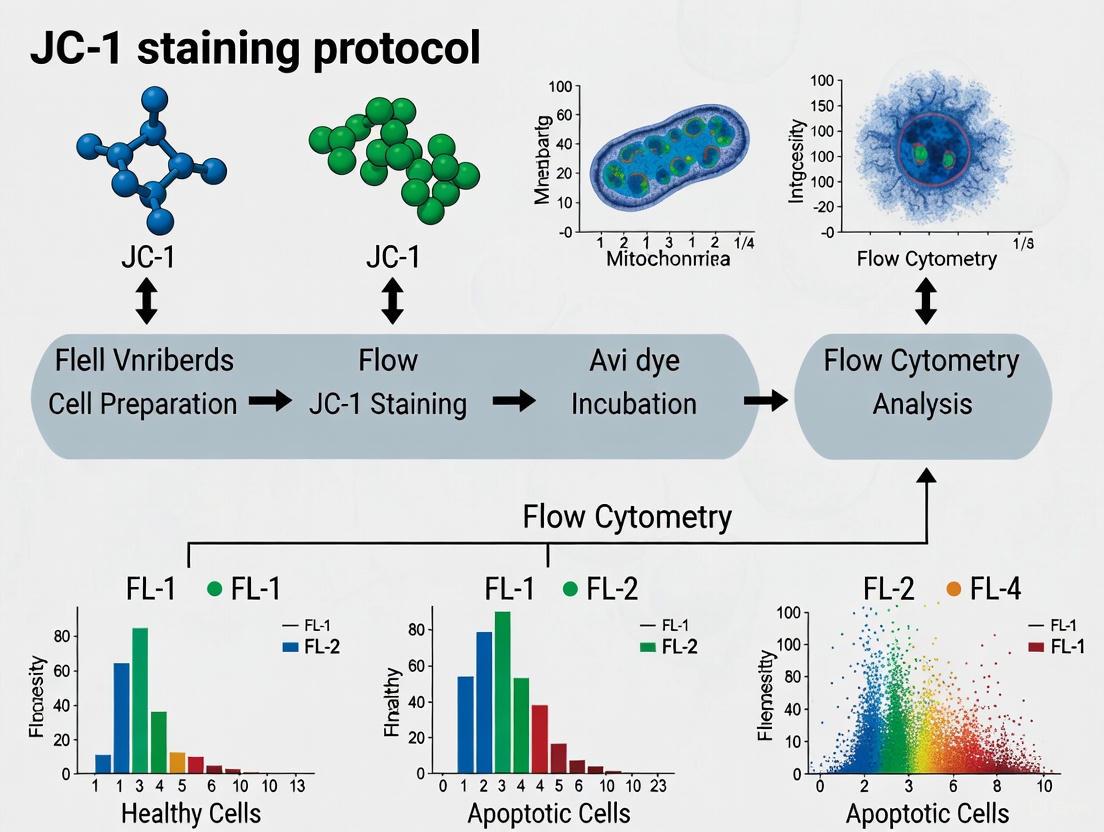
Detailed JC-1 Staining Protocol for Flow Cytometry
The following protocol is optimized for the detection of early apoptosis via flow cytometric analysis of ΔΨm in whole cells, utilizing the MitoProbe JC-1 Assay Kit (Thermo Fisher Scientific, catalog number: M34152) or equivalent components [1].
Materials and Reagents
Table 2: Essential Reagents and Equipment
| Item | Function/Description | Example Source/Catalog Number |
|---|---|---|
| JC-1 Dye (lyophilized) | Fluorescent cationic probe for ΔΨm | MitoProbe JC-1 Assay Kit (M34152) |
| Carbonyl cyanide m-chlorophenyl hydrazone (CCCP) | Oxidative phosphorylation uncoupler; positive control for depolarization | MitoProbe JC-1 Assay Kit (M34152) |
| Dimethyl sulfoxide (DMSO) | Solvent for preparing JC-1 stock solution | Sigma-Aldrich (D5879) |
| Phosphate-buffered saline (PBS) | Washing and suspension buffer | Sigma-Aldrich (D8537) |
| Flow Cytometer | Instrument for analysis, equipped with 488 nm laser and FITC/PE filters | BD FACSCalibur or comparable platform |
| Cell Culture Reagents | For maintaining cells (medium, serum, trypsin/EDTA) | Standard suppliers |
Step-by-Step Procedure
- Preparation of Stock Solutions: Reconstitute the lyophilized JC-1 dye with DMSO to create a 200 µM stock solution immediately before use. Ensure the powder is completely dissolved. For the positive control, prepare a 50 mM CCCP solution in DMSO [1].
- Cell Preparation and Seeding: Culture cells (e.g., bEnd3, HL60, Jurkat) in appropriate medium until they reach confluency. For suspension cells, proceed to staining. For adherent cells, wash with PBS, dissociate using trypsin/EDTA, and neutralize with warm culture medium. Centrifuge the cell suspension at 125 × g for 7 minutes at 25°C. Aspirate the supernatant and resuspend the cell pellet in warm PBS or culture medium at a density not exceeding 1 x 10^6 cells/ml [1].
- JC-1 Staining: Add 10 µl of the 200 µM JC-1 stock solution per 1 ml of cell suspension (achieving a final working concentration of 2 µM). Mix gently and incubate the cells at 37°C with 5% CO2 for 15-30 minutes, protected from light [1] [4].
- Preparation of Positive Control (Depolarized Cells): In a separate tube, treat cells with CCCP. Add 1 µl of the 50 mM CCCP stock per 1 ml of cell suspension (final concentration 50 µM) and incubate at 37°C for 5 minutes prior to JC-1 staining. This serves as a critical control for validating the assay [1].
- Post-Staining Wash: After incubation, add 2 ml of warm PBS to each tube and centrifuge at 400 × g for 5 minutes at 25°C. Carefully aspirate the supernatant to remove any unincorporated dye.
- Flow Cytometry Analysis: Resuspend the final cell pellet in 0.5-1 ml of warm PBS. Analyze the cells immediately on a flow cytometer equipped with a 488 nm excitation laser. Collect green monomer fluorescence using a 530/30 nm bandpass filter (FITC channel) and red J-aggregate fluorescence using a 585/42 nm bandpass filter (PE channel). Acquire data for at least 10,000 events per sample [1] [5].
Data Analysis and Interpretation
Flow cytometric data from JC-1 stained samples should be analyzed using a biparametric plot (dot plot or density plot) of red (J-aggregate) fluorescence versus green (monomer) fluorescence.
- Healthy Cell Population: Cells with high ΔΨm display a high red/green fluorescence ratio and will appear in the upper-left or upper-right quadrant of the plot [4].
- Apoptotic Cell Population: Cells with low ΔΨm display a low red/green fluorescence ratio, characterized by decreased red fluorescence and increased green fluorescence. They will appear in the lower-right quadrant of the plot [4] [6].
- Quantification: The percentage of cells within the "depolarized" population (low red/green ratio) can be quantified and compared between untreated and treated samples. A dose- or time-dependent increase in this population is indicative of apoptosis induction.
Technical Considerations and Troubleshooting
Optimization and Controls
- Dye Concentration and Incubation Time: The recommended 2 µM JC-1 and 15-30 minute incubation is a starting point. Optimization may be required for different cell types to ensure clear separation of populations without over-staining [1].
- Critical Controls: The inclusion of a CCCP-treated positive control is mandatory for confirming that the observed fluorescence shift is due to changes in ΔΨm. An unstained cell sample is necessary for setting fluorescence compensation and gating [1].
- Viability: JC-1 staining is for live cells and is not compatible with fixation [4]. Ensure cells are processed and analyzed promptly.
Advanced Technical Notes
- Excitation Wavelength: While 488 nm is standard, excitation at 405 nm can be used to detect J-aggregates with significantly less spillover from monomer fluorescence, thereby simplifying data analysis by reducing or eliminating the need for fluorescence compensation [5].
- Multiparametric Analysis: JC-1 staining can be successfully combined with other probes, such as Annexin V and propidium iodide, in a multiparametric panel to gain a more comprehensive view of the apoptotic timeline [6].
Application in Research and Drug Development
The JC-1 assay is extensively used to study the role of mitochondrial dysfunction in various pathological contexts and for drug screening.
- Neurodegenerative Diseases: It is employed in cellular models of Alzheimer's, Parkinson's, and Huntington's diseases to investigate the contribution of mitochondrial failure to disease phenotypes [7].
- Toxicology: The protocol is applied to evaluate the impact of xenobiotics, such as tobacco smoke or pharmacological agents, on mitochondrial health in target cells like brain endothelial cells [1].
- Cancer Research: The effect of chemotherapeutic agents (e.g., camptothecin, staurosporine) on ΔΨm and the induction of the intrinsic apoptotic pathway in cancer cell lines (e.g., Jurkat, HL60) is a common application [4] [6].
Table 3: Example Experimental Data from JC-1 Flow Cytometry
| Cell Line / Treatment | Effect on ΔΨm (Red/Green Ratio) | Interpretation / Apoptotic Effect |
|---|---|---|
| HL60 / Untreated | High Ratio | Healthy, polarized mitochondria [4] |
| HL60 / Staurosporine | Decreased Ratio | Induced mitochondrial depolarization [4] |
| Jurkat / Untreated | High Ratio | Healthy, polarized mitochondria [4] |
| Jurkat / Camptothecin | Decreased Ratio | Induced mitochondrial depolarization [4] |
| Fibroblasts / H₂O₂ | Progressive loss of Red signal over time | Time-dependent depolarization [4] |
Mitochondrial membrane potential (ΔΨM) is a critical parameter of mitochondrial function and cellular health, generated by the electrochemical proton gradient across the inner mitochondrial membrane during ATP synthesis [1]. This potential, with the interior of the organelle being electronegative, drives the synthesis of ATP and facilitates the inward transport of cations [1]. In early apoptosis, a distinctive feature is the disruption of mitochondrial integrity, including the loss of ΔΨM, which is associated with the opening of the mitochondrial permeability transition pore (MPTP), leading to the release of cytochrome c into the cytosol [4].
The lipophilic, cationic dye JC-1 (5,5',6,6'-tetrachloro-1,1',3,3'-tetraethylbenzimidazolylcarbocyanine iodide) has become a widely used tool for monitoring ΔΨM in apoptosis studies and mitochondrial health assessment [4] [1]. This fluorescent probe enables researchers to distinguish between polarized and depolarized mitochondria through a unique concentration-dependent fluorescence shift, providing valuable insights into mitochondrial health and activity across various cell types, including myocytes, neurons, and endothelial cells, as well as in intact tissues and isolated mitochondria [4] [1].
The Fundamental Principle of JC-1 Staining
Potential-Dependent Accumulation and Spectral Shifts
JC-1 operates as a molecular reporter of mitochondrial membrane potential through its unique potential-dependent accumulation within mitochondria. As a lipophilic cationic dye, JC-1 freely crosses cell membranes and selectively accumulates in the electronegative interior of mitochondria [4] [1]. The fundamental principle underlying JC-1's functionality lies in its concentration-dependent formation of reversible fluorescent complexes called J-aggregates.
In healthy cells with normal ΔΨM, the energized and negatively charged mitochondria drive substantial JC-1 accumulation, reaching high intramitochondrial concentrations (aqueous solutions above 0.1 µM) that trigger the formation of red-fluorescent J-aggregates [4] [1]. These J-aggregates exhibit excitation/emission maxima of 585/590 nm [1]. Conversely, in apoptotic or unhealthy cells with diminished ΔΨM, JC-1 still enters the mitochondria but to a lesser extent due to reduced membrane polarization. At these lower internal concentrations, JC-1 remains primarily in its monomeric form, which exhibits green fluorescence with excitation/emission maxima of 510/527 nm [1].
The Red/Green Fluorescence Ratio as a Quantitative Metric
The ratio of red to green fluorescence intensity provides a robust quantitative measurement of mitochondrial membrane potential that depends solely on ΔΨM and is not influenced by confounding factors such as mitochondrial size, shape, and density, which may affect single-component fluorescence signals [4] [1]. This ratiometric approach enables comparative measurements of membrane potential and allows researchers to determine the percentage of mitochondria within a population that respond to experimental treatments or stimuli [4].
Table 1: Fluorescence Properties of JC-1 Dye Forms
| JC-1 Form | Mitochondrial Condition | Excitation Maxima (nm) | Emission Maxima (nm) | Fluorescence Color |
|---|---|---|---|---|
| Monomer | Depolarized/Low ΔΨM | 510/514 | 527/529 | Green |
| J-aggregate | Polarized/High ΔΨM | 585 | 590 | Red |
JC-1 Staining Workflow and Detection Platforms
The following diagram illustrates the fundamental principle of JC-1 staining and how it reports on mitochondrial health through distinct fluorescence signals:
Practical Staining Protocol for Flow Cytometry
The following protocol provides a standardized approach for JC-1 staining optimized for flow cytometry applications:
Reagent Preparation:
- Prepare a fresh 200 µM JC-1 dye stock solution by reconstituting lyophilized JC-1 with DMSO immediately before use [1].
- Ensure complete dissolution of dye powder until the solution is clear of aggregates [1].
- Warm JC-1 powder and DMSO solutions to 25°C before use [1].
Cell Staining Procedure:
- Harvest and wash cells, then resuspend in warm cell culture medium or PBS at a density not exceeding 1 × 10^6 cells/ml [1].
- Add 10 µl of 200 µM JC-1 dye per 1 ml of cell suspension (achieving a final concentration of 2 µM) [1].
- Incubate cells at 37°C with 5% CO₂ for 15-30 minutes [1].
- Wash cells by adding 2 ml of warm PBS and centrifuging at 400 × g for 5 minutes at 25°C [1].
- Remove supernatant and resuspend cell pellet in fresh buffer for analysis [1].
Inclusion of Appropriate Controls:
- For a positive control (depolarized mitochondria), treat one sample with 50 µM carbonyl cyanide m-chlorophenyl hydrazone (CCCP) or 100 µM carbonyl cyanide-p-trifluoromethoxyphenylhydrazone (FCCP) and incubate at 37°C for 5 minutes before staining [1] [8].
- Include unstained cells for autofluorescence correction [1].
Detection Platform Specifications
JC-1 staining can be analyzed using various fluorescence detection platforms, each with specific configuration requirements:
Table 2: Detection Platform Configurations for JC-1 Analysis
| Platform | Excitation (nm) | Emission Filters/Detection | Key Applications | References |
|---|---|---|---|---|
| Flow Cytometry | 488 nm (standard) or 405 nm (improved separation) | 530/30 nm (green), 585/42 nm (red) | Quantitative population analysis, multiparametric assays | [4] [5] |
| Fluorescence Microscopy | 488 nm (green), 561 nm (red) | 500-550 nm (green), 560-610 nm (red) | Spatial localization, real-time dynamics | [8] |
| Plate Reader | 480-490 nm (green), 530-540 nm (red) | 525-545 nm (green), 585-605 nm (red) | High-throughput screening, kinetic studies | [8] |
Essential Reagents and Equipment
Research Reagent Solutions
Table 3: Essential Reagents for JC-1 Staining Experiments
| Reagent/Kit | Composition | Function | Supplier Examples |
|---|---|---|---|
| JC-1 Dye | 5,5',6,6'-tetrachloro-1,1',3,3'-tetraethylbenzimidazolylcarbocyanine iodide | Primary fluorescent indicator for ΔΨM | Thermo Fisher Scientific (T3168) [4] |
| MitoProbe JC-1 Assay Kit | JC-1, DMSO, CCCP, 10x PBS | Optimized kit for flow cytometry with membrane potential disrupter | Thermo Fisher Scientific (M34152) [4] [1] |
| JC-1 MitoMP Detection Kit | JC-1 Dye, Imaging Buffer (10x) | Enhanced solubility with HEPES-buffered imaging solution | Dojindo (MT09) [8] |
| Carbonyl Cyanide m-chlorophenyl hydrazone (CCCP) | Mitochondrial uncoupler in DMSO | Positive control for mitochondrial depolarization | Included in MitoProbe Kit [4] [1] |
| Dimethyl Sulfoxide (DMSO) | High-quality solvent | JC-1 dye reconstitution | Various suppliers [1] |
Required Equipment
- Flow cytometer equipped with 488 nm argon excitation laser and bandpass filters for FITC (530/30 nm) and PE (585/42 nm) detection [1]
- Alternative: Fluorescence microscope with dual-bandpass filter for simultaneous fluorescein and rhodamine detection [1]
- CO₂ incubator maintained at 37°C with 5% CO₂ [1] [6]
- Centrifuge capable of 125 × g to 400 × g [1]
- Pipettes and sterile centrifuge tubes [1]
Advanced Technical Considerations
While 488 nm excitation remains the standard for JC-1 detection, recent investigations reveal that alternative excitation wavelengths can significantly improve data quality. Excitation at 405 nm produces signals from J-aggregates with considerably less spillover from dye monomer fluorescence compared to 488 nm excitation [5]. This improved separation eliminates the necessity for fluorescence compensation, making JC-1 data more accurate and straightforward to interpret [5].
Experimental Design and Controls
Proper experimental design for JC-1 staining must include several critical controls:
- Viability Controls: Ensure analysis is performed on live cells, as JC-1 is not compatible with fixed samples [4].
- Depolarization Controls: Include CCCP or FCCP-treated samples (typically 50-100 µM) to establish the baseline for complete mitochondrial depolarization [1] [8].
- Compensation Controls: When using 488 nm excitation, prepare monomer-only samples (CCCP-treated) for proper spectral compensation between green and red channels [5].
- Time Course Considerations: For apoptosis detection, note that mitochondrial depolarization can occur rapidly following apoptotic stimuli, with significant changes observable within 5-20 minutes of treatment [4].
Multiparametric Applications
JC-1 staining can be effectively combined with other fluorescent probes for comprehensive cellular analysis. The following diagram illustrates an integrated experimental workflow for multiparametric flow cytometry combining JC-1 with other key cellular assays:
This integrated approach enables simultaneous assessment of mitochondrial membrane potential alongside other critical parameters including apoptosis progression (annexin V), cell viability (propidium iodide), proliferation rates (CellTrace Violet or BrdU), and cell cycle status [6]. Such multiparametric analysis provides a comprehensive view of cellular responses to experimental treatments, enabling researchers to establish causal relationships between mitochondrial dysfunction and other cellular processes.
Troubleshooting and Data Interpretation
Common Technical Challenges
- Poor JC-1 Solubility: Older JC-1 formulations presented dissolution challenges. Current commercial kits address this issue through optimized formulations [8].
- Inadequate Staining: Ensure JC-1 concentration (typically 2 µM) and incubation time (15-30 minutes) are optimized for specific cell types [1].
- Excessive Background: Proper washing after staining is crucial to reduce background fluorescence from unincorporated dye [1].
- Spectral Compensation: When using 488 nm excitation, apply appropriate compensation (approximately 30% of green signal subtracted from red channel) to correct for monomer spillover [5].
Quantitative Analysis and Interpretation
The quantitative interpretation of JC-1 data centers on the red/green fluorescence intensity ratio. A decrease in this ratio indicates mitochondrial depolarization, a hallmark of early apoptosis [4] [1]. Flow cytometric analysis typically reveals distinct populations of cells with varying degrees of mitochondrial depolarization following apoptosis-inducing treatments [4].
For accurate quantification, establish gating strategies based on positive (CCCP-treated) and negative (untreated) controls. The percentage of cells with depolarized mitochondria can be calculated from these defined populations, providing a quantitative measure of treatment effects on mitochondrial health [1] [6].
The investigation of mitochondrial health and function is a cornerstone of cellular research, particularly in the study of apoptosis, cancer biology, and neurodegenerative diseases. The cationic dye JC-1 (5,5',6,6'-tetrachloro-1,1',3,3'- tetraethylbenzimidazolylcarbocyanine iodide) stands out as a powerful tool for monitoring mitochondrial membrane potential (ΔΨm), a key indicator of mitochondrial viability. Unlike single-emission dyes such as rhodamine 123 or DiOC6(3), JC-1 exhibits a unique potential-dependent fluorescence shift, enabling ratiometric measurements. This application note details the superior advantages of JC-1, provides a validated flow cytometry protocol for apoptosis detection, and contextualizes its use within a framework of essential reagent solutions and cellular pathways, serving as a comprehensive resource for researchers and drug development professionals.
The Fundamental Principle: Ratiometric Advantage of JC-1
JC-1 functions as a superior probe due to its concentration-dependent formation of two distinct fluorescent species within mitochondria. In healthy, polarized mitochondria, the probe accumulates, leading to the formation of J-aggregates that emit red fluorescence (emission maximum ~590 nm). In apoptotic, depolarized, or less active mitochondria, where the probe cannot concentrate effectively, JC-1 remains in its monomeric form, emitting green fluorescence (emission maximum ~529 nm) [4] [1]. The central metric for analysis is the red-to-green fluorescence intensity ratio, which is directly proportional to the ΔΨm [9] [10].
This ratiometric approach offers critical advantages over single-emission dyes:
- Insensitivity to Artifacts: The ratio is independent of mitochondrial size, shape, density, and the absolute amount of dye loaded into the cell. This corrects for variables such as uneven dye loading, dye leakage, and photobleaching that can severely compromise quantitative measurements with single-wavelength dyes [9] [11] [1].
- Quantitative Comparisons: It allows for direct and reliable comparison of mitochondrial potential across different cell types, treatment conditions, and experimental batches [9].
- Early Apoptosis Detection: A decrease in the red/green ratio is a sensitive indicator of the mitochondrial depolarization that occurs in the early stages of apoptosis, often preceding other hallmark events like phosphatidylserine externalization [4] [10].
Table 1: Comparative Analysis of JC-1 and Single-Emission Mitochondrial Probes
| Feature | JC-1 (Ratiometric) | Rhodamine 123 / TMRE (Single-Emission) |
|---|---|---|
| Measurement Principle | Emission color shift (Green Red) | Fluorescence intensity change |
| Primary Readout | Red/Green Fluorescence Ratio | Fluorescence Intensity (at one wavelength) |
| Quantitative Reliability | High; self-correcting for artifacts | Moderate to Low; sensitive to dye concentration & loading |
| Sensitivity to ΔΨm Loss | High; clear color change | High, but quantification is less reliable |
| Influence of Mitochondrial Morphology/Density | Negligible | Can be significant [9] |
| Best Applications | Quantitative comparison of ΔΨm, Apoptosis detection, High-resolution imaging | Qualitative assessment, Kinetic studies of depolarization |
Experimental Protocol: JC-1 Staining for Flow Cytometry in Apoptosis Research
The following protocol, optimized for flow cytometry, enables robust detection of changes in mitochondrial membrane potential during apoptosis.
Materials and Reagent Solutions
Table 2: The Scientist's Toolkit - Essential Reagents for JC-1 Assay
| Item | Function/Description | Example & Notes |
|---|---|---|
| JC-1 Dye | Fluorescent, cationic probe for ΔΨm. | MitoProbe JC-1 Assay Kit (Thermo Fisher, M34152) [4] or equivalent. |
| Assay Buffer | Provides optimal ionic and pH environment for live cells. | 1X PBS or supplied 10X Assay Buffer [10] [1]. |
| Dimethyl Sulfoxide (DMSO) | Solvent for preparing JC-1 stock solution. | Use anhydrous DMSO; final concentration in cell culture ≤0.1-0.2% [9] [1]. |
| Carbonyl cyanide m-chlorophenyl hydrazone (CCCP) | Mitochondrial uncoupler; positive control for depolarization. | Used at 50 µM final concentration to collapse ΔΨm and establish baseline red/green ratio [1]. |
| Apoptosis Inducer | To treat experimental samples. | Staurosporine (e.g., 5 µM) or Camptothecin (e.g., 10 µM) [4] [8]. |
| Flow Cytometer | Instrument for multiparametric cell analysis. | Equipped with a 488 nm laser and standard FITC (530/30 nm) and PE (585/42 nm) filters [4] [5]. |
Step-by-Step Staining Procedure for Cells in Suspension (e.g., Jurkat, HL-60)
Cell Preparation and Treatment: Harvest and wash cells. Resuspend in warm culture medium or PBS at a density of ~1 x 10^6 cells/mL [1]. Divide cells into aliquots for untreated control, positive control (CCCP), and experimental treatments (e.g., with apoptosis-inducing agents).
JC-1 Staining:
Positive Control Preparation:
- To one sample tube, add 1 µL of 50 mM CCCP (from a DMSO stock) per 1 mL of cells.
- Incubate for 5 minutes at 37°C prior to JC-1 staining. This pre-treatment ensures mitochondrial depolarization [1].
Washing and Data Acquisition:
- After incubation, wash the cells by adding 2 mL of warm PBS and centrifuging at 400 × g for 5 minutes. Carefully aspirate the supernatant.
- Resuspend the cell pellet in 0.5 - 1 mL of fresh PBS or assay buffer.
- Analyze samples immediately on a flow cytometer using 488 nm excitation. Collect green monomer fluorescence in the FITC channel (∼530 nm) and red J-aggregate fluorescence in the PE channel (∼590 nm) [4] [1].
Data Analysis and Interpretation
- Gating Strategy: Collect forward and side scatter to gate on the viable cell population. Exclude debris and aggregates.
- Compensation: Due to spectral overlap, JC-1 monomers emit a small amount of signal into the PE (red) channel. Use the CCCP-treated sample (which contains only green monomers) to set the fluorescence compensation, subtracting ~10-30% of the green signal from the red channel to ensure proper separation [5].
- Analysis: Create a bivariate dot plot of Red (PE) vs. Green (FITC) fluorescence. Healthy cells with high ΔΨm will appear in the high red/low-to-medium green quadrant. Apoptotic cells with low ΔΨm will shift to the low red/high green quadrant. The results can be quantified by reporting the percentage of cells in the "depolarized" population or by calculating the mean fluorescence intensity ratio of red to green for the entire population [4] [5].
Advanced Technical Considerations and Validation
While 488 nm is the standard excitation wavelength, recent evidence suggests that using violet (405 nm) excitation for the red J-aggregate signal provides superior data quality in flow cytometry. J-aggregates excited at 405 nm produce signals with considerably less spillover from the green monomer fluorescence, which eliminates the need for electronic compensation and yields more accurate measurements [5]. Researchers with access to cytometers equipped with a violet laser should consider this optimized setup.
Integration in Multiparametric Apoptosis Assays
JC-1 is highly suited for integration into complex multiparametric workflows. It can be combined with other fluorescent probes to provide a more comprehensive view of cellular status. For example:
- JC-1 + Annexin V / Propidium Iodide (PI): This combination allows for the simultaneous assessment of early apoptosis (loss of ΔΨm and phosphatidylserine exposure) and late apoptosis/necrosis (loss of membrane integrity) [6] [12].
- JC-1 + CellTrace Violet / BrdU: Enables correlative analysis of mitochondrial function with cell proliferation and cell cycle dynamics [6].
Table 3: Quantitative Data Interpretation from JC-1 Assays
| Experimental Condition | Expected Green Fluorescence (Monomer) | Expected Red Fluorescence (J-Aggregate) | Expected Red/Green Ratio |
|---|---|---|---|
| Healthy / Untreated Cells | Low to Medium | High | High |
| Early Apoptotic Cells | High | Low | Low |
| CCCP / FCCP Treated (Positive Control) | High | Very Low | Very Low |
| Post-Fixation | Not Recommended; assay for live cells only [4] [10] |
JC-1 establishes itself as a superior ratiometric probe by transforming the qualitative assessment of mitochondrial membrane potential into a robust, quantitative, and reliable measurement. Its unique ability to shift fluorescence emission based on ΔΨm provides an internal control that single-emission dyes lack, making it an indispensable tool for critical research in apoptosis, drug screening, and mitochondrial pathophysiology. The provided protocol and technical insights offer a solid foundation for researchers to implement this powerful technique, ensuring accurate and reproducible data in the study of cellular health and death.
Mitochondrial membrane potential (ΔΨm) is a critical parameter of mitochondrial health, generated by the proton pumps of the electron transport chain and essential for ATP production through oxidative phosphorylation [13]. In apoptosis, the collapse of ΔΨm serves as a key event in the intrinsic pathway, facilitating the release of apoptogenic factors such as cytochrome c and initiating the caspase activation cascade [4]. This application note details the use of JC-1, a ratiometric fluorescent dye, to investigate ΔΨm collapse within the context of apoptotic signaling, providing methodologies to link mitochondrial depolarization to downstream events like cytochrome c release.
JC-1 exhibits potential-dependent accumulation in mitochondria, forming red-fluorescent J-aggregates in polarized mitochondria and remaining as green-fluorescent monomers upon depolarization [4]. This property allows researchers to monitor the early stages of apoptosis through fluorescence shifts, offering insights into the temporal relationship between ΔΨm dissipation and cytochrome c release, which can vary depending on the apoptotic stimulus and cell type [14].
Background
The Central Role of ΔΨm in Mitochondrial Function and Cell Death
The mitochondrial membrane potential is a key component of the proton motive force used to drive ATP synthesis. Beyond its bioenergetic function, ΔΨm plays a signaling role in cellular homeostasis, and its collapse is a hallmark of the intrinsic apoptotic pathway [13]. During early apoptosis, disruption of mitochondria includes changes in membrane potential, often associated with the opening of the mitochondrial permeability transition pore (MPTP), though some apoptotic stimuli can trigger cytochrome c release independently of MPTP [4] [14].
The release of cytochrome c into the cytosol activates caspase proteases through formation of the apoptosome complex, ultimately leading to apoptotic cell death [15]. Simultaneously, other mitochondrial proteins, such as Apoptosis-Inducing Factor (AIF), may also be released, contributing to caspase-independent apoptotic pathways [15].
Table 1: Key Mitochondrial Factors in Apoptosis
| Factor | Localization | Function in Apoptosis | Release Trigger |
|---|---|---|---|
| Cytochrome c | Mitochondrial intermembrane space | Activates caspase cascade via Apaf-1 and caspase-9 | Outer membrane permeabilization [16] |
| AIF | Mitochondrial intermembrane space | Caspase-independent DNA fragmentation | BAX/BAK-mediated permeabilization [15] |
| Caspase-9 | Mitochondria-associated | Initiator caspase activated by cytochrome c | Concurrent release with cytochrome c [14] |
JC-1 Dye as a Ratiometric Probe for ΔΨm
JC-1 (5,5',6,6'-tetrachloro-1,1',3,3'-tetraethylbenzimidazolylcarbocyanine iodide) is a lipophilic, cationic dye that selectively enters mitochondria. In healthy, polarized mitochondria, JC-1 accumulates and forms aggregates exhibiting red fluorescence (emission maximum ~590 nm). In depolarized mitochondria, the dye remains in monomeric form, emitting green fluorescence (~529 nm) [4]. The quantifiable shift in the red/green fluorescence intensity ratio provides a robust measure of ΔΨm changes, independent of mitochondrial size, shape, and density, which may confound single-wavelength measurements [4].
Key Experimental Findings
Relationship Between ΔΨm Collapse and Cytochrome c Release
The temporal relationship between ΔΨm loss and cytochrome c release varies across apoptotic models. In didemnin B-induced apoptosis in HL-60 cells, both cytochrome c release and ΔΨm collapse were found to be caspase-dependent and occurred independently of mitochondrial permeability transition, as demonstrated through the use of cyclosporin A and bongkrekic acid [14]. This challenges the paradigm that permeability transition is an obligate early step in all apoptotic pathways.
Conversely, in verteporfin-based photodynamic therapy-induced smooth muscle cell apoptosis, cytochrome c and AIF release were observed as immediate early events preceding caspase activation and ΔΨm collapse [15]. These findings highlight the cell type- and stimulus-dependent nature of apoptotic signaling.
Table 2: Experimental Models of ΔΨm Collapse and Cytochrome c Release
| Cell Type | Apoptotic Inducer | Key Findings | Reference |
|---|---|---|---|
| HL-60 (human pro-myeloid) | Didemnin B | ΔΨm collapse and cytochrome c release are caspase-dependent and do not require permeability transition | [14] |
| Human aortic smooth muscle cells | Photodynamic therapy (verteporfin) | Cytochrome c and AIF release occur before Bax translocation and caspase activation | [15] |
| Various cell types | Staurosporine, camptothecin | JC-1 staining reveals distinct cell populations with different degrees of mitochondrial depolarization | [4] |
Technical Considerations for JC-1 Assays
Optimal JC-1 application requires careful methodological consideration. While 488 nm excitation is commonly used, 405 nm excitation produces J-aggregate signals with considerably less spillover from monomer fluorescence, improving data accuracy and eliminating the need for fluorescence compensation [5]. Proper controls, including the use of mitochondrial uncouplers like CCCP or valinomycin, are essential to establish baseline fluorescence and validate assay conditions [4] [5].
Experimental Protocols
JC-1 Staining Protocol for Flow Cytometry
Materials:
- JC-1 dye (e.g., Thermo Fisher Scientific, Cat. No. T3168) or MitoProbe JC-1 Assay Kit (Cat. No. M34152)
- Cells in culture (adherent or suspension)
- Dimethyl sulfoxide (DMSO)
- Phosphate-buffered saline (PBS)
- Flow cytometer with 488 nm laser and filters for FITC (530/30 nm) and PE (585/42 nm)
- Optional: Carbonyl cyanide m-chlorophenyl hydrazone (CCCP, 50 μM)
Procedure:
- Cell Preparation: Harvest approximately 0.5-1 × 10^6 cells per sample. Include an unstained control and a depolarized control (pre-treated with 50 μM CCCP for 10-20 minutes).
- JC-1 Staining Solution Preparation: Dissolve JC-1 in DMSO to create a 1-2 mM stock solution. Further dilute in culture medium or PBS to a working concentration of 2-5 μM.
- Staining Incubation: Resuspend cells in the JC-1 working solution and incubate for 15-30 minutes at 37°C, protected from light.
- Washing: Centrifuge cells at 500 × g for 5 minutes, discard supernatant, and gently resuspend in pre-warmed PBS.
- Flow Cytometry Analysis: Resuspend cells in PBS and analyze immediately using 488 nm excitation. Collect green fluorescence (JC-1 monomers) in the FITC channel and red fluorescence (J-aggregates) in the PE channel.
- Data Analysis: Calculate the ratio of red to green fluorescence. A decrease in this ratio indicates mitochondrial depolarization.
Integrating JC-1 Staining with Apoptosis Assays
JC-1 staining can be effectively combined with other apoptotic markers in multiparametric flow cytometry. Below is a generalized workflow for simultaneous assessment of mitochondrial membrane potential, apoptosis, and cell proliferation:
Multiparametric Analysis Workflow
This integrated approach enables researchers to correlate ΔΨm collapse with other apoptotic markers and cellular processes in a single assay [6]. For example, annexin V binding detects phosphatidylserine externalization as an early apoptosis marker, while propidium iodide (PI) staining identifies late apoptotic and necrotic cells with compromised membrane integrity.
The Scientist's Toolkit
Table 3: Essential Reagents for JC-1-Based Apoptosis Research
| Reagent/Kit | Primary Function | Application Notes | Source/Example |
|---|---|---|---|
| JC-1 Dye (bulk) | ΔΨm-dependent mitochondrial staining | Flexible for imaging and flow cytometry; requires optimization | Thermo Fisher (Cat. No. T3168) [4] |
| MitoProbe JC-1 Assay Kit | Optimized JC-1 assay for flow cytometry | Includes JC-1, CCCP (uncoupler control), and buffers | Thermo Fisher (Cat. No. M34152) [4] |
| CCCP (Carbonyl cyanide m-chlorophenyl hydrazone) | Mitochondrial uncoupler; positive control for depolarization | Used at 50 μM for 10-20 min pre-treatment to collapse ΔΨm | Included in MitoProbe kit [4] |
| Annexin V Conjugates | Phosphatidylserine binding for early apoptosis detection | Can be combined with JC-1 in multiparametric panels | [4] [6] |
| Propidium Iodide (PI) | Membrane integrity assessment; cell viability dye | Distinguishes late apoptotic/necrotic cells; used with Annexin V | [6] |
| Caspase Inhibitors (e.g., z-VAD-fmk) | Pan-caspase inhibitor for mechanistic studies | Determines caspase-dependence of ΔΨm collapse | [14] |
Apoptotic Signaling Pathways
The following diagram illustrates the key apoptotic pathways linked to ΔΨm collapse, integrating cytochrome c release and subsequent caspase activation:
Apoptotic Pathways Linked to ΔΨm Collapse
JC-1 staining provides a robust method for detecting ΔΨm collapse as an integral component of apoptotic signaling. The ratiometric nature of JC-1 fluorescence allows for precise assessment of mitochondrial depolarization, which can be temporally linked to cytochrome c release and other apoptotic events through multiparametric experimental designs. However, researchers should be aware that the relationship between ΔΨm collapse and cytochrome c release is context-dependent, varying with cell type and apoptotic stimulus. By implementing the protocols and considerations outlined in this application note, researchers can effectively utilize JC-1 staining to advance their investigations into mitochondrial-mediated apoptosis for both basic research and drug discovery applications.
A Step-by-Step JC-1 Staining Protocol for Accurate Flow Cytometry Analysis
The reliability of flow cytometry data, particularly in sensitive applications like JC-1 staining for apoptosis detection, is fundamentally dependent on the quality of the starting cell sample. Proper sample preparation is critical for avoiding instrument clogs, reducing background noise, and preserving cell viability to obtain biologically relevant results [17] [18]. The primary goal is to produce a homogeneous single-cell suspension free from clumps and debris, which ensures accurate laser interrogation and precise fluorescence measurement [19] [18]. This guide details optimized protocols for preparing adherent and suspension cells, framing them within the essential context of mitochondrial membrane potential analysis.
The integrity of mitochondrial membrane potential (ΔΨm) measurements using JC-1 dye is exceptionally sensitive to cellular stress induced by suboptimal preparation techniques. Artifacts from enzymatic digestion, mechanical stress, or poor viability can prematurely depolarize mitochondria, leading to false-positive apoptosis signals [4] [1]. Consequently, the choice between adherent and suspension cell preparation protocols is not merely a matter of convenience but a critical determinant in the success of downstream apoptosis research.
Key Differences in Handling Cell Types
The fundamental distinction between adherent and suspension cells dictates all subsequent preparation steps. Adherent cells require active detachment from their growth surface, a process that inherently risks introducing variability in cell health, surface marker integrity, and mitochondrial function [20] [18]. In contrast, suspension cells naturally exist in a suspended state, allowing for a less invasive preparation workflow that minimizes exogenous stress [19] [17]. The table below summarizes the core differences in their handling, a critical consideration for functional assays like JC-1 staining.
Table 1: Fundamental Differences Between Adherent and Suspension Cell Preparation
| Parameter | Adherent Cells | Suspension Cells |
|---|---|---|
| Starting State | Attached to culture vessel surface | Naturally free-floating in medium |
| Key Detachment Step | Required (enzymatic or mechanical) | Not required |
| Primary Risk Factors | Enzymatic epitope damage, mechanical shear stress, cellular activation | Shear stress during centrifugation, aggregation |
| Optimal Cell Concentration | 1–2 x 10^6 cells/mL for cryopreservation; 1 x 10^7 cells/mL for staining [19] [21] | 2–5 x 10^6 cells/mL for cryopreservation; 1 x 10^7 cells/mL for staining [19] [21] |
| Viability Concern | Detachment process can induce apoptosis or necrosis | Generally higher viability if handled gently |
Detailed Experimental Protocols
Protocol for Adherent Cells
The detachment of adherent cells is a critical juncture where mitochondrial integrity can be compromised. The following protocol is optimized to minimize cellular stress.
Materials
- Cell Culture: Adherent cells at ~80% confluency, ideally in log phase growth with >90% viability [20] [21]
- Buffers and Reagents: Pre-warmed PBS (without Ca2+/Mg2+), pre-warmed trypsin/EDTA, TrypLE, or Accutase (recommended for surface antigen preservation) [19] [18], complete growth medium (with serum), Flow Cytometry Staining Buffer [19]
- Labware: Cell culture vessel, sterile centrifuge tubes, serological pipettes, pipette tips
Step-by-Step Procedure
- Wash: Aspirate and discard the spent culture medium. Gently wash the cell monolayer with pre-warmed PBS (without Ca2+/Mg2+) to remove any residual serum, calcium, and magnesium that would inhibit trypsin [20]. Remove and discard the wash solution.
- Detach: Add a sufficient volume of pre-warmed, enzyme-based detachment reagent (e.g., Accutase, TrypLE, or trypsin/EDTA) to just cover the cell layer [19] [20]. Incubate the vessel at 37°C for the time specified for the cell line (typically 2-10 minutes).
- Monitor: Periodically observe the cells under a microscope. Tap the vessel gently to expedite detachment. Once ≥90% of cells are rounded and detached, proceed immediately to the next step to prevent over-digestion [20].
- Neutralize: Add twice the volume of pre-warmed complete growth medium (containing serum) to the vessel to neutralize the enzyme [20]. Gently pipette the medium over the cell layer surface to disperse any remaining clumps and create a single-cell suspension.
- Transfer and Pellet: Transfer the cell suspension to a sterile centrifuge tube. Centrifuge at 200–400 x g for 5–10 minutes at room temperature [19] [20]. Carefully decant the supernatant.
- Wash and Count: Resuspend the cell pellet in PBS or staining buffer and perform a cell count and viability analysis (e.g., using Trypan blue exclusion) [19] [20].
- Prepare for Staining: Centrifuge again as in Step 5. Resuspend the cell pellet in an appropriate volume of Flow Cytometry Staining Buffer to a final concentration of 1 x 10^7 cells/mL (or as required for your staining protocol) [19].
Protocol for Suspension Cells
The protocol for suspension cells focuses on gentle handling to maintain viability and prevent aggregation.
Materials
- Cell Culture: Suspension cells in log phase growth
- Buffers and Reagents: PBS, Flow Cytometry Staining Buffer [19] [17]
- Labware: Centrifuge tubes, pipettes
Step-by-Step Procedure
- Harvest: Decant the cell culture into a conical centrifuge tube [19] [17].
- Pellet: Centrifuge at 300–400 x g for 5–10 minutes at room temperature. Discard the supernatant [19] [17].
- Wash: Resuspend the cell pellet in PBS. Centrifuge again at 300–400 x g for 5–10 minutes. Discard the supernatant.
- Count: Resuspend the pellet in a small volume of buffer and perform a cell count and viability analysis [19].
- Prepare for Staining: Adjust the cell concentration to 1 x 10^7 cells/mL using cold Flow Cytometry Staining Buffer [19] [17].
Integration with JC-1 Staining for Apoptosis Detection
The prepared single-cell suspensions are now ready for the assessment of mitochondrial membrane potential (ΔΨm) using JC-1 dye. The quality of the preparation directly impacts the stain's accuracy.
JC-1 Staining Workflow
The following diagram outlines the core steps from prepared cell sample to flow cytometric analysis, highlighting critical controls.
Key Considerations for JC-1 Staining
- Live-Cell Assay: JC-1 staining is performed on live, unfixed cells [4]. The health of the cell preparation is paramount.
- Critical Controls: Always include a positive control using a mitochondrial uncoupler like CCCP (50 µM final concentration), which depolarizes mitochondria and causes a shift from red (J-aggregates) to green (monomers) fluorescence [1]. This validates the assay's functionality.
- Dye Concentration and Time: A common starting point is 2 µM JC-1 with an incubation of 15–30 minutes at 37°C, 5% CO2, protected from light [1]. Optimization may be required for different cell types.
- Ratio Metric Analysis: The power of JC-1 lies in the red-to-green fluorescence intensity ratio. A decrease in this ratio indicates mitochondrial depolarization, a key early event in apoptosis [4] [1]. This ratiometric measurement is independent of mitochondrial size, shape, and density.
The Scientist's Toolkit: Essential Reagents and Materials
Table 2: Key Research Reagent Solutions for Cell Preparation and JC-1 Staining
| Item | Function/Application | Key Considerations |
|---|---|---|
| Accutase [19] [18] | Enzymatic detachment of adherent cells. | Gentler on cell surface proteins compared to trypsin; preferred for preserving epitopes for immunostaining. |
| Flow Cytometry Staining Buffer [19] | Washing and resuspending cells for staining and analysis. | Typically contains protein (e.g., BSA or FBS) and azide; azide-free buffers must be used if cells are to be cultured post-staining. |
| JC-1 Dye / MitoProbe Kit [4] [1] | Ratiometric fluorescent indicator of mitochondrial membrane potential (ΔΨm). | The kit (cat. no. M34152) often includes CCCP, a positive control. The dye is light-sensitive and requires a 488 nm laser with FITC and PE filters. |
| CCCP (Carbonyl cyanide 3-chlorophenylhydrazone) [1] | Mitochondrial oxidative phosphorylation uncoupler; used as a positive control for JC-1 assay. | Depolarizes mitochondria, causing a characteristic fluorescence shift from red to green, validating the assay. |
| DNase I [18] | Reduces cell clumping by digesting free DNA released from dead cells. | Added to isolation/media buffers (e.g., 25 mg/mL) to improve single-cell suspension quality and prevent instrument clogs. |
| EDTA Solution [19] [18] | Cation chelator that aids in cell detachment and prevents clumping. | Can be used alone or in combination with enzymes for detachment. Helps disperse cells in suspension by chelating adhesion-essential cations. |
| Cell Strainer [19] [18] | Removal of persistent cell clumps and debris prior to flow cytometry. | A 70 µm mesh is commonly used to filter the single-cell suspension just before analysis to prevent flow cytometer blockages. |
Troubleshooting and Optimization
Even with meticulous protocol adherence, challenges can arise. The table below outlines common issues and evidence-based solutions.
Table 3: Troubleshooting Common Sample Preparation Problems
| Problem | Potential Cause | Recommended Solution |
|---|---|---|
| Poor Cell Viability Post-Preparation | Over-digestion with enzymatic reagent; harsh mechanical dissociation; absence of protein in buffers. | Optimize enzyme incubation time and temperature [20]. Include 2% FBS or 1% BSA in all wash and resuspension buffers to improve viability [18]. |
| Excessive Cell Clumping | Free DNA from dead cells acting as "glue"; incomplete neutralization of enzyme; insufficient mixing. | Add DNase I (25 mg/mL) and/or 2 mM EDTA to buffers [18]. Perform thorough pipetting after neutralization. Use a cell strainer (70 µm) as a final step before acquisition [19]. |
| Loss of Surface Epitopes | Overly aggressive enzymatic detachment (e.g., traditional trypsin). | Switch to a gentler detachment agent like Accutase or a non-enzymatic cell dissociation buffer [18]. |
| High Background in JC-1 Stain | Inadequate washing post-staining; cell death leading to non-specific dye binding. | Ensure thorough washing with warm PBS after JC-1 incubation [1]. Begin with a high-viability cell preparation (>90%). |
| Weak JC-1 Signal | Incorrect dye concentration or incubation time; compromised dye; loss of ΔΨm due to poor cell health. | Titrate the JC-1 concentration and optimize incubation time [1]. Ensure CCCP control works; if not, check dye stock and preparation. Confirm cells are not undergoing apoptosis due to stressful preparation. |
The JC-1 dye (5,5',6,6'-tetrachloro-1,1',3,3'-tetraethylbenzimi-dazoylcarbocyanine iodide) serves as a critical tool in apoptosis research, enabling quantitative assessment of mitochondrial membrane potential (ΔΨm) through flow cytometric analysis. Its unique chemical properties allow for ratiometric measurements that are independent of mitochondrial size, shape, and density, providing superior accuracy for detecting early apoptotic events. This application note details standardized protocols for JC-1 reagent reconstitution, working solution preparation, and optimal buffer conditions to ensure experimental reproducibility and reliability in drug discovery and development research.
Mitochondrial membrane potential (ΔΨm) disruption represents one of the earliest indicators of apoptosis, preceding phosphatidylserine externalization and DNA fragmentation. The cationic JC-1 dye exhibits potential-dependent accumulation in mitochondria, functioning as a molecular sensor for mitochondrial health. In healthy cells with elevated ΔΨm, JC-1 accumulates in mitochondria and forms red-fluorescent J-aggregates (emission maximum: 590 nm). During early apoptosis, mitochondrial depolarization reduces JC-1 accumulation, resulting in green-fluorescent monomers (emission maximum: 529 nm) [4] [22]. This fluorescence shift enables quantitative assessment of apoptosis progression through flow cytometry, utilizing standard FITC (green) and PE (red) channels [4].
The reliability of JC-1 staining depends critically on proper reagent preparation and optimized staining conditions. Inconsistent working solution preparation represents a frequent source of experimental variability, potentially compromising data integrity in pharmacological screening and mechanistic studies.
Materials and Reagent Specifications
Research Reagent Solutions
Table 1: Essential reagents for JC-1 staining and their functions
| Reagent | Function | Specifications |
|---|---|---|
| JC-1 dye (lyophilized) | Fluorescent probe for ΔΨm detection | 5 mg bulk powder or kit component [4] |
| Anhydrous DMSO | Solvent for primary stock solution | High-purity, sterile-filtered [1] |
| JC-1 Assay Buffer | Diluent for working solution | Typically 1X PBS or culture medium [22] |
| CCCP (Carbonyl cyanide m-chlorophenyl hydrazone) | Mitochondrial uncoupler (positive control) | 50 mM stock in DMSO [1] |
| Phosphate-Buffered Saline (PBS) | Washing and suspension buffer | 1X concentration, pH 7.4 [1] |
Equipment Requirements
- Flow cytometer equipped with 488 nm excitation laser and bandpass filters for FITC (530 nm) and PE (585 nm) [1]
- Precision pipettes with appropriate volume ranges
- 37°C water bath or incubator with 5% CO₂
- Centrifuge capable of 400 × g
- Aluminum foil for light protection
JC-1 Working Solution Preparation Protocol
Primary Stock Solution Reconstitution
Table 2: JC-1 stock solution preparation parameters
| Parameter | Specification | Notes |
|---|---|---|
| Initial concentration | 200 μM (100X stock) | Prepare immediately before use [1] |
| Solvent | Anhydrous DMSO | Ensure complete dissolution |
| Temperature | 25°C (room temperature) | Pre-warm reagents before reconstitution [1] |
| Mixing | Vortex until clear | Ensure no particulate matter remains |
| Storage | Use immediately | Do not store reconstituted stock |
- Reconstitution Procedure: Transfer 100 μL of anhydrous DMSO directly into the vial containing lyophilized JC-1 powder (typically 5 mg) [22].
- Dissolution: Vortex the mixture vigorously for 30-60 seconds until the powder is completely dissolved and the solution appears clear without visible crystals.
- Quality Control: Inspect the solution against a white background. If red particulate crystals persist, place the vial in a 37°C water bath for 5 minutes with occasional gentle mixing [22].
Working Solution Preparation
- Dilution Sequence: Dilute the 200 μM JC-1 primary stock in the specified order to prevent precipitation:
- Final Concentration: Prepare a 2 μM working solution by diluting the 200 μM stock 1:100 in pre-warmed (37°C) JC-1 Assay Buffer or culture medium [1].
- Light Protection: Wrap the working solution in aluminum foil to prevent photodegradation and use within 30 minutes of preparation.
Critical Buffer Conditions and Parameters
Table 3: Optimal staining conditions for different sample types
| Condition | Suspended Cells | Adherent Cells | Isolated Mitochondria |
|---|---|---|---|
| JC-1 working concentration | 2 μM | 2 μM | 5 μM [23] |
| Staining temperature | 37°C | 37°C | 25-37°C |
| Incubation duration | 15-30 minutes | 15-30 minutes | 15-30 minutes |
| Cell concentration | 1 × 10⁶ cells/mL | 1 × 10⁶ cells/mL after trypsinization | 0.5-1 mg protein/mL |
| Wash steps | 2× with PBS | 2× with PBS | 1× with mitochondrial assay buffer |
Critical Considerations:
- Cell Viability: JC-1 staining requires live cells; fixation is incompatible with the assay [22]
- Adherent Cell Processing: Detach adherent cells using trypsin before JC-1 incubation to ensure uniform dye exposure [22]
- Tissue Samples: Prepare single-cell suspensions first, as JC-1 cannot directly stain tissue sections [22]
Experimental Workflow for Flow Cytometry
Staining Protocol for Suspended Cells
- Cell Preparation: Harvest and wash cells with warm PBS (37°C). Centrifuge at 400 × g for 5 minutes at 25°C [1]
- Cell Counting: Adjust cell concentration to 1 × 10⁶ cells/mL in warm culture medium or PBS
- Staining: Add 10 μL of 200 μM JC-1 stock to 1 mL of cell suspension (final concentration: 2 μM)
- Incubation: Incubate at 37°C with 5% CO₂ for 15-30 minutes, protecting from light
- Washing: Centrifuge at 400 × g for 5 minutes, discard supernatant, and resuspend in 2 mL warm PBS
- Analysis: Resuspend cells in 0.5-1 mL fresh buffer and analyze immediately by flow cytometry
Positive Control Preparation
- Treat separate cell aliquots with 50 μM CCCP (1 μL of 50 mM stock per 1 mL cells) [1]
- Incubate at 37°C for 5 minutes before JC-1 staining
- CCCP depolarizes mitochondria, establishing baseline green fluorescence for apoptotic cells
Data Acquisition and Analysis
Flow Cytometer Configuration
- Excitation: 488 nm argon laser
- Green Emission: 530/30 nm bandpass filter (FITC channel, monomers)
- Red Emission: 585/42 nm bandpass filter (PE channel, J-aggregates) [4]
- Voltage Settings: Adjust PMT voltages using unstained and CCCP-treated controls
Data Interpretation
- Healthy Cells: High red/green fluorescence ratio (high ΔΨm)
- Apoptotic Cells: Low red/green fluorescence ratio (low ΔΨm)
- Quantification: Calculate percentage of cells with depolarized mitochondria based on established cutoff from CCCP-treated control
Troubleshooting Common Issues
Table 4: JC-1 preparation issues and solutions
| Problem | Possible Cause | Solution |
|---|---|---|
| Red particulate crystals | Incorrect dilution order | Dilute JC-1 stock with distilled water first, then add buffer [22] |
| Poor signal intensity | Inadequate dye concentration | Ensure final working concentration of 2 μM |
| High background | Incomplete washing | Increase wash steps to 2-3 times with warm PBS |
| Precipitation | JC-1 stock stored too long | Prepare fresh stock solution for each experiment |
| Weak J-aggregate formation | Low mitochondrial potential | Include healthy control and verify cell viability |
Applications in Drug Development Research
The JC-1 staining protocol enables precise evaluation of mitochondrial functionality during pre-clinical drug screening. Recent research demonstrates its utility in assessing compound toxicity and mechanisms of action. In a 2025 study investigating nanosecond pulsed electric fields (nsPEF), JC-1 staining confirmed that treatments rescued d-galactose-induced mitochondrial membrane potential collapse in human umbilical vein endothelial cells, revealing potential anti-aging applications [24]. Another 2025 methodological study integrated JC-1 with annexin V/PI and BrdU/PI staining in a multiparametric flow cytometry workflow, providing comprehensive analysis of cell death, proliferation, and mitochondrial dynamics in response to pharmacological treatments [6].
Proper preparation of JC-1 working solution through optimized reconstitution, dilution, and buffer conditions is fundamental to obtaining reliable flow cytometry data for apoptosis detection. Adherence to the specified protocols for reagent handling, staining conditions, and control inclusion ensures accurate assessment of mitochondrial membrane potential in drug screening and mechanistic studies. The standardized methodologies presented herein provide researchers with a robust framework for implementing JC-1 staining in pre-clinical development pipelines.
The mitochondrial membrane potential (ΔΨm) is a critical parameter of mitochondrial function and a key indicator of cellular health, serving as one of the earliest intracellular events in apoptosis. The lipophilic, cationic dye 5,5',6,6'-tetrachloro-1,1',3,3'-tetraethylbenzimidazolylcarbocyanine iodide (JC-1) provides a sensitive fluorescent method for detecting changes in ΔΨm. Its unique potential-dependent accumulation in mitochondria allows for the distinction between healthy and apoptotic cells, making it an invaluable tool for apoptosis detection in flow cytometry-based research and drug development screening. In healthy cells with high ΔΨm, JC-1 accumulates in mitochondria and forms aggregates (J-aggregates) that emit red fluorescence. In apoptotic cells with diminished ΔΨm, JC-1 remains in the cytoplasm in a monomeric state that emits green fluorescence. The quantifiable red-to-green fluorescence intensity ratio provides a robust measure of mitochondrial polarization that is largely independent of mitochondrial size, shape, and density, which often confound single-component fluorescence signals [4] [25].
Mechanism of JC-1 Staining
The JC-1 dye functions as a molecular sensor that undergoes concentration-dependent aggregation within mitochondria based on the transmembrane electrical potential. The driving force behind this process is the electronegative interior of active mitochondria, which attracts and concentrates the positively charged JC-1 molecules. In healthy cells, the elevated ΔΨm drives sufficient JC-1 accumulation to exceed the critical concentration for J-aggregate formation (typically above 0.1 μM in aqueous solutions), resulting in a fluorescence emission shift from green (∼529 nm) to red (∼590 nm) [4] [26]. This potential-dependent property enables researchers to monitor the earliest stages of apoptosis, characterized by the disruption of mitochondrial membrane integrity through the opening of the mitochondrial permeability transition pore (MPTP). The subsequent equilibration of ions across the mitochondrial membrane collapses the electrochemical gradient, leading to the decoupling of the respiratory chain and the release of cytochrome c into the cytosol—key events in the intrinsic apoptosis pathway [4] [27]. The following diagram illustrates the fundamental mechanism of JC-1 staining in healthy versus apoptotic cells:
Optimized Staining Parameters
Successful JC-1 staining depends critically on several key parameters that must be optimized for specific experimental conditions. The following table summarizes the standardized staining conditions derived from multiple methodological studies and commercial protocols:
Table 1: Optimized JC-1 Staining Parameters for Flow Cytometry
| Parameter | Recommended Condition | Experimental Range | Technical Notes |
|---|---|---|---|
| Working Concentration | 2 μM [25] [28] | 1-10 μM [26] [29] | Higher concentrations may increase background; lower concentrations may yield weak signals. |
| Incubation Temperature | 37°C [25] [6] | 25-37°C [25] | Critical for proper dye accumulation and cellular metabolism. |
| Incubation Time | 15-30 minutes [25] [29] [27] | 10-45 minutes [26] | Shorter times suit most cell lines; primary cells may require longer incubation. |
| Light Protection | Essential throughout [29] | Entire procedure | JC-1 is photosensitive; use foil wrapping and dimmed lights. |
| Cell Concentration | 0.5-1 × 10⁶ cells/mL [25] [29] | Up to 2 × 10⁶ cells/mL | Excessive density reduces staining efficiency. |
| Post-staining Analysis | Immediate [29] | Within 60 minutes | Buffer must remain in wells; drying causes artifacts. |
Critical Optimization Considerations
Temperature control is paramount for reproducible results. The 37°C incubation temperature maintains physiological conditions that support normal mitochondrial function and dye uptake [25] [6]. Staining at lower temperatures may reduce dye accumulation kinetics and potentially yield suboptimal results. Incubation time must be sufficient for complete dye equilibration—typically 15-30 minutes for most mammalian cell lines—though primary cells or tissues may require extended incubation up to 45 minutes [26] [25]. The optimal concentration of 2 μM provides sufficient dye for accumulation without excessive background fluorescence, though titration from 1-10 μM is recommended when establishing protocols for new cell types [26] [28] [29].
Light protection is crucial throughout the staining procedure and subsequent storage, as JC-1 is highly photosensitive. Exposure to light can cause photobleaching and degradation of the fluorescent signal, compromising data quality [29]. All working solutions and stained samples should be protected from light using foil wrapping or operating in low-light conditions. Additionally, analysis should be performed immediately after staining completion, as prolonged storage—even under optimal conditions—can result in signal deterioration [29].
Detailed Experimental Protocol for Flow Cytometry
Reagent Preparation
- JC-1 Stock Solution (200 μM): Reconstitute lyophilized JC-1 dye with high-quality dimethyl sulfoxide (DMSO) to prepare a 100× stock solution (200 μM). Vortex thoroughly until the dye is completely dissolved and the solution is clear of aggregates [25]. Aliquot and store at -20°C, protected from light. Avoid multiple freeze-thaw cycles.
- JC-1 Working Solution (2 μM): Dilute the stock solution in pre-warmed cell culture medium or assay buffer to achieve a 2 μM working concentration [25] [28]. Mix gently by inversion until homogeneous.
- Assay Buffer: If using a commercial kit, prepare 1× assay buffer from 10× concentrate by dilution with deionized water [27]. Alternatively, phosphate-buffered saline (PBS) or culture medium can be used.
- Control Reagents: Prepare 50 mM carbonyl cyanide m-chlorophenyl hydrazone (CCCP) in DMSO as a positive control for mitochondrial depolarization. Working concentrations typically range from 5-50 μM [25] [29].
Staining Procedure for Suspension Cells
The following workflow outlines the complete JC-1 staining procedure for flow cytometry analysis:
Cell Preparation: Harvest cells and adjust concentration to 0.5-1 × 10⁶ cells/mL in warm culture medium or buffer. For adherent cells, gently detach using trypsin/EDTA, neutralize with complete medium, and wash by centrifugation (400 × g for 5 minutes at room temperature) [25] [29].
Staining Application: Add JC-1 working solution to cell suspension (1 mL per 0.5-1 × 10⁶ cells). Include appropriate controls:
Incubation: Incubate cells at 37°C for 15-30 minutes in a CO₂ incubator protected from light [25] [28].
Washing: Centrifuge at 400 × g for 5 minutes at room temperature. Carefully aspirate supernatant without disturbing cell pellet. Resuspend in pre-warmed assay buffer and repeat washing step twice to remove excess dye [25] [29].
Resuspension: Resuspend final cell pellet in 0.5-1 mL fresh assay buffer or culture medium. Keep samples protected from light and on ice until analysis.
Flow Cytometry Analysis: Analyze samples immediately using 488 nm excitation. Collect green fluorescence (JC-1 monomers) at 530 ± 30 nm (FITC channel) and red fluorescence (J-aggregates) at 590 ± 42 nm (PE or rhodamine channel) [4] [25]. Analyze a minimum of 10,000 events per sample.
Data Interpretation and Analysis
Calculate the red-to-green fluorescence intensity ratio as the primary indicator of mitochondrial membrane potential. A high ratio indicates polarized mitochondria (healthy cells), while a decreased ratio indicates mitochondrial depolarization (apoptotic cells) [4] [25]. Use CCCP-treated positive controls to establish the depolarized baseline and untreated cells to establish the healthy baseline. Gating strategies should exclude debris and aggregates based on forward and side scatter properties.
The Scientist's Toolkit: Essential Research Reagents
Table 2: Essential Reagents for JC-1 Staining and Mitochondrial Function Analysis
| Reagent/Category | Specific Examples | Function and Application |
|---|---|---|
| Primary Detection Dye | JC-1 (5,5',6,6'-tetrachloro-1,1',3,3'- tetraethylbenzimidazolylcarbocyanine iodide) [4] [26] | Potential-dependent fluorescent dye that forms red J-aggregates in healthy mitochondria and green monomers in depolarized mitochondria. |
| Mitochondrial Depolarization Agents | CCCP (Carbonyl cyanide m-chlorophenyl hydrazone) [25] [29], FCCP (Carbonyl cyanide-p-trifluoromethoxyphenylhydrazone) [8] | Protonophores that uncouple oxidative phosphorylation; used as positive controls for mitochondrial depolarization. |
| Apoptosis Inducers | Staurosporine [4], Camptothecin [4] | Experimental compounds to induce intrinsic apoptosis pathway for method validation. |
| Solvents | Dimethyl sulfoxide (DMSO) [25] | High-quality solvent for preparing JC-1 stock solutions; ensures complete dye dissolution. |
| Assay Buffers | Phosphate-buffered saline (PBS) [25], HEPES-buffered solutions [8] | Maintain physiological pH and osmolarity during staining procedures. |
| Viability Assessment Dyes | Propidium Iodide (PI) [6], Annexin V conjugates [4] [6] | Distinguish apoptotic from necrotic cell death when used in multiparameter staining panels. |
Troubleshooting and Technical Considerations
Common Challenges and Solutions
- Weak Fluorescence Signal: This may result from insufficient dye concentration, inadequate incubation time, or excessive washing. Re-optimize dye concentration using a titration approach and ensure incubation proceeds for the full 30 minutes at 37°C without light exposure [29].
- High Background Fluorescence: Often caused by incomplete washing, excessive dye concentration, or cellular debris. Increase washing steps and centrifuge speed, and filter samples through cell strainers before analysis [29].
- Poor Resolution Between Populations: Check instrument calibration and compensation. Ensure CCCP positive control shows clear depolarization. Titrate JC-1 concentration and verify that cells are healthy and at appropriate density [29].
- Inconsistent Results Between Experiments: Standardize cell culture conditions, passage numbers, and staining timing. Use fresh JC-1 working solutions prepared from aliquoted stock and include internal controls in each experiment.
Multiparameter Apoptosis Assessment
For comprehensive apoptosis evaluation, JC-1 staining can be combined with other probes in multiparametric flow cytometry panels. Annexin V conjugates detect phosphatidylserine externalization (early apoptosis), while propidium iodide (PI) identifies late apoptotic and necrotic cells with compromised membrane integrity [6]. CellTrace Violet or similar proliferation dyes can simultaneously track cell division, and bromodeoxyuridine (BrdU) incorporation assesses cell cycle dynamics [6]. This integrated approach provides a more complete understanding of cellular responses to experimental treatments.
Optimized JC-1 staining incubation parameters—specifically maintaining 2 μM concentration, 15-30 minute incubation at 37°C, and stringent protection from light—are essential for robust detection of mitochondrial membrane potential changes in apoptosis research. The ratiometric nature of JC-1 fluorescence (red/green) provides a sensitive measure of ΔΨm that is relatively independent of confounding factors such as mitochondrial density and cell size. When implemented according to the detailed protocols outlined herein, JC-1 staining serves as a powerful tool for drug discovery, toxicological screening, and fundamental apoptosis research, particularly when integrated with complementary assessment methods in multiparameter experimental designs.
Within the broader context of JC-1 staining protocol development for flow cytometry-based apoptosis detection, the inclusion of proper experimental controls is fundamental for data validity. This application note details the critical use of Carbonyl cyanide 3-chlorophenylhydrazone (CCCP), a potent mitochondrial uncoupler, as an essential control for validating mitochondrial depolarization in JC-1 assays. We provide a comprehensive protocol for integrating CCCP treatment, complete with optimized staining procedures, data interpretation guidelines, and troubleshooting tips specifically tailored for researchers and drug development professionals. The methodologies presented ensure accurate detection of shifts in mitochondrial membrane potential (ΔΨm), a key early event in apoptosis, thereby enhancing the reliability of cellular health assessments in therapeutic screening.
Mitochondrial membrane potential (ΔΨm) is a critical indicator of cellular health and function. The maintenance of a high ΔΨm (hyperpolarized state) is essential for ATP production, whereas the collapse of ΔΨm (depolarization) is a hallmark event in the intrinsic pathway of apoptosis [4] [1]. The fluorescent cationic dye JC-1 (5,5′,6,6′-tetrachloro-1,1′,3,3′-tetraethylbenzimidazolylcarbocyanine iodide) is a powerful tool for monitoring these changes, as it exhibits potential-dependent accumulation in mitochondria [4] [1].
A distinctive feature of JC-1 is its ratiometric properties. In healthy cells with high ΔΨm, JC-1 accumulates in mitochondria and forms J-aggregates that emit red fluorescence (∼590 nm). In apoptotic or unhealthy cells with low ΔΨm, JC-1 remains in the cytoplasm in its monomeric form, emitting green fluorescence (∼529 nm) [4] [1]. Consequently, mitochondrial depolarization is quantified by a decrease in the red-to-green fluorescence intensity ratio.
Given that changes in this ratio can be influenced by factors beyond apoptosis, such as technical artifacts or specific compound effects, the inclusion of a robust positive control is indispensable. CCCP, a protonophore and mitochondrial uncoupler, serves this critical function. It disrupts the proton gradient across the mitochondrial inner membrane, effectively collapsing the ΔΨm and providing a known depolarized state against which experimental results can be validated [1]. This article establishes the framework for using CCCP to confirm the specificity and sensitivity of JC-1 staining within apoptosis research protocols.
The Role of CCCP as a Validation Control
Mechanism of Action of CCCP
CCCP is a chemical inhibitor of oxidative phosphorylation that acts as a proton ionophore. It freely shuttles protons across the mitochondrial inner membrane, bypassing the ATP synthase complex (Complex V). This action dissipates the electrochemical proton gradient that is essential for maintaining ΔΨm [1]. The result is a rapid and potent uncoupling of the electron transport chain from ATP synthesis, leading to a complete loss of ΔΨm without directly inhibiting the respiratory chain complexes themselves. In the context of a JC-1 assay, this forces the dye to remain in its monomeric form, providing a definitive positive control for depolarization.
Importance in Experimental Design
Incorporating a CCCP control is crucial for several reasons:
- Assay Validation: It verifies that the JC-1 dye is functioning correctly and that the experimental system is capable of detecting a decrease in ΔΨm.
- Data Normalization: It provides a benchmark for the maximum depolarization state, allowing for the relative quantification of depolarization in test samples.
- Troubleshooting: It helps distinguish specific biological effects from technical issues, such as improper dye loading or instrument miscalibration.
- Protocol Optimization: The control is used to establish key flow cytometry parameters, including voltage settings and, when using 488 nm excitation, the necessary fluorescence compensation to account for spectral overlap between the JC-1 monomer and aggregate signals [5].
Materials and Reagents
Table 1: Essential Reagents and Equipment for the JC-1 Assay with CCCP Control
| Item | Specification/Function | Source/Example |
|---|---|---|
| JC-1 Dye | Lipophilic, cationic dye; forms red J-aggregates in energized mitochondria and green monomers when depolarized. | MitoProbe JC-1 Assay Kit (Thermo Fisher, M34152) or bulk chemical (T3168) [4] |
| CCCP | Mitochondrial uncoupler; used as a positive control to induce depolarization. | Often supplied in JC-1 assay kits (e.g., M34152) [4] [1] |
| Cell Culture Medium | Serum-free, dye-free medium for staining incubation. | e.g., Dulbecco's Modified Eagle's Medium (DMEM) [1] |
| Dimethyl Sulfoxide (DMSO) | Solvent for preparing JC-1 and CCCP stock solutions. | High-quality, sterile DMSO [1] |
| Phosphate-Buffered Saline (PBS) | Washing buffer to remove excess dye. | 1X, without Ca²⁺/Mg²⁺ [1] |
| Flow Cytometer | Instrument for analysis; requires 488 nm excitation and filters for FITC (530 nm) and PE (585 nm). | BD FACSLyric, BD FACSCalibur, or comparable systems [6] [1] |
Protocol: JC-1 Staining with CCCP Control
Preparation of Reagents
- JC-1 Working Solution (200 µM): Reconstitute lyophilized JC-1 in high-quality DMSO to create a 100x stock solution. Mix thoroughly until the dye is completely dissolved and the solution is clear. Prepare fresh immediately before use [1].
- CCCP Working Solution (50 mM): Prepare a stock solution of CCCP in DMSO. Aliquot and store at -20°C. Avoid repeated freeze-thaw cycles.
Cell Staining and Treatment Workflow
The following diagram outlines the key steps for preparing cells for the JC-1 assay, including the setup for the essential CCCP control.
Detailed Staining Steps:
- Cell Preparation: Harvest approximately 0.5-1 x 10⁶ cells per sample (experimental and control). Wash the cells once with warm PBS (37°C) by centrifugation at 400 × g for 5 minutes [1] [6].
- Staining: Suspend the cell pellets in 1 mL of pre-warmed culture medium or PBS. Add 10 µL of the 200 µM JC-1 stock solution to each tube to achieve a final concentration of 2 µM [1] [5].
- Incubation: Incubate the cells for 15-30 minutes at 37°C in a 5% CO₂ incubator, protected from light.
- CCCP Treatment (Positive Control): After the initial JC-1 staining, add 1 µL of the 50 mM CCCP stock to the designated control tube for a final concentration of 50 µM. Vortex gently and incubate for an additional 5 minutes at 37°C [1].
- Washing: Centrifuge all samples at 400 × g for 5 minutes and carefully aspirate the supernatant. Wash the cells once with 2 mL of warm PBS to remove any excess, non-specific dye.
- Analysis: Resuspend the final cell pellets in 0.5-1 mL of PBS and analyze immediately by flow cytometry.
Data Acquisition and Analysis
Flow Cytometry Setup
- Excitation: Use a 488 nm laser.
- Emission Detection:
- Compensation: When using 488 nm excitation, significant spectral spillover from the JC-1 monomer (green) into the J-aggregate (red) detector is common. Use the CCCP-treated sample (which contains only monomers) to set the compensation accurately [5]. Note that excitation at 405 nm can reduce this spillover [5].
Interpretation of Results
- Healthy Cells (High ΔΨm): Display high red and low green fluorescence, appearing in the upper-left quadrant of a density plot (Red vs. Green).
- Depolarized/CCCP-Treated Cells (Low ΔΨm): Display low red and high green fluorescence, showing a distinct population shift to the lower-right quadrant.
- Quantification: The key metric is the ratio of red (PE) to green (FITC) geometric mean fluorescence intensity (GeoMFI). A successful CCCP control will show a drastic reduction in this ratio compared to untreated cells.
Table 2: Expected Fluorescence Profiles and Data Interpretation
| Cell Population | JC-1 Monomer (Green, ~530 nm) | J-Aggregate (Red, ~590 nm) | Red/Green Fluorescence Ratio | Interpretation |
|---|---|---|---|---|
| Untreated / Healthy | Low | High | High | Normal, polarized mitochondria [4] |
| CCCP-Treated (Control) | High | Low | Very Low | Validated mitochondrial depolarization [1] |
| Early Apoptotic | Intermediate | Intermediate | Decreasing | Ongoing loss of ΔΨm [4] |
| Late Apoptotic/Necrotic | High | Low | Low | Collapsed ΔΨm [4] |
The following diagram illustrates the fundamental principle of how JC-1 staining reflects mitochondrial health, which the CCCP control exploits.
Application in Multiparametric Apoptosis Research
The JC-1 assay with a proper CCCP control can be effectively integrated into broader multiparametric workflows to provide a comprehensive view of cellular status. For instance, researchers can combine JC-1 staining with other probes such as Annexin V (for phosphatidylserine externalization) and propidium iodide (for membrane integrity) to simultaneously assess mitochondrial health and classic apoptosis markers [6] [30]. This integrated approach allows for the correlation of early mitochondrial events with later stages of apoptotic progression, offering powerful insights into the mechanisms of drug action and toxicity during pre-clinical screening.
Within the broader context of apoptosis detection research, precise flow cytometer configuration is paramount for generating reliable, reproducible data. This application note details the specific setup for the FITC and PE fluorescence channels, critical for ratiometric analysis in assays such as JC-1 staining for mitochondrial membrane potential. The disruption of active mitochondria, characterized by a loss of mitochondrial membrane potential (ΔΨM), is a hallmark early event in apoptosis [31] [1]. The cationic, lipophilic JC-1 dye exhibits potential-dependent accumulation in mitochondria: it fluoresces green (~529 nm) as a monomer at low potentials or low concentrations and forms red-fluorescent "J-aggregates" (~590 nm) at higher potentials or concentrations [31]. Consequently, the FITC and PE channels are used to detect these respective states, and their configuration must be optimized to accurately capture the shift in the red/green fluorescence intensity ratio that indicates mitochondrial health [31] [1]. This document provides researchers and drug development professionals with detailed methodologies for instrument configuration, experimental protocols, and data analysis to ensure the highest data quality.
Key Principles of JC-1 Detection and Channel Assignment
The JC-1 dye provides a ratiometric measure of mitochondrial membrane potential, a key advantage over single-emission probes. The fluorescence ratio depends solely on the membrane potential and is not influenced by extraneous factors such as mitochondrial size, shape, or density, which can affect single-component fluorescence signals [31]. In a healthy, polarized mitochondrion, the dye accumulates and forms J-aggregates, emitting strong red fluorescence. During early apoptosis, the membrane potential collapses, preventing J-aggregate formation and causing the dye to remain in its monomeric form, emitting green fluorescence [31] [1]. Mitochondrial depolarization is therefore indicated by a decrease in the red/green fluorescence intensity ratio [31].
This ratiometric measurement requires the simultaneous and distinct detection of two emission signals, making the configuration of the flow cytometer's FITC (Green) and PE (Red) channels a critical step. The table below outlines the fundamental optical properties for JC-1 detection.
Table 1: Optical Properties of the JC-1 Dye for Flow Cytometry
| Parameter | JC-1 Monomer (Green) | JC-1 J-Aggregate (Red) |
|---|---|---|
| Excitation Maximum | ~514 nm [31] | ~514 nm [31] |
| Emission Maximum | ~529 nm [31] | ~590 nm [31] |
| Primary Detection Channel | FITC (e.g., 530/30 BP) [31] | PE (e.g., 585/42 BP) [31] |
| Indication | Depolarized Mitochondria (Apoptotic) | Polarized Mitochondria (Healthy) |
| Recommended Laser | 488 nm argon laser [1] | 488 nm argon laser [1] |
Flow Cytometer Configuration for FITC and PE
Optical Configuration and Spectral Overlap
A flow cytometer equipped with a 488 nm argon laser is ideal for exciting the JC-1 dye [1]. The emitted light is then directed through a series of optical filters to separate the green and red signals into their respective detectors. The FITC channel typically uses a bandpass (BP) filter around 530/40 nm (center wavelength/bandwidth) to capture the monomer emission at ~529 nm. The PE channel uses a bandpass filter around 585/42 nm to capture the J-aggregate emission at ~590 nm [31] [32].
A critical step in configuring any multicolor experiment, including JC-1, is managing spectral overlap, where the emission signal from one fluorophore is detected in another's channel. While JC-1 monomers have minimal spillover into the PE channel, the bright PE signal can sometimes be detected in the FITC channel. This overlap is corrected through a process called compensation [33] [34]. Proper compensation is a mathematical process that ensures the signal in a detector comes only from its designated fluorophore, and is essential for accurate quantification [33].
Instrument Setup and Quality Control
Before data acquisition, the flow cytometer must be properly set up to ensure sensitivity and linearity of detection.
- Detector Optimization (Voltage Walk): The voltage (or gain) for each detector (FITC and PE) must be optimized. The goal is to find the minimum voltage requirement (MVR) that clearly resolves dim fluorescent signals from background noise while keeping bright signals within the detector's linear range [34]. This is typically done using dimly fluorescent calibration beads. Running the beads at a series of increasing voltage settings allows you to plot the signal spread (coefficient of Variation, CV) against the voltages. The optimal voltage is the lowest point on the %rCV curve before an increase in the robust standard deviation [34].
- Fluorescence Compensation: After setting voltages, compensation must be configured. This requires running single-stained controls—samples stained with JC-1 where the distinct monomer and aggregate signals can be recorded. Most modern flow cytometer software will automatically calculate the compensation matrix using these controls [33] [34]. Proper compensation is vital for the accuracy of the red/green ratio [33].
- Daily Quality Control: It is a best practice to run quality control beads (e.g., BD CS&T beads or CytoFLEX Daily QC Fluorospheres) before each session to ensure the instrument's lasers, fluidics, and optics are performing consistently and that fluorescence intensities are stable over time [35].
Experimental Protocol for JC-1 Staining and Data Acquisition
Staining Protocol for Cells in Suspension
The following protocol is adapted from established methodologies for use with cultured cells in suspension, followed by analysis on a flow cytometer [1].
Preparation:
- Allow the JC-1 reagent and dimethyl sulfoxide (DMSO) to reach 25°C.
- Prepare a fresh 200 µM JC-1 stock solution by reconstituting lyophilized JC-1 dye with DMSO. Mix until the solution is clear and the dye is completely dissolved [1].
- Prepare a 50 µM CCCP solution in DMSO. CCCP is a protonophore that uncouples oxidative phosphorylation and serves as a validated positive control for mitochondrial depolarization.
Cell Staining:
- Harvest and wash cells. Suspend the cell pellet in 1 mL of warm culture medium or PBS at a concentration not exceeding 1 x 10^6 cells/mL [1].
- Add 10 µL of the 200 µM JC-1 stock solution to 1 mL of cell suspension (final concentration: 2 µM). Incubate at 37°C with 5% CO₂ for 15-30 minutes [1].
- Protect the samples from light during incubation using foil.
Positive Control Preparation:
- To one tube of cells (1 mL), add 1 µL of 50 mM CCCP (final concentration: 50 µM). Incubate at 37°C for 5 minutes prior to JC-1 staining [1].
- After incubation with CCCP, pellet the cells by centrifugation (400 x g for 5 minutes at 25°C) and proceed with JC-1 staining as described above.
Post-Staining Wash and Acquisition:
- After incubation with JC-1, wash all samples by adding 2 mL of warm PBS.
- Centrifuge at 400 x g for 5 minutes at 25°C and carefully aspirate the supernatant [1].
- Resuspend the cell pellet in 0.5 - 1 mL of PBS for immediate analysis on the flow cytometer.
Data Acquisition Settings
- Acquisition: Use the 488 nm laser for excitation. Set the appropriate threshold, typically on forward scatter (FSC), to ignore small debris.
- Detectors: Collect fluorescence using the FITC (e.g., 530/40 BP) and PE (e.g., 585/42 BP) detectors, with the voltages optimized as described in Section 3.2.
- Compensation: Apply the compensation matrix calculated from your single-stained controls.
- Events: Collect a minimum of 10,000 events per sample within the live cell gate to ensure statistical robustness, especially when analyzing subpopulations [33].
Data Analysis and Gating Strategy
A logical gating strategy is essential to analyze only the population of interest—viable, single cells—and to accurately quantify the JC-1 signal.
Exclude Debris and Doublets:
- Create a gate on a Forward Scatter (FSC-A) vs. Side Scatter (SSC-A) plot to identify the main population of cells and exclude small debris.
- Plot FSC-Area (FSC-A) vs. FSC-Height (FSC-H) to gate for single cells and exclude doublets or clumped cells [36].
Gate Viable Cells:
- It is critical to exclude dead cells, as they are "sticky" and can bind antibodies and dyes nonspecifically, severely complicating analysis [34]. Use a viability dye (not compatible with fixation) in a channel separate from FITC and PE to positively identify and exclude dead cells.
Analyze JC-1 Fluorescence:
- On the gated population of live, single cells, create a bivariate dot plot of PE (J-aggregates, Red) vs. FITC (Monomers, Green).
- The population of healthy cells with high ΔΨM will appear in the upper left (PE high, FITC low) and lower right (FITC high, PE low) quadrants. Apoptotic cells with low ΔΨM will shift from the upper left to the lower right quadrant.
- The median fluorescence intensity (MFI) of both PE and FITC should be recorded for the population. The ratio of PE MFI to FITC MFI is the key quantitative metric for mitochondrial membrane potential [31] [37]. A decreasing ratio indicates mitochondrial depolarization.
Table 2: Essential Research Reagent Solutions for JC-1 Apoptosis Assay
| Reagent / Material | Function / Application | Example |
|---|---|---|
| JC-1 Dye | Ratiometric fluorescent probe for mitochondrial membrane potential (ΔΨM) | MitoProbe JC-1 Assay Kit (Thermo Fisher, Cat. No. M34152) [31] [1] |
| CCCP (Carbonyl cyanide m-chlorophenyl hydrazone) | Chemical inducer of mitochondrial depolarization; used as a positive control [1] | Supplied in MitoProbe JC-1 Assay Kit or available separately [31] |
| Viability Dye | Fluorescent dye to discriminate and exclude dead cells from analysis [34] | LIVE/DEAD Fixable Viability Dyes (e.g., Thermo Fisher) [34] |
| Calibration & QC Beads | For instrument performance tracking, quality control, and optimizing detector voltages [34] [35] | BD CS&T Beads, CytoFLEX Daily QC Fluorospheres [34] [1] |
| Compensation Beads | For setting up fluorescence compensation in multicolor panels | Anti-Mouse/Rat Ig κ/Negative Control Compensation Particles Set [34] |
Troubleshooting and Best Practices
- Low Signal Intensity: Ensure the JC-1 stock solution is fresh and properly dissolved. Confirm that the dye concentration and incubation time have been optimized for your specific cell type. Verify cytometer laser alignment and detector voltages.
- High Background Fluorescence: Include an unstained cell control to set negative population boundaries. Always include a viability dye to gate out dead cells that cause nonspecific binding [34]. Titrate the JC-1 dye to find the optimal signal-to-noise ratio.
- Poor Resolution Between Populations: Ensure compensation has been correctly applied. Use Fluorescence Minus One (FMO) controls if necessary to accurately set gates for dim populations [34]. An FMO for JC-1 would contain all other dyes in the panel (e.g., a viability dye) except JC-1.
- Data Reproducibility: Adhere to standardized protocols for sample preparation. Consistently use the same instrument settings and lot numbers of reagents where possible. Follow published guidelines for reporting flow cytometry data, which include detailing sample preparation, instrument configuration, and gating strategies [33].
Solving Common JC-1 Experimental Problems: Expert Troubleshooting Tips
Eliminating Red Particulate Crystals in Your JC-1 Working Solution
The JC-1 dye is a cornerstone reagent for assessing mitochondrial membrane potential, a key early indicator of apoptosis in drug development research. A frequent challenge in its application is the formation of red particulate crystals in the working solution, which compromises data quality and reliability. This Application Note details the root causes of this issue and provides optimized, actionable protocols to eliminate crystal formation, ensuring robust and reproducible flow cytometry data for apoptosis detection.
In the landscape of drug development, the accurate assessment of cell death mechanisms is paramount. The JC-1 dye serves as a critical tool for detecting early apoptosis by functioning as a ratiometric, potential-dependent probe that accumulates in mitochondria [38]. In healthy, polarized mitochondria, JC-1 forms J-aggregates that emit red fluorescence (emission max ~590 nm). During early apoptosis, the collapse of the mitochondrial membrane potential (∆Ψm) prevents aggregate formation, causing JC-1 to remain in its monomeric state, which emits green fluorescence (emission max ~529 nm) [39] [38]. This reversible, potential-dependent spectral response is the basis for its use in flow cytometry, where the shift from red to green fluorescence provides a quantitative measure of ∆Ψm loss.
However, the practical utility of JC-1 is often hampered by the precipitation of red, fluorescent crystals in the working solution. These particulates can be mistaken for cellular events or cause background noise during flow cytometry, leading to inaccurate data interpretation. This note provides a systematic solution to this common problem, framed within the essential context of optimizing JC-1 for apoptosis detection.
Troubleshooting: Causes and Solutions for Particulate Formation
The formation of red particulate crystals is primarily a solvation issue. The table below summarizes the identified causes and their respective validated solutions.
Table 1: Troubleshooting Guide for Red Particulate Crystals in JC-1 Working Solution
| Root Cause | Description | Recommended Solution | Prevention Tip |
|---|---|---|---|
| Incorrect Preparation Order [39] | Diluting the JC-1 concentrate directly into the JC-1 Assay Buffer, rather than water first. | Strictly follow the sequential order: first dilute the JC-1 (500X) concentrate with distilled water, then add the JC-1 Assay Buffer. | Standardize the preparation protocol across all users in the lab. |
| Limited Aqueous Solubility [39] | JC-1 has inherently low solubility in aqueous buffers, leading to supersaturation and precipitation. | After dilution, promote dissolution by placing the working solution in a 37°C water bath or using brief ultrasonication. | Gently vortex the warmed solution before use to ensure homogeneity. |
The following workflow diagram outlines the logical process for diagnosing and resolving the issue of crystal formation.
Optimized JC-1 Staining Protocol for Flow Cytometry
This section provides a detailed step-by-step protocol for flow cytometry, incorporating best practices to prevent crystal formation and ensure high-quality apoptosis detection.
Materials and Reagents
Table 2: Essential Research Reagent Solutions for JC-1 Flow Cytometry
| Item | Function/Description | Example Product/Catalog Number |
|---|---|---|
| JC-1 Dye | Fluorescent potentiometric probe for mitochondrial membrane potential. | MitoProbe JC-1 Assay Kit (M34152, Thermo Fisher) [38] |
| JC-1 Assay Buffer | Provides the optimal ionic environment for staining live cells. | Included in JC-1 Assay Kits |
| Dimethyl Sulfoxide (DMSO) | High-quality solvent for reconstituting and storing JC-1 stock solution. | Molecular Biology Grade DMSO |
| Positive Control (CCCP) | Mitochondrial uncoupler used to depolarize membranes and validate assay. | Often included in kits (e.g., MitoProbe JC-1 Assay Kit) [39] [38] |
| Phosphate-Buffered Saline (PBS) | Used for washing cells to remove excess dye and resuspending cells for analysis. | 1X, without Ca2+/Mg2+ |
| Flow Cytometer | Instrument for detecting JC-1 fluorescence (FITC & PE channels). | Equipped with 488 nm laser |
Step-by-Step Staining Procedure
- Preparation of JC-1 Working Solution: Thaw all components and briefly centrifuge. Prepare the JC-1 working solution immediately before use. For the MitoProbe JC-1 Assay Kit, dilute the JC-1 reagent to a final concentration of 2 µM in pre-warmed buffer [38]. Crucially, if preparing from a concentrate, first dilute the JC-1 in distilled water, then add the assay buffer. If crystals are observed, warm the solution in a 37°C water bath with gentle mixing until clear.
- Cell Preparation and Staining: Harvest and wash cells (approximately 1 x 10^6 cells/mL). For adherent cells, it is recommended to gently detach them first, as staining in suspension ensures more uniform dye exposure than staining in a well plate [39]. Pellet the cells and resuspend them in 1 mL of the pre-warmed, clear JC-1 working solution.
- Incubation: Incubate the cell suspension for 15-30 minutes at 37°C in the dark (e.g., in a CO₂ incubator) [38].
- Washing and Resuspension: After incubation, centrifuge the cells at 400 x g for 5 minutes. Carefully aspirate the supernatant to remove unincorporated dye. Gently wash the cells by resuspending the pellet in 2 mL of pre-warmed 1X PBS or the provided assay buffer. Repeat the centrifugation and aspiration steps.
- Flow Cytometric Analysis: Resuspend the final cell pellet in 0.5 mL of PBS. Keep the stained cells on ice and in the dark, and analyze by flow cytometry within 30 minutes [39]. Use 488 nm excitation and collect green fluorescence (JC-1 monomer) in the FITC/530 nm channel and red fluorescence (JC-1 aggregate) in the PE/585 nm channel. The ratio of PE (red) to FITC (green) fluorescence median intensity is proportional to the mitochondrial membrane potential.
The complete experimental workflow, from cell treatment to data acquisition, is summarized below.
Application in Drug Development Research
The JC-1 assay is extensively used in preclinical drug discovery to evaluate the mechanistic role of mitochondrial dysfunction in compound efficacy. For instance, in a study investigating Phillyrin as a therapeutic for calcium oxalate (CaOx) kidney stones, the JC-1 assay demonstrated that the compound significantly reduced CaOx-induced apoptosis in HK-2 cells, as evidenced by a higher red/green fluorescence ratio compared to damaged controls [40]. Similarly, research into the protective role of SIRT6 against CaOx nephrocalcinosis utilized JC-1 staining to confirm that SIRT6 overexpression alleviated mitochondrial damage, thereby attenuating oxidative injury and inflammation [41]. These examples underscore the value of a robustly optimized JC-1 protocol in generating reliable data for validating novel therapeutic agents and elucidating their mechanisms of action.
Within the framework of JC-1 staining protocol development for flow cytometry apoptosis detection, researchers frequently encounter significant challenges when working with complex biological samples. A distinctive feature of early-stage apoptosis is the disruption of active mitochondria, which includes a decrease in mitochondrial membrane potential (ΔΨm). [4] The carbocyanine dye JC-1 serves as a critical tool for detecting this key apoptotic event, as it undergoes a potential-dependent fluorescence shift from green (monomer) to red (J-aggregate) in healthy, polarized mitochondria. [4] [42] However, standard JC-1 protocols often require optimization for non-suspension cell types. This application note provides detailed methodologies and solutions for effectively staining adherent cell cultures and tissue-derived samples, enabling accurate flow cytometric assessment of mitochondrial health and early apoptosis.
Technical Principles and Staining Challenges
The JC-1 dye functions as a ratiometric probe, whose utility stems from its dual-emission characteristics that depend on the mitochondrial membrane potential. In healthy cells with high ΔΨm, the dye accumulates in mitochondria and forms J-aggregates emitting red fluorescence (emission maximum ~590 nm). Conversely, in apoptotic cells where ΔΨm has collapsed, JC-1 remains in the cytoplasm as monomers emitting green fluorescence (emission maximum ~529 nm). [4] [42] The quantitative ratio of red-to-green fluorescence provides a robust measure of mitochondrial depolarization, largely independent of confounding factors like mitochondrial size, shape, and density. [4]
When adapting this powerful technique for challenging samples, several key obstacles must be addressed:
- Adherent Cells: The nature of cell attachment and potential cell-cell contacts can lead to uneven dye exposure and uptake. [42]
- Tissue Samples: These require processing into single-cell suspensions, a procedure that can inadvertently damage cells and cause artifactual ΔΨm loss, leading to false-positive apoptosis signals. [42]
- Viability Requirement: JC-1 staining is strictly compatible with live cells, preventing the use of fixed or sectioned samples (e.g., paraffin or frozen sections). [42]
The following sections outline targeted protocols to overcome these specific challenges.
Optimized Protocols for Challenging Samples
Protocol for Adherent Cells
For adherent cell cultures, the optimal staining approach depends on the available laboratory equipment. The protocol below is designed for flow cytometric analysis.
Table 1: Key Reagents and Equipment for Adherent Cell Staining
| Item | Specification/Function |
|---|---|
| JC-1 Reagent | Available as a bulk chemical (e.g., Thermo Fisher T3168) or in optimized assay kits (e.g., MitoProbe JC-1 Assay Kit M34152). [4] |
| Buffered Salt Solution | e.g., 1x Phosphate-Buffered Saline (PBS). [4] |
| Cell Dissociation Agent | Trypsin-EDTA or a non-enzymatic dissociation solution suitable for the specific cell type. |
| Flow Cytometer | Configured with 488 nm excitation and standard FITC (530/30 nm) and PE (585/42 nm) emission filters. [4] |
Step-by-Step Workflow:
- Culture and Treatment: Grow adherent cells to 70-80% confluence in appropriate culture vessels. Apply experimental treatments as required.
- Cell Harvesting (Critical Step):
- Gently rinse the cell monolayer with pre-warmed PBS to remove serum and dead cells.
- Detach cells using a suitable dissociation agent (e.g., trypsin). It is recommended to incubate JC-1 after cell digestion and not before, to ensure uniform dye exposure. [42]
- Carefully collect the cell suspension, including any floating cells in the culture supernatant, as these may contain populations undergoing apoptosis.
- Neutralize the dissociation reagent with complete culture medium.
- Centrifuge the cell suspension and wash the pellet once with PBS.
- JC-1 Staining:
- Post-Staining Processing and Analysis:
- Centrifuge the cells and gently wash the pellet with warm PBS to remove excess, unincorporated dye.
- Resuspend the cells in fresh PBS for immediate analysis on the flow cytometer. Detection must be completed within 30 minutes of staining completion, as fixation is not possible and fluorescence quenching can occur over time. [42]
Figure 1: Experimental workflow for JC-1 staining of adherent cells, highlighting the critical steps of post-digestion staining and immediate analysis.
Protocol for Tissue Samples
Analysis of tissue samples requires an initial processing step to create a single-cell suspension while minimizing cellular stress that could artifactually depolarize mitochondria.
Table 2: Key Reagents and Equipment for Tissue Sample Staining
| Item | Specification/Function |
|---|---|
| Tissue Dissociation Kit | Enzyme-based kit optimized for the specific tissue type (e.g., tumor, liver, heart). |
| Mitochondria Extraction Kit | Optional; for indirect analysis (e.g., Elabscience E-BC-E001). [42] |
| Fluorescence Plate Reader | Alternative if flow cytometry is unavailable; used with purified mitochondria. [42] |
Step-by-Step Workflow:
- Single-Cell Suspension Preparation:
- Process fresh tissue samples using a gentle, optimized mechanical and enzymatic dissociation protocol.
- It is crucial to minimize processing time and use ice-cold buffers where possible to preserve mitochondrial integrity and prevent false positives. [42]
- Filter the resulting cell suspension through a 40-70 µm cell strainer to remove clumps and debris.
- Wash cells and resuspend in PBS for counting and viability assessment.
- JC-1 Staining & Analysis:
- Follow the staining procedure outlined for adherent cells (Section 3.1, Steps 3-4).
- Alternative Approach: Mitochondrial Isolation:
- For tissues that are exceptionally difficult to dissociate without damage, an alternative is to first isolate intact mitochondria using a dedicated extraction kit. [42]
- The isolated mitochondria are then incubated with JC-1, and the fluorescence signal is measured using a fluorescence plate reader. This method assesses the mitochondrial population's overall health directly, bypassing the need for single cells.
Research Reagent Solutions
A curated list of essential materials and reagents for performing JC-1 experiments is provided below.
Table 3: Essential Reagents and Kits for JC-1 Staining
| Reagent/Kits | Function and Key Characteristics |
|---|---|
| JC-1 Bulk Dye | Membrane-permeant dye for detecting ΔΨm; used for imaging and flow cytometry (e.g., Thermo Fisher T3168). [4] |
| MitoProbe JC-1 Assay Kit | Flow cytometry-optimized kit including JC-1, DMSO, CCCP (membrane potential disrupter), and buffers (e.g., Thermo Fisher M34152). [4] |
| Mitochondrial Membrane Potential Assay Kit | Commercial kits providing optimized JC-1 and buffers for robust results (e.g., Elabscience E-CK-A301). [42] |
| CCCP (Carbonyl cyanide m-chlorophenyl hydrazone) | A protonophore and mitochondrial uncoupler used as a validated positive control to collapse ΔΨm and establish assay parameters. [4] [42] |
| Annexin V Conjugates | Used in multiparameter apoptosis assays to simultaneously detect phosphatidylserine externalization, a hallmark of mid-stage apoptosis. [4] [6] |
| Propidium Iodide (PI) | A viability dye that stains dead cells with compromised membranes; used with Annexin V to differentiate stages of cell death. [6] |
Advanced Technical Considerations
Multiparameter Apoptosis Assays
To gain a comprehensive understanding of cellular status, JC-1 can be integrated into multiparameter panels. A powerful workflow combines JC-1 with other stains like Annexin V and Propidium Iodide (PI), allowing for the simultaneous assessment of early apoptotic events (ΔΨm loss), mid-stage apoptosis (phosphatidylserine exposure), and late-stage apoptosis/necrosis (loss of membrane integrity). [6] This integrated approach provides a more detailed view of the cell death cascade.
While JC-1 is traditionally excited by the 488 nm laser line, advanced flow cytometers equipped with a 405 nm (violet) laser offer an advantage. Research shows that excitation at 405 nm produces J-aggregate signals with significantly less spillover from monomer fluorescence compared to 488 nm excitation. [5] This reduces the need for electronic compensation and can yield more accurate data for distinguishing cells with energized and deenergized mitochondria.
Figure 2: JC-1 mechanism of action. The dye forms red fluorescent J-aggregates in polarized mitochondria of healthy cells, but remains as green fluorescent monomers in the cytoplasm of apoptotic cells with low membrane potential.
Troubleshooting Common Issues
Table 4: Troubleshooting Guide for JC-1 Staining
| Problem | Potential Cause | Recommended Solution |
|---|---|---|
| Red particulate crystals in JC-1 working solution | Incorrect preparation order or poor solubility of JC-1 in water. [42] | Prepare working solution strictly per instructions: dilute JC-1 stock with distilled water first, then add assay buffer. Promote dissolution with a 37°C water bath or brief sonication. [42] |
| Poor separation between red and green populations in flow cytometry | Spillover of green monomer signal into the red (PE) detection channel. [5] | Use a positive control (e.g., CCCP) to set up proper fluorescence compensation on your cytometer. Consider using 405 nm excitation if available to reduce spillover. [5] |
| High background green fluorescence in untreated cells | Cell damage during tissue dissociation or adherent cell harvesting. [42] | Optimize the tissue dissociation or cell detachment protocol to be gentler and faster. Perform staining and analysis immediately after sample preparation. |
| Weak overall fluorescence signal | Inadequate dye concentration, short incubation time, or dye degradation. | Ensure JC-1 working solution is freshly prepared and used at the recommended final concentration (2-5 µM). Verify incubation is performed at 37°C for the full duration. |
By implementing these optimized protocols and carefully considering the outlined technical aspects, researchers can reliably apply JC-1 staining to adherent cells and tissue samples, thereby expanding the scope of their mitochondrial function and apoptosis research.
Mitochondrial membrane potential (ΔΨM) is a critical parameter for assessing cellular health and an early indicator of apoptosis. The cationic, lipophilic dye JC-1 (5,5',6,6'-tetrachloro-1,1',3,3'-tetraethylbenzimidazolylcarbocyanine iodide) serves as a key tool for measuring ΔΨM in flow cytometry, distinguished by its unique rationetric properties. In healthy cells with high ΔΨM, JC-1 accumulates in mitochondria and forms red-fluorescent J-aggregates. In apoptotic or unhealthy cells with diminished ΔΨM, JC-1 remains in its green-fluorescent monomeric form due to reduced mitochondrial accumulation [4] [1]. This application note addresses the critical experimental challenges of high background fluorescence and weak signal intensity during JC-1 staining, providing optimized protocols for incubation and wash steps to ensure reliable data in apoptosis detection research.
The JC-1 Staining Mechanism and Workflow
The fundamental principle of JC-1 staining relies on its potential-dependent accumulation within mitochondria. At low membrane potentials or concentrations, JC-1 exists as a monomer emitting green fluorescence (∼529 nm). At higher potentials or concentrations, it forms J-aggregates emitting red fluorescence (∼590 nm) [4]. The red/green fluorescence intensity ratio provides a quantitative measure of mitochondrial health that is independent of mitochondrial size, shape, and density [4] [1]. The following diagram illustrates the core JC-1 staining mechanism and the experimental workflow for flow cytometry:
Troubleshooting High Background and Weak Signals
High background fluorescence and weak signal intensity represent the most common challenges in JC-1 staining protocols, often stemming from suboptimal incubation conditions or improper wash steps. The table below summarizes the primary issues and their practical solutions:
| Problem | Potential Causes | Recommended Solutions |
|---|---|---|
| High Background Fluorescence | Incomplete dye removal during washing [43] | Increase wash volume (2 mL per 1×10⁶ cells) and repetitions (2x) [1] |
| Excessive dye concentration [43] | Titrate JC-1 working concentration (1-15 μM range) [43] | |
| Non-specific dye binding | Use specialized Imaging Buffer to minimize background [43] | |
| JC-1 precipitation in aqueous buffer | Use commercial kits with optimized formulations to prevent precipitation [43] | |
| Weak J-Aggregate Signal | Insufficient incubation time/temperature [1] | Standardize incubation (15-30 min at 37°C in 5% CO₂) [1] |
| Low mitochondrial membrane potential | Include healthy, untreated controls in every experiment | |
| Suboptimal dye concentration | Optimize JC-1 concentration for specific cell type (typically 2-4 μM) [1] [43] | |
| Poor Signal Discrimination | Spectral spillover [5] | Consider 405 nm excitation to reduce monomer spillover [5] |
| Inadequate controls for compensation | Include CCCP/valinomycin-treated controls [1] [5] | |
| Cell Damage During Processing | Use of PBS for washing [43] | Replace PBS with HBSS or culture medium for washing steps [43] |
| Excessive centrifugal force | Reduce centrifugation speed (400 × g for 5 min) [1] |
Optimized Incubation Protocol
JC-1 Solution Preparation
Proper preparation of JC-1 staining solutions is fundamental to achieving consistent results while minimizing background and signal issues:
JC-1 Stock Solution (2 mM): Reconstitute lyophilized JC-1 with high-quality DMSO to create a 100× stock solution (200 μM). Mix thoroughly until the solution is clear and free of aggregates [1]. Aliquot and store protected from light at -20°C for up to one month [43].
JC-1 Working Solution (2-4 μM): Immediately before use, dilute the stock solution in pre-warmed culture medium (37°C) to achieve the final working concentration. Rapidly mix by pipetting 10 times to ensure homogeneity. Use the working solution within the same day [43].
Imaging Buffer Preparation: For commercial kits requiring specialized buffers, dilute 10× Imaging Buffer 10-fold using double-deionized water. Prepare fresh on the day of use [43].
Staining Procedure for Flow Cytometry
The following optimized protocol ensures consistent JC-1 staining while addressing background and signal intensity challenges:
Cell Preparation: Harvest approximately 1×10⁶ cells/mL in warm culture medium or buffer. For adherent cells, use gentle trypsinization and neutralize with complete medium before centrifugation (125 × g for 7 minutes at 25°C) [1].
Staining Incubation:
Positive Control Preparation:
- Treat one sample with 50 μM carbonyl cyanide m-chlorophenyl hydrazone (CCCP) for 5 minutes at 37°C before JC-1 staining [1].
- CCCP collapses mitochondrial membrane potential, serving as a technical control for J-aggregate disruption.
Critical Wash Steps for Background Reduction
Proper washing is crucial for removing unbound dye and reducing background fluorescence without compromising cell integrity or signal intensity:
Post-Staining Washes:
- Add 2 mL of warm HBSS (37°C) or culture medium per 1 mL of stained cell suspension. Avoid using PBS, which can damage cells and affect mitochondrial function [43].
- Centrifuge at 400 × g for 5 minutes at 25°C [1].
- Carefully aspirate supernatant without disturbing the cell pellet.
- Repeat wash step once more for a total of two washes.
Final Resuspension:
- Resuspend cells in 0.5-1 mL of pre-warmed HBSS, culture medium, or specialized Imaging Buffer [43].
- Maintain cells at 37°C during acquisition to preserve mitochondrial function.
Timing Considerations:
- Process samples immediately after staining completion.
- Begin flow cytometry analysis within 60 minutes of staining completion.
- For depolarized controls (CCCP-treated), note that washing steps may alter membrane potential; minimize processing time [43].
The Scientist's Toolkit: Essential Reagents and Materials
Successful implementation of JC-1 staining requires specific reagents and equipment optimized for mitochondrial membrane potential assessment:
| Reagent/Equipment | Function | Application Notes |
|---|---|---|
| JC-1 Dye | Mitochondrial membrane potential indicator | Available as bulk chemical (T3168) or in optimized kits (M34152) [4] |
| DMSO | Solvent for JC-1 stock solution | Use high-quality, sterile DMSO for consistent dye dissolution [1] |
| CCCP (50 mM) | Mitochondrial uncoupler for positive controls | Final concentration 50 μM; validates J-aggregate disruption [1] |
| HBSS or Culture Medium | Washing buffer | Preferred over PBS to maintain cell viability [43] |
| Imaging Buffer | Specialized buffer for signal enhancement | Minimizes background fluorescence; maintains cell health [43] |
| Flow Cytometer | Signal detection and analysis | Requires 488 nm excitation with 530 nm & 585 nm bandpass filters [4] [1] |
| CO₂ Incubator | Maintains physiological conditions during staining | Critical for consistent 37°C, 5% CO₂ environment [1] |
Advanced Technical Considerations
Recent evidence suggests that alternative excitation wavelengths can significantly improve JC-1 signal discrimination:
- 488 nm Excitation: The conventional approach efficiently excites both monomers and J-aggregates but requires substantial compensation (∼30%) due to significant spectral spillover [5].
- 405 nm Excitation: Excites J-aggregates with considerably less spillover from monomer fluorescence, potentially eliminating compensation requirements and improving data accuracy [5].
Quantitative Data Analysis
Proper gating strategies and ratio calculations are essential for accurate ΔΨM assessment:
- Flow Cytometry Setup: Use 488 nm excitation with standard FITC (530/30 nm) and PE (585/42 nm) filters for monomer and J-aggregate detection, respectively [4].
- Compensation Controls: Include CCCP or valinomycin-treated cells to establish proper compensation settings [5].
- Data Interpretation: Calculate the red/green fluorescence ratio rather than relying on single parameters. This ratio is dependent only on membrane potential, not on mitochondrial morphology or density [4] [1].
Optimizing incubation and wash steps in JC-1 staining protocols is essential for resolving the common challenges of high background and weak signal intensity in flow cytometry-based apoptosis detection. Critical factors include precise control of dye concentration, incubation conditions, proper washing techniques with appropriate buffers, and inclusion of relevant controls. Implementation of these optimized protocols enables researchers to obtain more reliable, reproducible data on mitochondrial membrane potential changes during apoptotic processes, supporting robust drug discovery and development research.
In mitochondrial membrane potential (ΔΨm) analysis using JC-1 dye, maintaining cell viability throughout the experimental procedure is not merely a recommendation—it is an absolute requirement for generating scientifically valid data. JC-1 (5,5',6,6'-tetrachloro-1,1',3,3'-tetraethylbenzimidazolylcarbocyanine iodide) is a lipophilic, cationic dye widely used in apoptosis research for monitoring mitochondrial health [4] [1]. Its unique potential-dependent spectral properties provide a ratiometric measurement that is exceptionally valuable for detecting early apoptotic events, but these properties are fundamentally incompatible with standard fixation methods.
The critical importance of using live cells stems from the very mechanism by which JC-1 functions. This dye accumulates in active mitochondria in a membrane potential-dependent manner, undergoing a concentration-dependent shift from green fluorescent monomers (∼529 nm emission) to red fluorescent "J-aggregates" (∼590 nm emission) as mitochondrial polarization increases [4] [1]. This potential-dependent accumulation and the subsequent J-aggregate formation occur only in metabolically active, intact mitochondria with maintained electrochemical gradients. Chemical fixation disrupts these essential physiological conditions, rendering JC-1 staining unreliable and potentially generating misleading results in apoptosis detection workflows.
The Science Behind the Incompatibility: Why Fixation Disrupts JC-1 Staining
Mechanism of JC-1 Accumulation and Signal Generation
The JC-1 dye operates on fundamental electrochemical principles that require intact cellular and organellar membranes. In healthy, polarized mitochondria, the interior-negative membrane potential (typically -120 to -180 mV) drives the electrophoretic accumulation of the positively charged JC-1 molecules [1]. At high intramitochondrial concentrations (approximately >0.1 µM), the dye reversibly forms J-aggregates that exhibit a distinct spectral shift from green (monomer emission at ∼529 nm) to red (J-aggregate emission at ∼590 nm) [4]. This potential-dependent accumulation is completely abolished by fixation procedures.
Chemical fixatives such as formaldehyde, paraformaldehyde, and methanol-based formulations fundamentally alter cellular infrastructure in ways that directly interfere with JC-1 function. These fixatives cross-link proteins, disrupt membrane integrity, and destroy the electrochemical gradients that drive JC-1 accumulation [4]. Consequently, fixed cells cannot maintain the potential-dependent distribution of JC-1 between the cytoplasm and mitochondria, nor can they support the concentration-dependent J-aggregate formation within mitochondrial compartments.
Consequences of Fixation on Data Integrity
The impact of fixation on JC-1 staining quality manifests in several critical ways that compromise experimental outcomes. The most significant effect is the leakage of JC-1 dye from mitochondrial compartments after fixation, which destroys the quantitative relationship between fluorescence signals and actual mitochondrial membrane potential [44]. This leakage occurs because fixatives alter membrane permeability and disrupt the potential gradient that retains the cationic dye within mitochondria.
Additionally, fixation introduces artifactual fluorescence patterns that do not reflect physiological conditions. Studies have demonstrated that certain chemical treatments can create autofluorescence or spectral interference that overlaps with JC-1 emission spectra, necessitating sophisticated correction methods like spectral deconvolution even in live-cell applications [44]. These interference issues become exponentially more problematic in fixed cell preparations.
Perhaps most critically, fixation eliminates the dynamic, potential-dependent equilibrium that is fundamental to JC-1's ratiometric measurement capability. The red/green fluorescence intensity ratio—the key parameter for assessing mitochondrial polarization—becomes fixed at values that do not reflect the pre-fixation physiological state [4] [1]. This loss of dynamic range fundamentally undermines the primary advantage of JC-1 over single-emission dyes.
Optimized Live-Cell Protocols for JC-1 Staining
Standard JC-1 Staining Protocol for Flow Cytometry
The following protocol has been optimized for live-cell analysis by flow cytometry and represents current best practices for JC-1 staining:
Materials and Reagents
- JC-1 dye (e.g., T3168 from Thermo Fisher Scientific) or MitoProbe JC-1 Assay Kit (M34152)
- Carbonyl cyanide m-chlorophenyl hydrazone (CCCP) for positive control preparation
- Dimethyl sulfoxide (DMSO)
- Phosphate-buffered saline (PBS), pH 7.4
- Cell culture medium appropriate for your cell type
- Flow cytometer equipped with 488 nm excitation and filters for FITC (530/30 nm) and PE (585/42 nm) detection [4] [1]
Step-by-Step Procedure
- Cell Preparation: Harvest cells gently to maintain viability. For adherent cells, use mild trypsinization and neutralize with complete medium. Wash cells twice with warm PBS (37°C) and resuspend in culture medium at a density of 0.5-1 × 10^6 cells/mL [1].
JC-1 Staining Solution Preparation: Prepare a fresh 200 µM JC-1 stock solution in DMSO immediately before use. Dilute this stock in warm culture medium to a final working concentration of 2 µM JC-1 [1].
Staining Incubation: Add 10 µL of 200 µM JC-1 stock per 1 mL of cell suspension (final concentration: 2 µM). Mix gently and incubate for 15-30 minutes at 37°C in the dark with 5% CO₂ [1].
Positive Control Preparation: Treat a separate aliquot of cells with 50 µM CCCP (from a 50 mM stock in DMSO) for 5 minutes at 37°C prior to JC-1 staining to depolarize mitochondria and establish baseline fluorescence ratios [1].
Post-Staining Processing: After incubation, centrifuge cells at 400 × g for 5 minutes at room temperature. Carefully remove supernatant and resuspend cells in warm PBS or culture medium. Keep samples at 37°C and protected from light until analysis [1].
Flow Cytometry Analysis: Analyze samples immediately using 488 nm excitation. Collect green fluorescence (JC-1 monomers) through a 530/30 nm bandpass filter (FITC channel) and red fluorescence (J-aggregates) through a 585/42 nm bandpass filter (PE channel). Acquire at least 10,000 events per sample [4] [1].
Table 1: Critical Parameters for JC-1 Flow Cytometry
| Parameter | Optimal Condition | Purpose |
|---|---|---|
| Cell Density | 0.5-1 × 10^6 cells/mL | Ensure uniform staining without aggregation |
| JC-1 Concentration | 2 µM final | Balance between signal intensity and potential-dependent accumulation |
| Incubation Time | 15-30 minutes | Allow dye accumulation and J-aggregate formation |
| Incubation Temperature | 37°C | Maintain physiological mitochondrial function |
| Analysis Timing | Immediately after staining (<1 hour) | Prevent dye redistribution and maintain signal fidelity |
Integrated Multiparameter Apoptosis Assessment
For comprehensive apoptosis evaluation, JC-1 staining can be combined with other viability and apoptosis markers in a multiparameter approach:
Annexin V/Propidium Iodide Co-staining Protocol
- Perform JC-1 staining as described above, but omit the final resuspension step.
- After JC-1 staining and washing, resuspend cells in 100 µL of Annexin V binding buffer.
- Add Annexin V-FITC (per manufacturer's recommended dilution, typically 1:100) and propidium iodide (1 µg/mL final concentration).
- Incubate for 15 minutes at room temperature in the dark.
- Add 400 µL of additional Annexin V binding buffer and analyze immediately by flow cytometry [45] [6].
This integrated approach enables simultaneous assessment of mitochondrial membrane potential (JC-1), phosphatidylserine externalization (Annexin V), and membrane integrity (propidium iodide), providing a more comprehensive view of apoptotic progression [6].
Table 2: Multiparameter Apoptosis Assessment by Flow Cytometry
| Fluorophore | Detection Channel | Biological Parameter | Interpretation |
|---|---|---|---|
| JC-1 Monomer | FITC (530/30 nm) | Mitochondrial depolarization | Increased green signal indicates loss of ΔΨm |
| JC-1 J-aggregate | PE (585/42 nm) | Mitochondrial polarization | Decreased red signal indicates loss of ΔΨm |
| Annexin V-FITC | FITC (530/30 nm) | Phosphatidylserine exposure | Early apoptosis marker |
| Propidium Iodide | PerCP-Cy5-5-A (670 nm) | Membrane integrity | Late apoptosis/necrosis marker |
Advanced Technical Considerations and Troubleshooting
Spectral Optimization and Compensation Strategies
The dual-emission nature of JC-1 presents specific technical challenges that require careful instrument setup:
Excitation Wavelength Considerations While 488 nm excitation is most commonly used for JC-1, recent evidence suggests that 405 nm excitation may provide improved spectral separation by producing J-aggregate signals with considerably less spillover from monomer fluorescence [5]. This alternative excitation can eliminate the need for extensive fluorescence compensation in some instruments.
Compensation Controls Proper compensation is critical for accurate JC-1 ratiometric measurements. CCCP-treated cells (completely depolarized mitochondria) should be used to set compensation between green and red fluorescence channels, as these cells contain primarily JC-1 monomers [5]. The optimal compensation setting typically requires subtracting 20-35% of the green fluorescence signal from the red channel [5].
Validation and Quality Control Measures
Essential Experimental Controls
- Viability Control: Include unstained cells to assess autofluorescence.
- CCCP Control: Treat cells with 50 µM CCCP for 5 minutes before JC-1 staining to establish the fully depolarized baseline [1].
- Single-Stain Controls: For multiparameter experiments, include cells stained with JC-1 only, Annexin V only, and PI only to set compensation properly [45].
- Time Course Controls: For kinetic studies, include time-matched controls to account for any spontaneous depolarization over time.
Troubleshooting Common Issues
- Poor Signal-to-Noise Ratio: Ensure JC-1 solution is fresh and properly dissolved. Avoid excessive washing after staining.
- High Background Fluorescence: Titrate JC-1 concentration for specific cell types. Some cell types may require optimization of dye concentration (1-5 µM range).
- Population Heterogeneity: Use forward scatter/side scatter gating to exclude debris and aggregates. Consider cell cycle effects on mitochondrial potential.
- Rapid Signal Decay: Maintain cells at 37°C until immediately before analysis. Reduce time between staining and analysis.
Visualizing the JC-1 Experimental Workflow
The following diagram illustrates the critical steps in the live-cell JC-1 staining protocol and highlights points where fixation would compromise results:
The Scientist's Toolkit: Essential Reagents and Materials
Table 3: Key Research Reagent Solutions for JC-1 Assays
| Reagent/Material | Function/Purpose | Example Sources/Products |
|---|---|---|
| JC-1 Dye | Potential-sensitive dual-emission mitochondrial dye | Thermo Fisher Scientific (T3168) [4] |
| MitoProbe JC-1 Assay Kit | Optimized JC-1 formulation with control reagents | Thermo Fisher Scientific (M34152) [4] |
| CCCP | Mitochondrial uncoupler for depolarization controls | Included in MitoProbe kit or Sigma-Aldrich [1] |
| Annexin V Conjugates | Phosphatidylserine binding protein for early apoptosis detection | Multiple commercial sources (e.g., Roche) [45] |
| Propidium Iodide | Membrane-impermeant DNA stain for viability assessment | Sigma-Aldrich, Thermo Fisher Scientific [45] |
| Cell Culture Media | Maintain cell viability during staining procedure | Cell type-specific formulations |
The requirement for live-cell analysis in JC-1-based mitochondrial membrane potential assessment is not merely a technical limitation but a fundamental necessity rooted in the electrochemical principles underlying the technique. Fixation methods, while valuable for many cytometric applications, irrevocably disrupt the very physiological parameters that JC-1 staining is designed to measure. By adhering to optimized live-cell protocols, implementing appropriate controls, and understanding the technical considerations outlined in this application note, researchers can ensure the generation of reliable, physiologically relevant data on mitochondrial function and apoptotic progression.
The multiparameter approaches described herein further enhance the value of JC-1 staining by contextualizing mitochondrial membrane potential within broader apoptotic cascades. As mitochondrial function continues to be a focus in drug development, toxicology, and basic cell biology research, maintaining methodological rigor in JC-1 applications remains paramount for generating scientifically valid insights into cellular health and death pathways.
In the context of flow cytometry-based apoptosis detection research, the fluorochrome JC-1 (5,5′,6,6′-tetrachloro-1,1′,3,3′-tetraethylbenzimidazolylcarbocyanine iodide) serves as a critical tool for monitoring mitochondrial membrane potential (ΔΨm), an early marker of apoptotic induction [4]. The reliability of this data is intrinsically tied to the chemical stability of the JC-1 reagent itself. This application note provides a detailed protocol for the proper storage, aliquoting, and handling of JC-1 to ensure experimental reproducibility and generate high-quality, reliable data for researchers and drug development professionals.
JC-1 Mechanism and Role in Apoptosis Detection
JC-1 is a ratiometric, cationic dye that exhibits potential-dependent accumulation in active mitochondria [4]. In healthy cells with high mitochondrial membrane potential, JC-1 forms aggregates known as J-aggregates, which emit red fluorescence (at ~590 nm) [4]. During the early stages of apoptosis, the mitochondrial membrane potential dissipates, preventing JC-1 accumulation. The dye remains in its monomeric form in the cytoplasm, emitting green fluorescence (at ~529 nm) [4]. The ratio of red-to-green fluorescence is therefore a direct quantitative measure of mitochondrial health [4] [46].
A key feature of early apoptosis is the disruption of active mitochondria, which involves changes in membrane potential and is often associated with the opening of the mitochondrial permeability transition pore (MPTP) [4]. This leads to the release of cytochrome c into the cytosol, initiating the intrinsic apoptosis pathway [6] [4]. Consequently, a decrease in the red/green fluorescence intensity ratio provides a sensitive indicator of mitochondrial depolarization and the onset of programmed cell death.
The following diagram illustrates the core working principle of JC-1 and its relationship to the apoptosis signaling pathway.
Storage and Aliquoting Protocol
Proper handling of JC-1 begins upon receipt. The reagent is typically supplied as a lyophilized powder or a ready-made solution in dimethyl sulfoxide (DMSO) [4].
Initial Reconstitution and Aliquoting
- Preparation of Stock Solution: If received as a powder, reconstitute the JC-1 reagent with high-quality, anhydrous DMSO to prepare a concentrated stock solution. A common preparation is a 15 mM stock solution in DMSO [46].
- Aliquoting into Working Stocks: Immediately after reconstitution, aliquot the stock solution into small, single-use volumes in sterile, low-protein-binding microcentrifuge tubes. This is a critical step to minimize freeze-thaw cycles, which can lead to dye degradation and loss of functionality [46].
- Storage Conditions: Store all aliquots at -20 °C in a non-frost-free freezer to prevent temperature fluctuations [46]. Ensure tubes are tightly sealed to prevent moisture absorption, as water can hydrolyze the dye.
Handling of Working Solutions
- Thawing: When needed, gently thaw a single aliquot at room temperature in the dark. Avoid thawing in a 37°C water bath, as rapid heating can be detrimental.
- Preparation of Working Solution: Once thawed, the stock can be diluted to the final working concentration in an appropriate buffer. A commonly used final working concentration is 3 µM [46]. For example, dilute 1 µL of a 1.5 mM working stock into 0.5 mL of cell suspension to achieve this concentration [46].
- Stability: The freshly prepared working solution should be used immediately. Do not re-freeze thawed aliquots.
Table 1: JC-1 Storage and Aliquoting Specifications
| Parameter | Specification | Purpose/Rationale |
|---|---|---|
| Initial Stock Concentration | 15 mM in DMSO [46] | Provides a concentrated, stable master stock for long-term use. |
| Aliquot Volume | 5 - 20 µL (single-use) | Prevents repeated freeze-thaw cycles, preserving dye performance. |
| Long-Term Storage | -20°C, protected from light [46] | Maintains chemical stability of the dye. Frost-free freezers should be avoided. |
| Working Solution Concentration | 2 - 5 µM (e.g., 3 µM) [4] [46] | Optimal for staining without causing self-quenching or non-specific signal. |
| Working Solution Stability | Use immediately after preparation; do not store. | Prevents hydrolysis, oxidation, and precipitation of the dye in aqueous buffer. |
Buffer and Staining Condition Optimization
The choice of buffer and staining conditions significantly impacts the fluorescence signal and quality of data.
Buffer Selection
While Phosphate-Buffered Saline (PBS) is commonly used, a HEPES-based buffer (e.g., 10 mM HEPES, 1 mM CaCl₂, 1 mM MgCl₂, 0.6 mM sorbitol, pH 7.2) may be superior for certain cell types, such as algae, as it better mimics the cytoplasmic conditions and can improve staining efficiency [46]. Always ensure the buffer does not contain phenol red, as it can interfere with fluorescence detection.
Staining Protocol
The following workflow integrates JC-1 staining into a broader multiparametric flow cytometry analysis, which can include assays for proliferation and apoptosis [6].
Table 2: Optimized Staining Conditions for JC-1 in Flow Cytometry
| Condition | Optimized Parameter | Effect on Staining |
|---|---|---|
| Buffer System | PBS (pH 7.4) or HEPES-based buffer [46] | HEPES may provide better ionic balance for specific cell types, improving signal. |
| Incubation Time | 15 - 30 minutes [4] [46] | Allows for sufficient dye accumulation in mitochondria without over-staining. |
| Incubation Temperature | 37°C [4] [46] | Maintains physiological conditions and active dye transport into mitochondria. |
| Cell Density | ~1 x 10⁶ cells/mL in staining buffer [46] | Prevents signal saturation and ensures an adequate number of events for flow cytometry. |
| Light Conditions | Protected from light during all steps | Prevents photobleaching of the fluorescent dye. |
The Scientist's Toolkit: Key Research Reagent Solutions
Successful execution of the JC-1 staining protocol requires a set of core reagents and materials. The following table details these essential components.
Table 3: Essential Materials and Reagents for JC-1 Staining
| Item | Function/Description | Example Source / Specification |
|---|---|---|
| JC-1 Reagent | The core fluorescent dye for measuring mitochondrial membrane potential. Available as bulk powder or optimized assay kit. | T3168 (Stand-alone); M34152 (MitoProbe Kit) [4] |
| Anhydrous DMSO | Solvent for reconstituting and aliquoting the lyophilized JC-1 dye. | High-purity, sterile-filtered [46] |
| Flow Cytometer | Instrument for multiparametric analysis of JC-1 fluorescence. | BD FACSLyric or similar, equipped with 488 nm laser and FITC/PE filters [6] [4] |
| Propidium Iodide (PI) | Cell viability dye; used in combination with JC-1 to exclude dead cells from analysis. | - [6] |
| Annexin V Conjugates | Marker for early apoptosis; can be combined with JC-1 in a multiparametric panel. | FITC or APC conjugates [6] [30] |
| CCCP (Carbonyl cyanide 3-chlorophenylhydrazone) | Mitochondrial uncoupler; used as a positive control for mitochondrial depolarization. | Provided in MitoProbe Kit or sourced separately [4] [46] |
Troubleshooting and Validation
A robust protocol includes validation and troubleshooting steps to ensure data quality.
- Positive Control: Always include a positive control for mitochondrial depolarization. Treat a sample of cells with 50-100 µM CCCP for 10-20 minutes at 37°C prior to JC-1 staining. This should result in a strong shift from red (J-aggregates) to green (monomers) fluorescence [4] [46].
- Gating Strategy: During flow cytometry analysis, first gate on the intact, single-cell population using forward and side scatter. Exclude PI-positive dead cells if co-staining is performed. Then, analyze the JC-1 signal within the viable cell population.
- Data Interpretation: Report the results as the ratio of red-to-green fluorescence intensity [4]. A decrease in this ratio indicates a loss of mitochondrial membrane potential. Avoid using median fluorescence intensity (MFI) of only one channel, as the ratiometric measurement is independent of mitochondrial size, shape, and density [4].
Beyond Basics: Validating JC-1 Data and Integrating it into Multiparametric Panels
Within the framework of investigating the JC-1 staining protocol for flow cytometry apoptosis detection, integrating mitochondrial membrane potential (ΔΨm) assessment with definitive apoptosis staging is paramount. The loss of ΔΨm is a hallmark early event in the intrinsic apoptosis pathway, preceding other biochemical and morphological changes [6] [10] [47]. This application note details a robust methodology for correlating data from the JC-1 dye, a sensitive indicator of ΔΨm, with the gold standard Annexin V/Propidium Iodide (PI) assay. This multiparametric flow cytometry approach provides a comprehensive view of the apoptotic cascade, from the initial mitochondrial depolarization to the externalization of phosphatidylserine and eventual loss of plasma membrane integrity [6] [47]. The protocol outlined herein is designed to yield critical insights into the mechanisms of cell death, which is essential for researchers and drug development professionals evaluating the efficacy and mode of action of novel therapeutic compounds.
Theoretical Foundation: The Apoptotic Cascade & Detection Windows
Apoptosis is a coordinated process characterized by a series of biochemical events. The intrinsic (mitochondrial) pathway is often initiated by cellular stress, leading to mitochondrial outer membrane permeabilization and a consequent decrease in ΔΨm [6] [47]. This depolarization is one of the earliest measurable events in this pathway. It is followed by the externalization of phosphatidylserine (PS) from the inner to the outer leaflet of the plasma membrane, an "eat-me" signal for phagocytic cells. The final stages involve caspase activation, DNA fragmentation, and a total loss of plasma membrane integrity [6] [48].
The power of correlating JC-1 with Annexin V/PI lies in their complementary detection windows for this cascade, as summarized in Table 1.
Table 1: Key Apoptosis Assays and Their Detection Windows
| Assay | Primary Measurable Parameter | Stage of Apoptosis Detected | Key Interpretative Readout |
|---|---|---|---|
| JC-1 | Mitochondrial Membrane Potential (ΔΨm) | Early (initiation of intrinsic pathway) [10] [47] | Shift from red (J-aggregates, high ΔΨm) to green fluorescence (monomers, low ΔΨm); often reported as red/green ratio [49] [10]. |
| Annexin V | Phosphatidylserine (PS) Externalization | Early-to-Mid (after ΔΨm loss) [6] [48] | Binding of fluorescently-conjugated Annexin V to PS on the cell surface. |
| Propidium Iodide (PI) | Plasma Membrane Integrity | Late Apoptosis / Necrosis [6] [48] [47] | Uptake of PI and binding to nucleic acids in cells with compromised membranes. |
The coordinated use of these assays allows for the discrimination of cell populations based on their progression through apoptosis, as visualized in the following signaling pathway.
Diagram 1: The intrinsic apoptosis pathway and corresponding detection windows for JC-1 and Annexin V/PI. JC-1 detects the early loss of ΔΨm, while Annexin V and PI bind to later-stage markers.
Staging Apoptosis with Annexin V/PI
The Annexin V/PI assay is a cornerstone of apoptosis detection because it differentiates between viable, early apoptotic, and late apoptotic/necrotic cells based on two fundamental cellular properties [6] [48] [47]:
- Viable, Non-Apoptotic Cells: Annexin V⁻ / PI⁻ (double negative). These cells have intact membranes and PS resides on the inner membrane leaflet.
- Early Apoptotic Cells: Annexin V⁺ / PI⁻. These cells have externalized PS but maintain an intact plasma membrane that excludes PI.
- Late Apoptotic/Dead Cells: Annexin V⁺ / PI⁺ (double positive). The membrane integrity is lost, allowing PI to enter.
- Necrotic Cells or Late-Stage Apoptosis: Annexin V⁻ / PI⁺. This population may represent cells that have undergone primary necrosis or are in the very terminal stages of apoptosis where PS exposure is lost.
It is crucial to note that the Annexin V assay detects higher levels of apoptosis because it identifies cells in an earlier stage of the pathway compared to methods like the comet assay, which are more effective in the late stages [48].
Integrated Experimental Protocol
This protocol describes a flow cytometry-based method for the simultaneous analysis of mitochondrial health and apoptosis staging from a single sample.
The Scientist's Toolkit: Essential Research Reagents
Table 2: Key Reagents and Materials for JC-1 & Annexin V/PI Staining
| Item | Function/Description | Critical Notes |
|---|---|---|
| JC-1 Dye (e.g., MitoProbe JC-1 Assay Kit [50] or Biotium Kit [10]) | A cationic carbocyanine dye that accumulates in mitochondria. Forms red fluorescent J-aggregates in high-ΔΨm conditions and green fluorescent monomers when ΔΨm is low. | The ratio of red-to-green fluorescence is a quantitative indicator of ΔΨm [10] [47]. |
| Annexin V, Fluorochrome-Conjugated (e.g., Annexin V-FITC) | Binds to phosphatidylserine (PS) exposed on the outer membrane of apoptotic cells. The fluorescence signal marks PS externalization [6] [30]. | Requires calcium in the binding buffer. |
| Propidium Iodide (PI) | A membrane-impermeant DNA intercalator. It stains nucleic acids in cells with compromised plasma membranes, marking late apoptotic and necrotic cells [6] [47]. | Must be used alongside Annexin V for accurate staging. |
| 10X Assay Buffer / Binding Buffer | Provides the optimal ionic and calcium conditions for Annexin V binding to PS [10]. | Must contain Ca²⁺. |
| Valinomycin or CCCP (Carbonyl cyanide m-chlorophenyl hydrazone) | Mitochondrial uncouplers used as a positive control for ΔΨm collapse. They induce complete mitochondrial depolarization [49] [50]. | Essential for validating JC-1 staining and setting flow cytometry compensation. |
| Flow Cytometer | Instrument with minimum 488 nm laser and filters for FITC (∼530 nm), PE (∼585 nm), and a long-pass filter for PI (>670 nm). A 405 nm laser can improve JC-1 aggregate detection [49] [51]. | Proper laser and filter configuration is critical for multicolor panel design [51]. |
Detailed Staining Procedure
The following workflow integrates JC-1 and Annexin V/PI staining for a cohesive experimental process.
Diagram 2: Integrated experimental workflow for the simultaneous staining of cells with JC-1 and Annexin V/PI.
Step-by-Step Protocol:
Cell Preparation and Staining:
- Harvest approximately 0.5 x 10⁶ cells per experimental condition and wash with PBS [6] [47].
- Resuspend the cell pellet in pre-warmed culture medium containing 1-2.5 μM JC-1. Vortex gently and incubate for 15-30 minutes at 37°C in the dark [49] [10] [50].
- Include a positive control for mitochondrial depolarization by pre-treating a sample with 10-50 μM CCCP or 1 μM Valinomycin for 5-15 minutes prior to JC-1 staining [49] [50].
Annexin V/Propidium Iodide Staining:
- After JC-1 incubation, centrifuge the cells and carefully remove the supernatant.
- Wash the cells once with 1X PBS to remove excess JC-1 dye.
- Gently resuspend the cell pellet in 100-200 μL of 1X Annexin Binding Buffer [10] [30].
- Add the recommended volume of fluorochrome-conjugated Annexin V (e.g., Annexin V-FITC or Annexin V-APC). Mix gently and incubate for 15 minutes at room temperature in the dark [30].
- Just prior to flow cytometry analysis, add Propidium Iodide to a final concentration of 0.5-1 μg/mL. Placing the samples on ice can help stabilize the staining.
Flow Cytometry Data Acquisition:
- Acquire data on a flow cytometer within 1 hour of PI addition.
- Instrument Setup: Use a 488 nm laser for excitation of JC-1 monomers, Annexin V-FITC, and PI. A 405 nm laser can be used as an alternative for exciting JC-1 aggregates, resulting in less spectral spillover and simplified compensation [49].
- Critical Filters:
- Compensation Controls: It is essential to run single-stained controls (JC-1 alone, Annexin V alone, PI alone) and an unstained control to properly set fluorescence compensation and correct for spectral overlap [49] [51].
Data Analysis and Correlation
Gating Strategy and Interpretation
Analyze JC-1 Data: Create a dot plot of JC-1 Red (Aggregate) fluorescence versus JC-1 Green (Monomer) fluorescence. Healthy cells will populate the high red/low green region, while apoptotic cells will shift towards high green and low red fluorescence. The ratio of median red-to-green fluorescence is a quantitative metric for ΔΨm [49] [10].
Analyze Annexin V/PI Data: Create a dot plot of Annexin V fluorescence versus PI fluorescence to identify the four distinct populations: viable (Annexin V⁻/PI⁻), early apoptotic (Annexin V⁺/PI⁻), late apoptotic (Annexin V⁺/PI⁺), and necrotic/damaged (Annexin V⁻/PI⁺) [6] [48] [47].
Correlate the Datasets: The most powerful analysis involves correlating the two measurements. For instance, gate on the early apoptotic (Annexin V⁺/PI⁻) population and display the JC-1 red/green profile for these cells. A strong correlation is demonstrated when the cells gated as early apoptotic by Annexin V/PI show a clear loss of JC-1 red fluorescence (ΔΨm collapse) compared to the viable cell population. This provides multilevel evidence supporting the activation of the intrinsic apoptosis pathway [6] [47].
The integrated protocol for correlating JC-1 and Annexin V/PI staining provides a powerful, multiparametric tool for dissecting the apoptotic process. By simultaneously monitoring the loss of mitochondrial membrane potential and the subsequent externalization of phosphatidylserine, researchers can obtain a dynamic and mechanistic understanding of cell death in response to various stimuli. This approach is particularly valuable in drug discovery and development, where elucidating the precise mode of action of cytotoxic or cytostatic compounds is critical. The methodology is robust, adaptable to various cell types, and when performed with attention to technical details such as compensation and proper controls, yields highly reproducible and informative data on cellular health and fate.
Within the framework of JC-1 staining protocol for flow cytometry apoptosis research, the accurate identification of cell subpopulations with depolarized mitochondria is a critical endpoint. Mitochondrial membrane potential (ΔΨM) is a key indicator of cellular health, and its loss is a hallmark of the intrinsic apoptosis pathway [6] [31]. While the JC-1 dye, with its shift from red J-aggregates to green monomers upon depolarization, is a powerful tool, the full potential of this assay is only realized through sophisticated gating strategies [31] [5]. This Application Note details a robust, fluorescence-based gating protocol to precisely distinguish and quantify cells with depolarized mitochondria, moving beyond traditional light-scatter methods that can be unreliable under conditions of cellular stress, such as those induced by cryopreservation or cytotoxic treatments [52].
Gating Strategy and Signaling Pathways
Logical Gating Workflow for JC-1 Analysis
The following diagram outlines the sequential gating strategy essential for accurately identifying cells with depolarized mitochondria, starting from the raw flow cytometry data.
Mitochondrial Signaling in Apoptosis
The biochemical pathway below illustrates how mitochondrial depolarization triggers apoptosis, connecting the cellular event measured by JC-1 to downstream apoptotic markers.
Experimental Protocols
Detailed Workflow for Multiparametric Analysis of Cell Death
This integrated protocol, adapted from a comprehensive flow cytometry methodology, allows for the concurrent assessment of mitochondrial membrane potential, cell death, and proliferation from a single sample [6] [47].
Sample Preparation and Staining
- Cell Seeding and Treatment: Seed approximately 0.5 - 1 x 10^6 cells per condition in an appropriate culture vessel. Apply the experimental treatment (e.g., apoptosis-inducing drug like 10 µM camptothecin or 5 µM staurosporine) for the desired duration [31] [47].
- Cell Harvest and Washing: Harvest both adherent and suspension cells, ensuring a single-cell suspension. Wash cells once with 1X Phosphate-Buffered Saline (PBS) and resuspend in pre-warmed culture medium for subsequent staining steps [6].
- JC-1 Staining: Incubate cells with 2 µM JC-1 dye for 15-30 minutes at 37°C, protected from light. For a positive control for depolarization, pre-treat a separate sample with a mitochondrial uncoupler like 10-50 µM Carbonyl cyanide m-chlorophenyl hydrazone (CCCP) or 1 µM valinomycin for 15-30 minutes prior to JC-1 staining [31] [5].
- Annexin V/Propidium Iodide (PI) Staining: After JC-1 staining, wash cells with 1X Annexin V Binding Buffer. Resuspend the cell pellet in Annexin V Binding Buffer containing a predetermined optimal concentration of fluorescently conjugated Annexin V (e.g., FITC-Annexin V) and PI (e.g., 0.5 - 1 µg/mL). Incubate for 15 minutes at room temperature in the dark [6] [47].
- Flow Cytometry Acquisition: Analyze samples on a flow cytometer equipped with 488 nm (for JC-1, FITC, PI) and 640 nm lasers (if using Annexin V-APC, for example). Acquire a minimum of 10,000 events per sample that fall within the live cell gate established using forward and side scatter or a viability dye [6] [52].
Critical Gating Steps
- Identify Singlets: Use a plot of Forward Scatter-Height (FSC-H) vs. Forward Scatter-Area (FSC-A) to gate on single cells and exclude doublets or aggregates.
- Gate Live Cells: Under cryobiological or treatment stress, light scatter properties can change significantly. As an alternative, gate on cells that are negative for PI fluorescence (or another viability dye) to accurately identify the intact cell population [52].
- Analyze Mitochondrial Status: On the singlet, live cell population, create a bivariate plot of JC-1 Green Fluorescence (e.g., FITC/530 nm) vs. JC-1 Red Fluorescence (e.g., PE/585 nm).
- Define Populations:
- Healthy Mitochondria (High ΔΨM): JC-1 Red (High) / JC-1 Green (Low to Medium).
- Depolarized Mitochondria (Low ΔΨM): JC-1 Red (Low) / JC-1 Green (High).
- Correlate with Apoptosis: On the depolarized population (from step 4), assess Annexin V binding to confirm progression into apoptosis.
Data Presentation and Analysis
Quantitative Analysis of Mitochondrial Depolarization
The following table summarizes key quantitative data and parameters that can be derived from the JC-1 gating strategy to interpret experimental outcomes.
Table 1: Key Quantitative Parameters from JC-1-based Mitochondrial Analysis
| Parameter | Description | Typical Readout | Biological Interpretation |
|---|---|---|---|
| % Cells with Depolarized Mitochondria | Percentage of live, single cells falling within the "JC-1 Red Low / Green High" gate. | 5-90% (Dose-dependent increase with apoptosis inducers) | Primary indicator of mitochondrial health and early apoptosis [31]. |
| Red/Green Fluorescence Ratio | Mean fluorescence intensity (MFI) ratio of JC-1 Red to JC-1 Green. | Decrease from >5 (healthy) to <1 (fully depolarized) | A quantitative, ratiometric measure of the average ΔΨM, less influenced by mitochondrial mass [31]. |
| Association with Annexin V+ Staining | Percentage of cells with depolarized mitochondria that are also Annexin V positive. | High correlation (>80%) expected in intrinsic apoptosis. | Confirms that mitochondrial depolarization is linked to the commitment to apoptotic cell death [6] [47]. |
| Subpopulation in Cell Cycle | Proportion of depolarized cells in G1, S, or G2 phases (if combined with BrdU/PI staining). | Varies by stimulus; e.g., S-phase arrest reported with ETC inhibitors [6] [47]. | Links metabolic stress to proliferation defects and cell cycle arrest. |
Advanced Technical Considerations for JC-1 Gating
Table 2: Technical Specifications and Reagent Solutions for JC-1 Assay
| Reagent / Equipment | Function / Specification | Application Note |
|---|---|---|
| JC-1 Dye (MitoProbe Kit) | Ratiometric fluorescent dye for ΔΨM; emits green (529 nm, monomer) and red (590 nm, J-aggregate) [31]. | Must be used on live, unfixed cells. The 488 nm laser is standard, but 405 nm excitation can reduce spillover and simplify compensation [5]. |
| Fluorescent-conjugated Annexin V | Binds to externalized phosphatidylserine on the outer leaflet of the plasma membrane, a marker for early apoptosis [6]. | Requires calcium-containing binding buffer. Should be paired with a viability dye like PI to classify early (Annexin V+/PI-) and late (Annexin V+/PI+) apoptotic cells. |
| Propidium Iodide (PI) | Membrane-impermeant DNA dye that stains nucleic acids in cells with compromised plasma membranes [6]. | Used as a viability probe to exclude dead and necrotic cells from the analysis of mitochondrial depolarization. |
| Mitochondrial Uncouplers (CCCP, Valinomycin) | Induce controlled collapse of ΔΨM, serving as essential technical controls for assay validation and fluorescence compensation [31] [5]. | A CCCP-treated sample (fully depolarized) is critical for setting the boundary between polarized and depolarized mitochondrial populations. |
| Flow Cytometer | Requires 488 nm laser and filters for FITC (530/30) and PE (585/42). Additional lasers (405 nm, 640 nm) enable multiplexing [6] [5]. | For complex panels, use single-color controls (e.g., JC-1 alone, Annexin V alone) for proper spectral compensation. |
The Scientist's Toolkit
Essential Research Reagent Solutions
A successful JC-1-based assay relies on a suite of carefully selected reagents and controls.
Table 3: Essential Reagents and Kits for Mitochondrial Analysis
| Item | Function | Example Product/Catalog Number |
|---|---|---|
| JC-1 Assay Kit | Optimized kit for flow cytometry, often including JC-1 dye and a mitochondrial uncoupler (e.g., CCCP) as a control. | MitoProbe JC-1 Assay Kit (M34152, Thermo Fisher Scientific) [31]. |
| Annexin V Staining Kit | Kit containing fluorescent Annexin V, PI, and binding buffer for standardized apoptosis detection. | eBioscience Annexin V Apoptosis Detection Kit (e.g., FITC conjugate) [6]. |
| Cell Proliferation Dye | Fluorescent cell tracing dye for monitoring cell division and proliferation capacity in parallel. | CellTrace Violet Cell Proliferation Kit (Thermo Fisher Scientific) [6] [47]. |
| BrdU/PI Staining Kit | For detailed cell cycle analysis, identifying phases (G1, S, G2) and DNA synthesis intensity. | BrdU Flow Kit (BD Biosciences) [6] [47]. |
| Flow Cytometry Compensation Beads | Antibody capture beads used to set up accurate spectral compensation for multicolor panels. | UltraComp eBeads Compensation Beads (Thermo Fisher Scientific) or similar. |
Mitochondrial membrane potential (ΔΨm) serves as a critical indicator of cellular health and early apoptosis. The carbocyanine dye JC-1 enables ratiometric measurement of ΔΨm through its concentration-dependent formation of fluorescent monomers (green) and J-aggregates (red). While traditional flow cytometry protocols utilize 488 nm excitation, recent investigations demonstrate that alternative excitation at 405 nm significantly improves signal discrimination by reducing fluorescence spillover. This application note provides a comprehensive comparison of these excitation methodologies, detailed experimental protocols for apoptosis detection, and technical considerations for optimizing JC-1 staining in flow cytometric analysis of drug-induced apoptosis.
JC-1 (5,5',6,6'-tetrachloro-1,1',3,3'-tetraethylbenzimidazolylcarbocyanine iodide) is a lipophilic, cationic dye that exhibits potential-dependent accumulation in mitochondria [4]. This unique property enables discrimination between energized and de-energized mitochondria based on fluorescence emission shifts:
- At low membrane potential (depolarized mitochondria): JC-1 exists predominantly as monomers emitting green fluorescence (emission maximum ~529 nm) [4] [53]
- At high membrane potential (polarized mitochondria): JC-1 forms J-aggregates emitting red fluorescence (emission maximum ~590 nm) [4] [53]
The ratio of red-to-green fluorescence intensity provides a quantitative measure of mitochondrial polarization that is independent of mitochondrial size, shape, and density [4]. During early apoptosis, disruption of ΔΨm causes a measurable decrease in this ratio, making JC-1 a valuable tool for detecting initial stages of programmed cell death [4] [6].
The following table summarizes key spectral properties of JC-1 under different excitation conditions:
| Parameter | 488 nm Excitation | 405 nm Excitation |
|---|---|---|
| Monomer Emission Intensity | High (reference) | ~5-fold lower [5] |
| J-aggregate Emission Intensity | High (reference) | ~16-fold lower [5] |
| Spillover of Monomer Fluorescence into J-aggregate Detection Channel | Significant (requires ~30% compensation) [5] | Minimal (eliminates compensation need) [5] |
| Signal Discrimination | Moderate | Excellent [5] |
| Optimal Application | Standard apoptosis screening | High-sensitivity detection of subtle ΔΨm changes [5] |
Investigation of JC-1 fluorescence using spectrofluorimetry reveals that although 405 nm excites both JC-1 monomers and J-aggregates less efficiently than 488 nm, it produces J-aggregate signals with considerably less spillover from dye monomer fluorescence [5]. The emission spectra of 405-nm- and 488-nm-excited J-aggregates are perfectly superimposed when normalized, confirming identical spectral properties despite different excitation efficiencies [5]. This reduced spillover eliminates the necessity for electronic fluorescence compensation in flow cytometric analysis, simplifying data acquisition and interpretation [5] [54].
Materials and Reagents
Research Reagent Solutions
The table below outlines essential materials for JC-1-based mitochondrial membrane potential assessment:
| Item | Function/Description | Example Products/Sources |
|---|---|---|
| JC-1 Dye | Fluorescent ΔΨm indicator; available as bulk chemical or optimized kit | MitoProbe JC-1 Assay Kit (Thermo Fisher, M34152) [4]; JC-1 (Iodide) (STEMCELL, #70210) [55] |
| Mitochondrial Uncoupler | Positive control for ΔΨm disruption; validates assay performance | CCCP (carbonyl cyanide m-chlorophenyl hydrazone) [4]; Valinomycin (K+ ionophore) [5] [54] |
| Apoptosis Inducer | Experimental control for apoptosis induction | Staurosporine [55] [8]; Camptothecin [4] |
| Buffer System | Maintains optimal cell health during staining | HEPES-buffered Imaging Buffer [8]; 1x PBS [4] |
| Cell Lines | Model systems for apoptosis research | Jurkat (human T-cell leukemia) [4] [8]; U937 (human leukemic monocyte lymphoma) [54]; HL-60 (human promyelocytic leukemia) [4] |
Experimental Protocols
Standard JC-1 Staining Protocol for Flow Cytometry
This protocol is optimized for detection using 488 nm excitation and can be adapted for 405 nm excitation with minimal modification:
Day 1: Cell Preparation and Treatment
- Cell Harvesting: Collect approximately 0.5-1 × 10^6 cells per experimental condition by gentle centrifugation (300 × g for 5 minutes) [6]
- Apoptosis Induction: Resuspend cells in fresh culture medium containing apoptosis inducer (e.g., 5-10 μM staurosporine or camptothecin). Incubate for 2-4 hours at 37°C in a 5% CO₂ incubator [4] [55]
- Positive Control Preparation: Treat control cell aliquot with mitochondrial uncoupler (1 μM valinomycin or 50-100 μM CCCP/FCCP) for 15-60 minutes at 37°C to collapse ΔΨm [5] [8]
Day 2: JC-1 Staining and Flow Cytometry
- JC-1 Working Solution Preparation: Dissolve JC-1 in DMSO to create a stock solution, then dilute in pre-warmed serum-free culture medium or buffer to a final concentration of 2-2.5 μM [5] [4] [8]
- Cell Staining:
- Sample Washing and Analysis:
- Centrifuge cells (300 × g, 5 minutes) and carefully remove supernatant
- Resuspend in pre-warmed PBS or HEPES-buffered imaging buffer [8]
- Analyze immediately by flow cytometry using appropriate excitation and emission settings
Figure 1: JC-1 Excitation Pathways and Emission Profiles. The diagram illustrates multiple laser excitation options for JC-1 fluorescence. While 488 nm excitation efficiently detects both monomer and aggregate forms, 405 nm excitation provides improved signal separation, and 561 nm excitation specifically targets J-aggregates with minimal monomer interference [5] [54].
Flow Cytometer Configuration:
- 488 nm Excitation Setup:
405 nm Excitation Setup:
- JC-1 Monomer: 405 nm laser with 530/30 nm bandpass filter
- J-aggregates: 405 nm laser with 585/42 nm bandpass filter
- Minimal compensation required due to reduced spectral overlap [5]
Multilaser Excitation Setup (Optimal Configuration):
- JC-1 Monomer: 488 nm laser with 530/30 nm bandpass filter
- J-aggregates: 561 nm laser with 585/16 nm bandpass filter
- Eliminates compensation requirements by exciting aggregates with separate laser [54]
Data Analysis and Interpretation
Gating Strategy:
Quantitative Analysis:
- Calculate percentage of cells in each population
- Determine mean fluorescence intensity (MFI) of red and green channels
- Compute red/green fluorescence ratio for quantitative comparison of ΔΨm [4]
Figure 2: Mitochondrial Apoptosis Pathway and JC-1 Detection. The diagram illustrates the key events in early apoptosis, highlighting where JC-1 detects ΔΨm collapse, which occurs upstream of caspase activation and other terminal apoptosis events [4] [6].
Application in Multiparameter Apoptosis Analysis
JC-1 staining can be effectively combined with other apoptosis markers for comprehensive cell death assessment:
Three-Color Apoptosis Panel Example:
- Mitochondrial Membrane Potential: JC-1 (using 488 nm + 561 nm excitation)
- Phosphatidylserine Externalization: Pacific Blue annexin V (405 nm excitation) [54]
- Oxidative Stress: CellROX Deep Red Reagent (637 nm excitation) [54]
This multiparameter approach enables simultaneous detection of early (ΔΨm collapse) and mid-stage (PS externalization) apoptotic events within the same cell population, providing enhanced mechanistic insights into cell death pathways [6] [54].
Technical Considerations and Troubleshooting
Critical Optimization Parameters
- JC-1 Concentration: Optimal staining typically achieved at 2-5 μM; higher concentrations may increase background [4] [8]
- Incubation Conditions: Maintain 37°C during staining to preserve mitochondrial function [4]
- Analysis Timing: Analyze immediately after staining as JC-1 distribution may change over time [4]
- Cell Viability: Maintain >90% viability for accurate ΔΨm assessment [6]
- Drug Screening: Enhanced detection of subtle ΔΨm changes in response to pharmacological agents [5]
- Multiparameter Experiments: Reduced compensation requirements free up fluorescence channels for additional probes [54]
- High-Throughput Applications: Simplified data acquisition and analysis workflow [5]
Limitations and Alternative Approaches
- Reduced Brightness: 405 nm excitation produces lower overall fluorescence intensity compared to 488 nm [5]
- Instrument Requirement: Requires flow cytometer with violet laser capability [5]
- Alternative Dyes: For instruments without violet laser, consider TMRE or TMRM as single-emission ΔΨm probes [8]
The implementation of 405 nm excitation for JC-1-based mitochondrial membrane potential assessment provides significant technical advantages over traditional 488 nm excitation, particularly through reduced fluorescence spillover and elimination of compensation requirements. This enhanced methodology enables more sensitive detection of early apoptotic events, which is crucial for accurate assessment of compound toxicity in drug development and precise mechanistic studies in basic research. The protocols detailed in this application note provide researchers with robust methodologies for implementing this improved approach in both standard and multiparameter apoptosis assays.
This application note provides a detailed protocol for a robust, multiparametric flow cytometry workflow that integrates the assessment of mitochondrial membrane potential using JC-1 with key assays for cell cycle distribution and proliferation. By enabling the simultaneous acquisition of up to eight distinct cellular parameters from a single sample, this methodology offers a comprehensive framework for deciphering the complex interplay between metabolic state, cell death, and proliferative capacity in response to pharmacological or genetic treatments. The outlined approach is versatile for various cell types and provides a systems-level perspective crucial for fundamental research and pre-clinical drug development.
Understanding the biological mechanisms behind changes in cell numbers during in vitro experiments is a cornerstone of biomedical research. These dynamics are primarily governed by the balance between cell death and proliferation [6]. A decrease in cell number, for instance, could result from either diminished proliferation or increased cell death, and distinguishing between these is critical for deciphering the mode of action of any treatment.
Mitochondrial membrane potential (ΔΨm) is a key indicator of cellular health and a sentinel of early apoptosis. Its disruption is a hallmark of the intrinsic apoptotic pathway, often preceding other biochemical changes [56] [1]. The JC-1 dye provides a powerful ratiometric measure of ΔΨm, forming red-fluorescent J-aggregates in healthy, polarized mitochondria and shifting to green-fluorescent monomers upon depolarization [56] [10].
This integrated protocol moves beyond single-parameter analysis by combining JC-1 staining with well-established techniques:
- Cell Cycle Analysis using BrdU (bromodeoxyuridine) and propidium iodide (PI) to determine the proportion of cells in G1, S, and G2/M phases [6].
- Proliferation Tracking using CellTrace Violet (a CFSE-like dye) to monitor cell division and calculate proliferation rates [6].
- Apoptosis Detection using annexin V and PI to distinguish between healthy, early apoptotic, late apoptotic, and necrotic cell populations [6].
This unified workflow facilitates a detailed view of the cellular state, revealing whether observed changes in cell numbers are driven by metabolic stress, cell cycle arrest, or the initiation of programmed cell death.
The Scientist's Toolkit: Essential Reagents and Equipment
The successful implementation of this multiparametric assay relies on a specific set of reagents and instruments. The table below details the core components and their functions within the experimental workflow.
Table 1: Key Research Reagent Solutions and Equipment
| Item | Function/Description | Key Details |
|---|---|---|
| JC-1 Dye | Ratiometric fluorescent indicator of mitochondrial membrane potential (ΔΨm). | Forms red J-aggregates in polarized mitochondria (Ex/Em: 585/590 nm) and green monomers in depolarized mitochondria (Ex/Em: 510/527 nm) [56] [10]. |
| Carbonyl cyanide m-chlorophenyl hydrazone (CCCP) | Mitochondrial uncoupler; used as a positive control for membrane depolarization. | Collapses the proton gradient, eliminating ΔΨm and validating JC-1 staining [56] [1]. |
| Annexin V Conjugate | Detects phosphatidylserine (PS) externalization on the outer leaflet of the plasma membrane, an early marker of apoptosis. | Used in conjunction with PI to differentiate stages of cell death [6]. |
| Propidium Iodide (PI) | Impermeant DNA dye that stains cells with compromised membrane integrity (late apoptosis/necrosis). Also used for cell cycle analysis with BrdU. | Distinguishes viable from non-viable cells; indicates DNA content in cell cycle assays [6]. |
| BrdU (Bromodeoxyuridine) | Thymidine analog incorporated into DNA during synthesis; labels cells in S-phase. | Allows for identification of actively proliferating cells and detailed cell cycle analysis when combined with PI [6]. |
| CellTrace Violet | Fluorescent cell proliferation dye that dilutes equally with each cell division. | Tracks proliferation history, number of cell generations, and calculates proliferation rates [6]. |
| Flow Cytometer | Instrument for multiparametric analysis of individual cells in suspension. | Requires a 488 nm laser and filters for FITC (530 nm) and PE (585 nm) to detect JC-1 monomers and aggregates, respectively. A 405 nm laser is beneficial for improved JC-1 aggregate detection and a violet laser for CellTrace Violet [6] [5]. |
Integrated Experimental Workflow and Signaling Pathways
The relationship between the measured parameters is intrinsically linked. Mitochondrial depolarization can trigger the intrinsic apoptosis pathway, leading to phosphatidylserine externalization. Simultaneously, mitochondrial dysfunction can impair energy production, reducing proliferation rates and potentially causing cell cycle arrest. The following diagram illustrates the logical sequence of these cellular events and the corresponding assays used to detect them.
Diagram 1: Logical workflow linking cellular events and their corresponding detection assays.
Detailed Integrated Staining Protocol
This section provides a step-by-step methodology for the simultaneous staining of a single sample for analysis by flow cytometry. The entire procedure takes approximately 5 hours [6].
Sample Preparation and Proliferation Labeling
- Cell Culture: Culture cells (e.g., ~0.5 x 10⁶ per sample) under standard conditions (37°C, 5% CO₂) in appropriate medium.
- CellTrace Violet Staining: Prior to treatments, harvest and wash cells in PBS. Resuspend the cell pellet in pre-warmed PBS containing a recommended concentration of CellTrace Violet (e.g., 1-5 µM) and incubate for 20 minutes at 37°C. Quench the reaction by adding 5 volumes of complete culture medium and incubate for 5 minutes. Pellet cells and resuspend in fresh medium [6].
- Treatment: Seed the stained cells and apply the experimental treatments (e.g., pharmacological compounds, genetic modifications) for the desired duration.
Combined Staining Procedure
- BrdU Pulse: Shortly before the end of the treatment period (e.g., 1-2 hours), add BrdU to the culture medium to label cells actively synthesizing DNA [6].
- Harvesting: Harvest cells (both adherent and suspension) using gentle methods. Combine all samples, including untreated and positive controls, into a single tube. Wash cells with warm PBS and centrifuge at 400 × g for 5 minutes.
- Annexin V Staining: Resuspend the cell pellet in annexin V binding buffer containing a fluorescently conjugated annexin V reagent. Incubate for 15-20 minutes at room temperature in the dark. Do not wash.
- JC-1 Staining: Add JC-1 dye directly to the cell suspension to a final concentration of 2 µM. Mix gently and incubate for 15-30 minutes at 37°C, 5% CO₂ in the dark [1].
- Wash: Add 2 mL of warm PBS to the tube and centrifuge at 400 × g for 5 minutes. Aspirate the supernatant.
- Fixation and Permeabilization (for BrdU/PI): Fix and permeabilize the cells using a suitable kit or buffer (e.g., 70% ethanol added drop-wise while vortexing, followed by incubation on ice). This step is required for subsequent intracellular BrdU and DNA staining.
- BrdU/PI Staining: Stain the fixed/permeabilized cells with a fluorescent anti-BrdU antibody according to the manufacturer's instructions. Finally, resuspend the cell pellet in a solution containing propidium iodide (PI) and RNase to stain total DNA and degrade RNA, respectively. Incubate for 15-30 minutes at room temperature in the dark [6].
- Acquisition: Analyze the samples on a flow cytometer equipped with 488 nm and 405 nm (or 355 nm) lasers. Collect at least 10,000 events per sample.
Table 2: Key Staining Parameters and Controls
| Step | Reagent | Concentration | Incubation | Critical Note |
|---|---|---|---|---|
| Proliferation | CellTrace Violet | 1-5 µM | 20 min, 37°C | Perform before experimental treatment. |
| S-phase Label | BrdU | Protocol-dependent | 1-2 hr, 37°C | Pulse before harvesting. |
| Apoptosis | Annexin V | Protocol-dependent | 15-20 min, RT | Use calcium-containing binding buffer; no post-stain wash. |
| Viability | Propidium Iodide (PI) | e.g., 1 µg/mL | 15-30 min, RT | Added during DNA staining step. |
| ΔΨm | JC-1 | 2 µM | 15-30 min, 37°C | Protect from light; use fresh stock. |
| Positive Control | CCCP | 50 µM | 5 min, 37°C | Pre-incubate before JC-1 addition to depolarize mitochondria [1]. |
Data Analysis and Interpretation
After data acquisition, analyze the fluorescence signals using flow cytometry software. The ratiometric nature of JC-1 (red/green fluorescence) allows for clear discrimination of cells with high and low ΔΨm. The table below summarizes how to interpret the combined data from the different assays.
Table 3: Multiparametric Data Interpretation Guide
| Assay | Key Readout | Normal State | Indicative Change | Biological Interpretation |
|---|---|---|---|---|
| JC-1 | Red/Green Fluorescence Ratio | High Ratio | Decreased Ratio | Early mitochondrial depolarization; initiation of intrinsic apoptosis pathway [56]. |
| Annexin V/PI | Annexin V+ / PI- Population | Low | Increased | Early apoptosis (phosphatidylserine exposure, intact membrane) [6]. |
| Annexin V/PI | Annexin V+ / PI+ Population | Low | Increased | Late apoptosis (loss of membrane integrity) [6]. |
| BrdU/PI | % Cells in S-phase | Baseline | Decreased | Inhibition of DNA synthesis; reduced proliferation. |
| BrdU/PI | % Cells in S-phase | Baseline | Increased (with arrest) | S-phase arrest, potentially due to replication stress or DNA damage [6]. |
| CellTrace Violet | Fluorescence Intensity Dilution | Undivided (Bright) | Increased Dilution | Active cell proliferation over the treatment period. |
| CellTrace Violet | Proliferation Index | >1 | Decreased towards 1 | Reduced divisional capacity. |
Technical Considerations and Advanced Applications
- JC-1 Excitation Wavelength: While JC-1 is typically excited at 488 nm, using a 405 nm laser can significantly reduce spectral spillover from monomers into the J-aggregate (red) detection channel, thereby improving data resolution and potentially eliminating the need for fluorescence compensation [5].
- Assay Expansion: This core workflow can be expanded to include other parameters. For instance, incorporating caspase activity probes can provide even earlier detection of apoptosis initiation than annexin V staining. Similarly, γH2AX staining can be added to directly assess DNA damage levels, and dyes like DCFDA can be used to measure reactive oxygen species [6].
- Alternative Dyes: JC-10, a derivative of JC-1, offers higher solubility and an enhanced signal-to-background ratio in some cell types, potentially providing greater sensitivity for detecting subtle changes in ΔΨm [57].
The integrated protocol detailed in this application note empowers researchers to move beyond simplistic, single-parameter analysis. By concurrently evaluating mitochondrial health, apoptosis, cell cycle progression, and proliferation, this method provides a powerful, multidimensional dataset from a single biological sample. This comprehensive view is indispensable for accurately characterizing cellular responses to therapeutic candidates, understanding mechanisms of toxicity, and validating targets in drug discovery pipelines.
Within the realm of apoptosis detection research, particularly for drug development, assessing mitochondrial health is a critical parameter. The mitochondrial membrane potential (ΔΨm) is a key indicator of mitochondrial function and its disruption is an early event in the intrinsic apoptotic pathway [4]. This application note provides a detailed comparative analysis of three fluorescent dyes widely used for measuring ΔΨm in flow cytometry: JC-1, TMRE, and TMRM. Framed within the context of optimizing a JC-1 staining protocol for apoptosis detection, this document outlines the principles, advantages, and practical protocols for each dye, empowering researchers to select the most appropriate tool for their experimental needs.
Dye Principles and Key Characteristics
Mechanism of Action
All three dyes are lipophilic, cationic probes that passively distribute across cellular membranes and accumulate in the mitochondrial matrix in a ΔΨm-dependent manner, driven by the negative charge inside the mitochondria [58] [59]. However, their specific fluorescence properties and mechanisms for reporting on ΔΨm differ.
- JC-1 (5,5',6,6'-tetrachloro-1,1',3,3'-tetraethylbenzimidazolylcarbocyanine iodide): JC-1 is a ratiometric dye with a unique concentration-dependent fluorescence shift. In healthy cells with high ΔΨm, JC-1 accumulates in mitochondria and forms aggregates (J-aggregates) that emit red fluorescence (emission maximum ~590 nm). In apoptotic or unhealthy cells with low ΔΨm, JC-1 remains in the cytoplasm in a monomeric form that emits green fluorescence (emission maximum ~529 nm) [4] [58]. The ratio of red to green fluorescence provides a quantitative measure of ΔΨm that is relatively independent of mitochondrial size, shape, and density [4].
- TMRE (Tetramethylrhodamine Ethyl Ester) & TMRM (Tetramethylrhodamine Methyl Ester): TMRE and TMRM are single-wavelength, Nernstian dyes. They enter cells and accumulate in polarized mitochondria, exhibiting strong orange-red fluorescence (Ex/Em ~549/574 nm for TMRE, ~548/573 nm for TMRM) [58]. A decrease in ΔΨm leads to a release of the dye from the mitochondria and a corresponding decrease in cellular fluorescence intensity [59]. Of the two chemically similar dyes, TMRE is brighter, while TMRM exhibits the lowest mitochondrial binding and minimal inhibition of the electron transport chain, making it preferable for long-term or highly quantitative studies [58].
Comparative Analysis of Dye Properties
Table 1: Quantitative Comparison of JC-1, TMRE, and TMRM
| Parameter | JC-1 | TMRE | TMRM |
|---|---|---|---|
| Detection Method | Ratiometric (Aggregate/Monomer) | Intensity-based | Intensity-based |
| Excitation (Peak) | 498 nm (405 nm can be optimal) [5] | ~549 nm | ~548 nm |
| Emission (Peak) | 525 nm (Monomer), 595 nm (Aggregate) [4] | ~574 nm | ~573 nm |
| Flow Cytometry Channels | FITC (Monomer), PE (Aggregate) | PE | PE |
| Compatible with 488 nm laser | Yes (standard) | Yes | Yes |
| Quantitative Robustness | High (ratiometric) | Moderate (requires careful controls) | Moderate (requires careful controls) |
| Key Advantage | Ratiometric measurement, internal control | Bright signal | Minimal functional impact on mitochondria |
| Primary Disadvantage | Complex protocol, potential for misinterpretation [59] | Can suppress respiration at high concentrations [59] | Less bright than TMRE |
Table 2: Advantages and Limitations at a Glance
| Dye | Advantages | Limitations |
|---|---|---|
| JC-1 | - Ratiometric measurement is insensitive to dye loading, cell size, and mitochondrial density [4]. - Clear distinction between high and low ΔΨm populations. - Well-established for apoptosis studies. | - More complex staining and analysis protocol. - J-aggregate formation can be influenced by factors other than ΔΨm, such as H2O2 and mitochondrial morphology [59]. - Requires careful compensation in flow cytometry when using 488 nm excitation [5]. |
| TMRE/TMRM | - Simple intensity-based readout. - Reversible binding allows for dynamic studies. - TMRM has minimal impact on mitochondrial function [58]. - Generally more photostable than JC-1. | - Intensity-based signal is sensitive to variations in dye loading, cell size, and mitochondrial mass. - Requires careful titration and normalization controls. - Can inhibit mitochondrial respiration at higher concentrations (>50 nM), with TMRE having the most pronounced effect [59]. |
Detailed Experimental Protocols
JC-1 Staining Protocol for Flow Cytometry Apoptosis Detection
The following protocol is optimized for the detection of early apoptosis in cell lines (e.g., Jurkat, HL60) via flow cytometry, using a 488 nm laser for excitation.
The Scientist's Toolkit: Key Research Reagent Solutions
- JC-1 Dye: Available as a bulk reagent (e.g., Thermo Fisher Scientific T3168) or in optimized assay kits like the MitoProbe JC-1 Assay Kit (Thermo Fisher Scientific M34152), which includes a mitochondrial depolarization control (CCCP) [4].
- Apoptosis Inducer: Camptothecin (10 µM for 4 hours) or Staurosporine (5 µM for 2 hours) can be used as a positive control [4].
- Flow Cytometer: Equipped with a 488 nm laser and standard FITC (530/30 nm) and PE (585/42 nm) filters [4].
- Dimethyl Sulfoxide (DMSO): High-quality, sterile DMSO for preparing dye stock solutions.
- Assay Buffer: 1X Phosphate-Buffered Saline (PBS), optionally supplemented with 10 mM glucose.
Step-by-Step Procedure:
- Cell Preparation and Treatment: Harvest approximately 0.5 - 1 x 10⁶ cells per experimental condition. Include an unstained control and a positive control for depolarization (e.g., treat cells with 50 µM Carbonyl cyanide m-chlorophenyl hydrazone (CCCP) for 10-20 minutes at 37°C) [4].
- JC-1 Staining Solution: Prepare a 2X JC-1 working solution in pre-warmed assay buffer or culture medium. The final concentration for staining is typically 2-5 µM. For the MitoProbe JC-1 Assay Kit, use 2 µM as recommended [4].
- Staining Incubation: Resuspend the cell pellet in the JC-1 working solution. Incubate for 15-30 minutes at 37°C, protected from light [4].
- Washing and Resuspension: After incubation, centrifuge the cells (300-400 x g for 5 minutes) and carefully remove the supernatant. Gently resuspend the cell pellet in pre-warmed assay buffer.
- Flow Cytometry Acquisition: Keep the cells on ice and protected from light. Acquire data on the flow cytometer within 1 hour. Use the unstained cells to set voltage and detect autofluorescence. Use the CCCP-treated cells to adjust fluorescence compensation between the FITC and PE channels, as the green monomer signal will spill over into the red channel when excited at 488 nm [5].
TMRE/TMRM Staining Protocol for Flow Cytometry
This protocol provides a general guideline for using TMRE or TMRM, which must be titrated for each specific cell type.
Step-by-Step Procedure:
- Dye Titration: Prior to the experiment, perform a titration to determine the optimal dye concentration (typically 20-200 nM) that provides a strong signal without causing artifactual respiration suppression [59].
- Cell Staining: Resuspend cells in pre-warmed culture medium containing the optimized concentration of TMRE or TMRM. Incubate for 15-30 minutes at 37°C, protected from light.
- Washing (Optional): For TMRE, which is more reversible, a quick wash may be performed. For TMRM, some protocols recommend analysis without washing to maintain equilibrium. Follow the specific recommendations for your experimental setup.
- Flow Cytometry Acquisition: Analyze cells immediately using the PE channel. The median fluorescence intensity (MFI) of the population is proportional to the ΔΨm. Include CCCP-treated controls to define the background signal from depolarized mitochondria.
Data Analysis and Interpretation
Analyzing JC-1 Data
For JC-1, the key parameter is the ratio of red (J-aggregate) to green (monomer) fluorescence. This can be visualized on a density plot of PE (Y-axis) vs. FITC (X-axis) fluorescence.
- Healthy Cells: Appear in the upper-left or upper-right quadrant (high PE, low-to-medium FITC).
- Apoptotic/Unhealthy Cells: Shift to the lower-right quadrant (low PE, high FITC).
The ratio of the MFI in the PE channel to the MFI in the FITC channel provides a quantitative, population-level metric for ΔΨm. A decrease in this ratio indicates mitochondrial depolarization. Using 405 nm excitation, if available, can minimize spillover and simplify analysis by reducing the need for compensation [5].
Analyzing TMRE/TMRM Data
For TMRE and TMRM, analysis is based on a histogram of fluorescence intensity in the PE channel.
- Healthy Cells: Exhibit a bright fluorescence peak (right-shifted).
- Apoptotic/Unhealthy Cells: Exhibit a dim fluorescence peak (left-shifted).
The median fluorescence intensity of the test sample is compared to that of the CCCP-treated control and the untreated control. A leftward shift or a decrease in MFI indicates a loss of ΔΨm.
The choice between JC-1, TMRE, and TMRM depends on the specific research question and technical requirements.
- For robust, quantitative screening in apoptosis research, JC-1 is highly recommended. Its ratiometric nature corrects for artifacts and provides a reliable measure of ΔΨm shifts, making it ideal for drug screening applications where comparing multiple treatments is necessary [6] [4].
- For kinetic studies or when monitoring dynamic changes in ΔΨm, TMRM is the preferred tool. Its minimal impact on mitochondrial function and reversible binding allow for real-time observation of ΔΨm fluctuations without perturbing the system [58] [59].
- When maximum signal brightness is required and potential respiratory effects are not a primary concern, TMRE can be considered.
For researchers framing their work within a thesis on JC-1 staining protocol optimization, this document provides a foundational protocol and a clear rationale for its use against other common tools. Validating the JC-1 protocol with a known apoptosis inducer and the mitochondrial uncoupler CCCP is essential to establish assay robustness and accuracy.
Conclusion
JC-1 staining provides a powerful, ratiometric method for detecting early apoptosis through changes in mitochondrial membrane potential, offering a critical window into cellular health before irreversible commitment to cell death. Mastering this technique—from foundational principles and a robust staining protocol to advanced troubleshooting and validation—empowers researchers to generate highly reliable data. Integrating JC-1 into multiparametric flow cytometry panels with Annexin V/PI, cell cycle markers, and proliferation dyes creates a comprehensive picture of cellular fate decisions. As research advances, the application of optimized JC-1 protocols will continue to be indispensable in elucidating disease mechanisms, particularly in cancer and neurodegeneration, and in accelerating the development of novel therapeutics that target mitochondrial pathways.
References
- 1. Analysis of the Mitochondrial Membrane Potential Using ... [https://pmc.ncbi.nlm.nih.gov/articles/PMC6343665/]
- 2. The mitochondrial (Δψm) in membrane ; an... potential apoptosis [https://link.springer.com/article/10.1023/A:1022945107762]
- 3. Role of Mitochondrial and Lactate... Membrane Potential [https://pubmed.ncbi.nlm.nih.gov/34825878/]
- 4. JC-1 Dye for Mitochondrial Membrane Potential [https://www.thermofisher.com/us/en/home/life-science/cell-analysis/cell-viability-and-regulation/apoptosis/mitochondria-function/jc-1-dye-mitochondrial-membrane-potential.html]
- 5. JC-1: alternative excitation wavelengths facilitate ... [https://www.nature.com/articles/cddis2012171]
- 6. From proliferation to mitochondrial membrane potential ... [https://pmc.ncbi.nlm.nih.gov/articles/PMC11933298/]
- 7. Guidelines on experimental methods to assess ... [https://www.nature.com/articles/s41418-017-0020-4]
- 8. JC-1 MitoMP Detection Kit [https://www.dojindo.com/products/MT09/]
- 9. Ratiometric high-resolution imaging of JC-1 fluorescence ... [https://pmc.ncbi.nlm.nih.gov/articles/PMC3192276/]
- 10. JC-1 Mitochondrial Membrane Potential Detection Kit [https://biotium.com/product/jc-1-mitochondrial-membrane-potential-detection-kit/]
- 11. Theoretical analysis on ratiometric fluorescent indicators ... [https://www.sciencedirect.com/science/article/pii/S1011134404001733]
- 12. Mitochondrial Apoptosis Detection Kit (JC-1) [https://www.genscript.com/kit/L00291-Mitochondrial_Apoptosis_Detection_Kit_JC_1_.html]
- 13. Mitochondrial membrane potential - PMC [https://pmc.ncbi.nlm.nih.gov/articles/PMC5792320/]
- 14. is caspase-dependent and does... Mitochondrial cytochrome c release [https://www.nature.com/articles/1204545?error=cookies_not_supported]
- 15. Mitochondrial Release of Apoptosis-Inducing Factor and ... [https://pmc.ncbi.nlm.nih.gov/articles/PMC1850399/]
- 16. Mechanisms of cytochrome c release from mitochondria [https://www.nature.com/articles/4401950]
- 17. Flow Cytometry Sample Preparation: Protocols for Cell ... [https://www.bosterbio.com/protocol-and-troubleshooting/flow-cytometry-sample-preparation?srsltid=AfmBOor-y49FBGFunvMlI7CXvIHrO5yWtQuFauAWRH7YfS7aB6_hpADn]
- 18. How To Prepare a Good Single Cell Suspension [https://www.appliedcytometry.com/articles/good-single-cell-suspension/]
- 19. BestProtocols: Cell Preparation for Flow Cytometry Protocols [https://www.thermofisher.com/us/en/home/references/protocols/cell-and-tissue-analysis/protocols/cell-preparation-flow-cytometery.html]
- 20. Adherent Cell Culture Protocol [https://www.thermofisher.com/us/en/home/references/gibco-cell-culture-basics/cell-culture-protocols/subculturing-adherent-cells.html]
- 21. Cell culture and maintenance protocol [https://www.abcam.com/en-us/technical-resources/protocols/cell-culture-and-maintenance-protocol]
- 22. JC-1 Experiment Common Questions and Solutions [https://www.elabscience.com/resources/cell-function-technical-topics/1845?srsltid=AfmBOop0Dt0xFrG9YzUddwBvbb7XvWfP0znbOqhSd7wzq809J5ohxqZH]
- 23. Establishment of a low-temperature immersion method for ... [https://plantmethods.biomedcentral.com/articles/10.1186/s13007-025-01419-z]
- 24. Nanosecond pulsed electric field applications rejuvenate ... [https://pmc.ncbi.nlm.nih.gov/articles/PMC12209942/]
- 25. Analysis of the Mitochondrial Membrane Potential Using ... [https://en.bio-protocol.org/en/bpdetail?id=3128&type=0]
- 26. JC-1 (CBIC2) | Mitochondrial Membrane Potential Probe [https://www.medchemexpress.com/JC-1.html?srsltid=AfmBOoqTx6yNRtaxQ_JvprSeWhoI_9glgANnEmzdqPN5-AXzqyYOupnV]
- 27. JC-1 Fluorescent Mitochondrial Membrane Assay | 911 [https://www.antibodiesinc.com/products/mitopt-jc-1-assay-911?srsltid=AfmBOorc9fXq2sU0ZWdZu6FYimNwiyRuqHhrb12WrwO9dAdWzdmHTugR]
- 28. Automated Image-Based Fluorescence Screening of ... [https://pmc.ncbi.nlm.nih.gov/articles/PMC11393999/]
- 29. JC-1 Mitochondrial Membrane Potential Assay [https://www.creative-bioarray.com/support/jc-1-mitochondrial-membrane-potential-assay.htm]
- 30. Flow cytometry-based quantitative analysis of cellular ... [https://www.sciencedirect.com/science/article/pii/S2405844024096968]
- 31. JC-1 Dye for Mitochondrial Membrane Potential [https://www.thermofisher.com/br/en/home/life-science/cell-analysis/cell-viability-and-regulation/apoptosis/mitochondria-function/jc-1-dye-mitochondrial-membrane-potential.html]
- 32. How to Select the Appropriate Detection Channel Through ... [https://www.elabscience.com/resources/flow-cytometry-technical-topics/1070?srsltid=AfmBOorKNzcR8LCUQuz13HxdaoCduV_kWAcyYjQ1dmHkuh1l8_4yMk13]
- 33. Publishing flow cytometry data - PMC [https://pmc.ncbi.nlm.nih.gov/articles/PMC2822558/]
- 34. Best Practices for Multiparametric Flow Cytometry [https://www.thermofisher.com/us/en/home/references/newsletters-and-journals/bioprobes-journal-of-cell-biology-applications/bioprobes-79/best-practices-multiparametric-flow-cytometry.html]
- 35. Quantitative Flow Cytometry Measurements | NIST [https://www.nist.gov/programs-projects/quantitative-flow-cytometry-measurements]
- 36. Data analysis in flow cytometry [https://www.abcam.com/en-us/technical-resources/guides/flow-cytometry-guide/data-analysis-in-flow-cytometry]
- 37. How to Interpret Flow Cytometry Data [https://www.fortislife.com/resources/antibody-resources/how-to-interpret-flow-cytometry-data]
- 38. - JC Dye for Mitochondrial Membrane... | Thermo Fisher Scientific - RU 1 [https://www.thermofisher.com/ru/ru/home/life-science/cell-analysis/cell-viability-and-regulation/apoptosis/mitochondria-function/jc-1-dye-mitochondrial-membrane-potential.html]
- 39. - JC Experiment Common Questions and Solutions 1 [https://www.elabscience.com/resources/cell-function-technical-topics/1845]
- 40. Phillyrin prevents calcium oxalate kidney stones through ... [https://pubmed.ncbi.nlm.nih.gov/40826835/?utm_source=Chrome&utm_medium=rss&utm_campaign=None&utm_content=1nASi37tjavVgwsXmk5YUf_GRBPtoGVcaaaxKnz2ejNfc5MMoY&fc=None&ff=20250819153836&v=2.18.0.post9+e462414]
- 41. SIRT6 attenuates calcium oxalate Nephrocalcinosis ... [https://www.sciencedirect.com/science/article/abs/pii/S1567576925002929]
- 42. JC-1 Experiment Common Questions and Solutions [https://www.elabscience.com/resources/cell-function-technical-topics/1845?srsltid=AfmBOorRCnmrKWkmUQ64nBZY3xjrdz4KOcQk6PJEi8zP4PQLtSj4Zj9Q]
- 43. JC-1 MitoMP Detection Kit MT09 manual [https://www.dojindo.com/manual/MT09/]
- 44. Monitoring mitochondrial depolarization with JC-1 and ... [https://pmc.ncbi.nlm.nih.gov/articles/PMC3695757/]
- 45. Protocol for Apoptosis Assay by Flow Cytometry Using ... [https://pmc.ncbi.nlm.nih.gov/articles/PMC4943750/]
- 46. Optimization of a microplate reader method for the analysis of changes... [https://link.springer.com/article/10.1007/s10811-019-01860-3]
- 47. From proliferation to mitochondrial membrane potential ... [https://www.nature.com/articles/s41420-025-02391-2]
- 48. flow cytometry using Annexin V and propidium iodide ... [https://pubmed.ncbi.nlm.nih.gov/12116376/]
- 49. JC-1: alternative excitation wavelengths facilitate ... [https://pmc.ncbi.nlm.nih.gov/articles/PMC3542606/]
- 50. Apoptosis Protocols | Thermo Fisher Scientific - RU [https://www.thermofisher.com/ru/en/home/references/protocols/cell-and-tissue-analysis/apoptosis-protocol.html]
- 51. Designing a multicolor flow cytometry protocol [https://www.abcam.com/en-us/technical-resources/guides/flow-cytometry-guide/designing-a-multicolor-protocol]
- 52. Fluorescence as an alternative to light-scatter gating ... [https://www.sciencedirect.com/science/article/pii/S0011224014001205]
- 53. JC-1 Mitochondrial Membrane Potential Dye [https://www.aatbio.com/products/jc-1]
- 54. Multiparameter Detection of Early Apoptosis Markers ... [https://www.thermofisher.com/us/en/home/references/newsletters-and-journals/bioprobes-journal-of-cell-biology-applications/bioprobes-71/bioprobes-71-early-apoptosis-no-compensation.html]
- 55. JC-1 (Iodide) [https://www.stemcell.com/products/jc-1-iodide.html]
- 56. JC-1 Dye for Mitochondrial Membrane Potential [https://www.thermofisher.com/za/en/home/life-science/cell-analysis/cell-viability-and-regulation/apoptosis/mitochondria-function/jc-1-dye-mitochondrial-membrane-potential.html]
- 57. Signature assays for early apoptosis: JC-1, JC-10 - Yeasen [https://www.yeasenbio.com/blogs/cell/signature-assays-for-early-apoptosis-jc-1-jc-10]
- 58. What is the difference between MitoPT TMRE and JC-1? [https://www.antibodiesinc.com/blogs/news/ict-answers-your-questions-5?srsltid=AfmBOopJ0eRTOObQsLfQ9RsExCjjlvelfaIJE-bzyhmKckVhNAtZ16bT]
- 59. Characterization of the far-red fluorescent probe MitoView ... [https://pmc.ncbi.nlm.nih.gov/articles/PMC10627182/]