Troubleshooting Weak or No Cleaved PARP-1 Signal in Western Blot: A Comprehensive Guide for Researchers
Detecting cleaved PARP-1, a crucial apoptosis marker, can be challenging in Western blot assays.
Troubleshooting Weak or No Cleaved PARP-1 Signal in Western Blot: A Comprehensive Guide for Researchers
Abstract
Detecting cleaved PARP-1, a crucial apoptosis marker, can be challenging in Western blot assays. This guide provides a systematic framework for researchers and drug development professionals to diagnose and resolve issues leading to weak or absent signals. Covering foundational principles, optimized methodologies, a step-by-step troubleshooting protocol, and rigorous validation techniques, this article synthesizes current knowledge to enhance assay reliability, ensure accurate interpretation of cell death mechanisms, and support robust preclinical research.
Understanding Cleaved PARP-1: Biology, Significance, and Detection Challenges
The Role of PARP-1 Cleavage as a Hallmark of Apoptosis
Poly (ADP-ribose) polymerase-1 (PARP-1) is a nuclear enzyme with a central role in detecting and repairing DNA single-strand breaks. During apoptosis, PARP-1 serves as a primary substrate for executioner caspases, and its cleavage is considered a biochemical hallmark of programmed cell death [1]. Caspase-mediated cleavage of PARP-1 occurs at the conserved aspartic acid residue 214 in human PARP-1, generating two characteristic fragments: a 24 kDa DNA-binding fragment and an 89 kDa catalytic fragment [2] [3]. This proteolytic event separates the DNA-binding domain from the catalytic domain, effectively inactivating the enzyme and preventing wasteful depletion of cellular NAD+ and ATP pools during the cell death process. The appearance of the 89 kDa fragment is widely used as a standard biomarker for apoptosis in experimental research, particularly in Western blot assays [4] [5] [3].
PARP-1 Cleavage Signaling Pathway
The following diagram illustrates the key signaling pathway leading to PARP-1 cleavage during apoptosis:
Essential Research Reagents for PARP-1 Cleavage Detection
The table below details key reagents required for effective detection of PARP-1 cleavage in apoptosis research:
| Reagent Type | Specific Examples | Function & Importance |
|---|---|---|
| Cleavage-Specific Antibodies | Anti-cleaved PARP (Asp214) [3], Clone 4G4C8 [5] | Specifically recognizes the 89 kDa fragment without cross-reacting with full-length PARP-1; essential for accurate apoptosis detection |
| Positive Control Lysates | Staurosporine or etoposide-treated Jurkat/HeLa cells [4] [3] | Provide known apoptotic material to validate antibody performance and experimental protocol |
| Negative Control Lysates | Non-apoptotic cell lysates, PARP-1 knockout/knockdown cells [6] | Verify antibody specificity and identify non-specific binding |
| Protease Inhibitors | Complete EDTA-free protease inhibitor cocktail [7] | Prevent sample degradation during preparation that could generate misleading cleavage fragments |
| Detection Reagents | HRP-conjugated secondary antibodies, enhanced chemiluminescence substrates [7] | Enable visualization of the cleaved PARP-1 signal with high sensitivity |
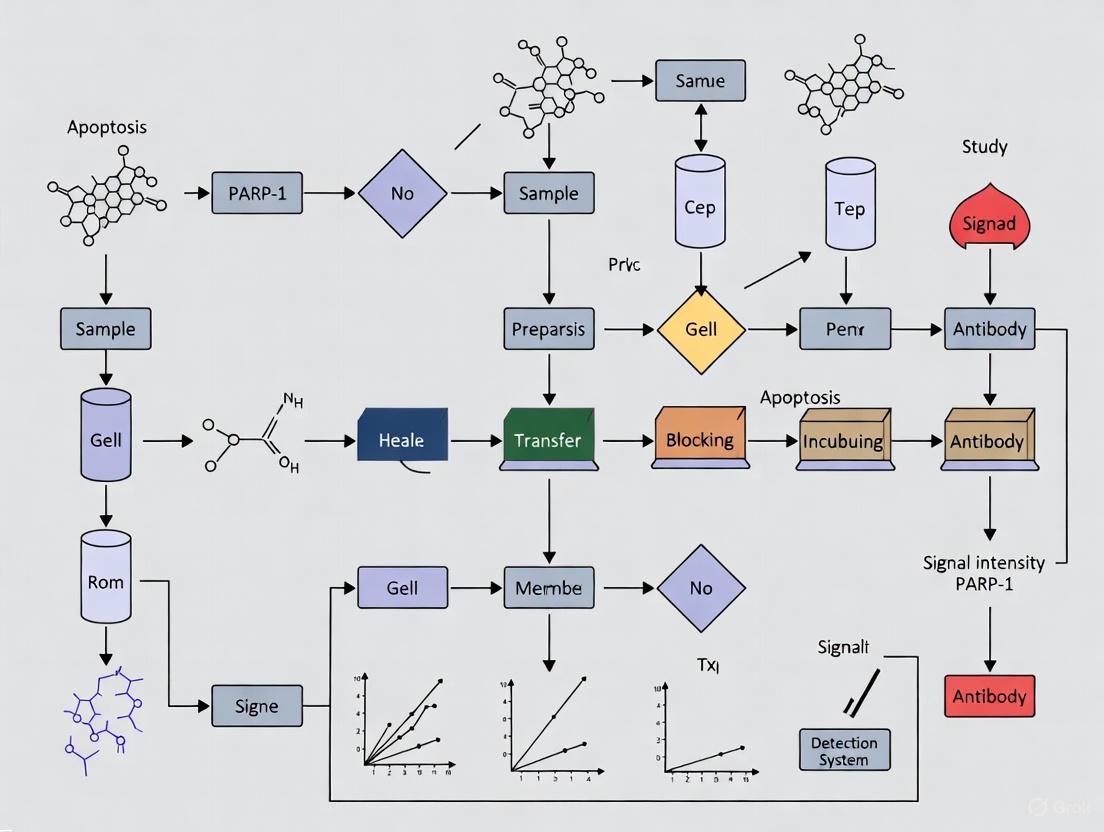
Experimental Protocol for Detecting PARP-1 Cleavage
Sample Preparation from Cultured Cells
- Induce Apoptosis: Treat cells with appropriate apoptotic stimuli (e.g., staurosporine at 1 μM for 3-6 hours, etoposide at 25 μM for 3 hours) [4] [3].
- Harvest Cells: Collect cells by trypsinization or scraping, followed by centrifugation at 1,500 ×g for 5 minutes.
- Prepare Nuclear Extracts:
- Resuspend cell pellet in ice-cold hypotonic buffer (10 mM HEPES, pH 8.0, 10 mM KCl, 1.5 mM MgCl₂, 0.5 mM DTT) with protease inhibitors [7].
- Incubate on ice for 10 minutes, then add NP-40 to 0.1% final concentration.
- Vortex briefly and centrifuge at 1,500 ×g for 10 minutes at 4°C.
- Resuspend nuclear pellet in RIPA buffer (50 mM Tris-HCl, pH 8.0, 150 mM NaCl, 1% NP-40, 0.5% sodium deoxycholate, 0.1% SDS) with protease inhibitors [7].
- Incubate on ice for 30 minutes with occasional vortexing.
- Centrifuge at 1,500 ×g for 30 minutes at 4°C and collect supernatant.
- Quantify Protein: Measure nuclear protein concentration using Bradford assay [7].
Western Blot Procedure
- Gel Electrophoresis: Load 30 μg of nuclear protein extracts per well on 10% SDS-PAGE gel [7].
- Protein Transfer: Transfer proteins to PVDF or nitrocellulose membrane using wet transfer system.
- Blocking: Incubate membrane with 5% BSA in TBST (Tris-buffered saline with 0.1% Tween 20) for 1 hour at room temperature [7].
- Primary Antibody Incubation: Incubate with anti-cleaved PARP antibody (diluted 1:1,000 in blocking buffer) overnight at 4°C [3].
- Secondary Antibody Incubation: Incubate with HRP-conjugated goat anti-rabbit IgG (1:2,000-1:10,000) for 1 hour at room temperature [7].
- Detection: Develop using enhanced chemiluminescence substrate with exposure times optimized for signal strength.
Troubleshooting Guide: Weak or No Cleaved PARP-1 Signal
Comprehensive Troubleshooting Table
| Problem | Possible Causes | Recommended Solutions |
|---|---|---|
| Weak or No Signal | Low target protein abundance | Load more protein (30-50 μg); enrich nuclear fraction; use positive control lysate from treated cells [8] [9] |
| Inefficient transfer | Verify transfer efficiency with Ponceau S staining; use wet transfer method; optimize transfer time [8] [10] | |
| Antibody-related issues | Titrate antibody concentration (1:500-1:2,000); extend incubation at 4°C overnight; verify species cross-reactivity [8] [9] | |
| Inadequate apoptosis induction | Optimize apoptotic treatment conditions; include validated positive control (staurosporine-treated cells) [4] | |
| Detection reagent problems | Use fresh detection reagents; check HRP inhibition by sodium azide; optimize exposure time [8] | |
| Non-Specific Bands | Protein degradation | Use fresh protease inhibitors; keep samples on ice; avoid freeze-thaw cycles [6] [9] |
| Antibody concentration too high | Titrate to optimal dilution; reduce primary/secondary antibody concentration [6] [10] | |
| Non-specific antibody binding | Include negative control lysate; optimize blocking conditions (5% BSA, 1-2 hours) [6] | |
| High Background | Inadequate blocking or washing | Increase blocking time; increase wash frequency/duration; add low detergent (0.1% Tween-20) to washes [6] [9] |
| Antibody over-concentration | Decrease primary/secondary antibody concentration; optimize dilution [6] [10] | |
| Overexposure during detection | Reduce film exposure time; use imaging system with auto-exposure function [9] |
Frequently Asked Questions (FAQs)
Q1: Why is my cleaved PARP-1 signal weak even with strong apoptosis induction?
A: Weak signals despite apoptosis induction typically result from technical issues in detection. First, verify your antibody specificity by including a validated positive control (e.g., staurosporine-treated Jurkat cells) [4]. Second, ensure efficient nuclear extraction, as PARP-1 is predominantly nuclear - use appropriate nuclear extraction buffers and confirm extraction efficiency [7] [8]. Third, optimize antibody dilution and incubation conditions; some antibodies perform better with overnight incubation at 4°C [6] [3]. Finally, check protein transfer efficiency by staining membranes with Ponceau S or Coomassie Blue after transfer [8].
Q2: What are the key controls for interpreting cleaved PARP-1 Western blot results?
A: Proper controls are essential for accurate interpretation:
- Positive Control: Lysate from cells with confirmed apoptosis (e.g., staurosporine or etoposide-treated cells) demonstrates antibody functionality [6] [4].
- Negative Control: Non-apoptotic cell lysate identifies non-specific binding [6].
- Loading Control: Nuclear protein (e.g., B23) verifies consistent nuclear protein loading [7].
- Full-length PARP-1 Detection: Simultaneous detection of full-length (116 kDa) and cleaved (89 kDa) PARP-1 provides context for cleavage extent [5] [3].
Q3: My antibody detects bands at unexpected molecular weights. What could explain this?
A: Multiple bands may indicate:
- Protein Degradation: Use fresh protease inhibitors and handle samples on ice to prevent artifactual cleavage [6] [9].
- Alternative Protease Activity: Other proteases (calpains, cathepsins, granzymes, MMPs) can generate different PARP-1 fragments (42-55 kDa) in non-apoptotic cell death [1].
- Isoforms or Modifications: Consult protein databases (UniProt) for known isoforms; consider post-translational modifications that affect mobility [6].
- Non-specific Binding: Include negative controls and titrate antibody to optimal concentration [6] [10].
Q4: How can I distinguish between apoptotic and non-apoptotic PARP-1 cleavage?
A: The specific fragment size and protease involvement provide distinguishing features:
- Apoptotic Cleavage: Generates specific 89 kDa and 24 kDa fragments via caspase-3/7 at Asp214 [2] [3].
- Non-apoptotic Cleavage: Other proteases produce different fragments - calpains generate 55-62 kDa fragments, cathepsins create 50 kDa fragments, and granzyme A produces a 50 kDa fragment, while granzyme B generates 64 and 50 kDa fragments [1]. Using cleavage-site specific antibodies (e.g., targeting Asp214) helps distinguish caspase-mediated apoptosis from other cleavage events [4] [3].
PARP-1 Cleavage Experimental Workflow
The following diagram summarizes the complete experimental workflow for detecting PARP-1 cleavage in apoptosis research:
Technical Support Center: Troubleshooting Weak or No Cleaved PARP-1 Signal in Western Blot
Frequently Asked Questions (FAQs)
Q1: Why am I detecting a weak or no cleaved PARP-1 (89 kDa) signal in my western blot, even with apoptosis induction? A: This common issue can arise from multiple factors:
- Insufficient Apoptosis Induction: Ensure apoptosis is properly triggered using validated inducers (e.g., staurosporine, etoposide) at optimal concentrations and durations. Confirm apoptosis with positive controls like caspase-3/7 activity assays.
- Antibody Problems: The primary antibody may have low affinity, be degraded, or used at incorrect dilution. Validate antibody specificity using knockout cells or peptide blocks.
- Sample Preparation Issues: Overloading or underloading protein, improper lysis (inadequate protease/phosphatase inhibition), or degradation during storage can mask signals. Use fresh samples and optimize protein concentration (e.g., 20–50 μg per lane).
- Western Blot Technical Errors: Transfer inefficiency (e.g., incomplete wet transfer), high background, or suboptimal blocking can reduce sensitivity. Optimize transfer conditions and use high-sensitivity substrates.
- Caspase-3/7 Activity Low: If caspases are not adequately activated, cleavage won't occur. Measure caspase-3/7 activity fluorometrically or colorimetrically to confirm.
Q2: How can I optimize caspase-3/7 activity to enhance PARP-1 cleavage detection? A: To maximize caspase-3/7-mediated cleavage:
- Inducer Titration: Titrate apoptosis inducers (e.g., 0.1–1 μM staurosporine for 4–6 hours in HeLa cells) and monitor viability via MTT assay.
- Time Course Analysis: Perform time-course experiments (e.g., 0–24 hours post-induction) to capture peak cleavage, as PARP-1 cleavage can be transient.
- Inhibition Checks: Include caspase inhibitors (e.g., Z-VAD-FMK) as negative controls to confirm cleavage specificity.
- Cell Line Considerations: Use sensitive cell lines (e.g., Jurkat for apoptosis) and avoid resistant lines; pre-test responsiveness.
Q3: What controls are essential for interpreting cleaved PARP-1 western blots? A: Always include these controls:
- Positive Control: Cells treated with a known apoptosis inducer (e.g., 1 μM staurosporine for 6 hours).
- Negative Control: Untreated cells or cells pre-treated with caspase inhibitor (e.g., 20 μM Z-VAD-FMK).
- Loading Control: Housekeeping proteins (e.g., GAPDH, β-actin) to normalize loading.
- Specificity Control: siRNA knockdown of PARP-1 or use of knockout cells to confirm antibody binding.
Q4: How do I troubleshoot high background or non-specific bands in my PARP-1 western blot? A: Address this by:
- Antibody Optimization: Titrate primary and secondary antibodies; typical dilutions are 1:1000 for anti-PARP-1 and 1:5000 for HRP-conjugated secondaries. Pre-absorb antibodies if needed.
- Blocking and Washing: Use 5% non-fat milk or BSA in TBST for blocking; increase wash stringency (e.g., 3x 10 minutes with TBST).
- Membrane Quality: Ensure PVDF or nitrocellulose membranes are properly activated and not over-dried.
Q5: What are the key steps to validate antibodies for detecting cleaved PARP-1? A: Follow this validation protocol:
- Specificity Testing: Use recombinant full-length PARP-1 (116 kDa) and cleaved PARP-1 (89 kDa) in parallel.
- Peptide Competition: Pre-incubate antibody with immunizing peptide; signal loss confirms specificity.
- Cross-Reactivity Check: Test on multiple cell lines and species to ensure no off-target binding.
- Lot Consistency: Compare different antibody lots for reproducibility.
Table 1: Typical Caspase-3/7 Activity and PARP-1 Cleavage Under Apoptosis Induction Data based on standard assays in HeLa or Jurkat cells treated with staurosporine (1 μM, 6 hours).
| Parameter | Value Range | Assay Type | Notes |
|---|---|---|---|
| Caspase-3/7 Activity (Fold Increase) | 3–10 fold | Fluorometric (e.g., DEVD-AMC substrate) | Peak at 4–6 hours post-induction |
| Cleaved PARP-1 (89 kDa) Signal Intensity | 2–5 fold over control | Western Blot Densitometry | Normalized to β-actin; varies by cell line |
| Full-length PARP-1 (116 kDa) Reduction | 50–80% decrease | Western Blot Densitometry | Indicates cleavage efficiency |
| Optimal Protein Load | 20–50 μg | Bradford Assay | Prevents over/under saturation |
| Antibody Dilution (Anti-PARP-1) | 1:500 – 1:2000 | Western Blot | Vendor-dependent; validate empirically |
Table 2: Troubleshooting Common Issues and Recommended Adjustments
| Issue | Possible Cause | Solution | Expected Outcome |
|---|---|---|---|
| Weak Cleaved PARP-1 Signal | Low apoptosis | Increase inducer concentration or time | Enhanced 89 kDa band |
| No Signal | Antibody failure | Use fresh aliquot; validate with positive control | Detectable cleavage |
| High Background | Non-specific binding | Optimize blocking; switch to BSA | Cleaner bands |
| Multiple Bands | Cross-reactivity | Pre-absorb antibody; check specificity | Single band at 89 kDa |
Experimental Protocols
Protocol 1: Inducing Apoptosis and Detecting PARP-1 Cleavage via Western Blot This protocol is adapted from standard methods for adherent cells (e.g., HeLa).
Materials:
- Cell line: HeLa cells
- Apoptosis inducer: Staurosporine (1 mM stock in DMSO)
- Lysis buffer: RIPA buffer with protease inhibitors (e.g., 1 mM PMSF, 1x cocktail)
- Antibodies: Anti-PARP-1 (cleavage-specific), anti-β-actin, HRP-conjugated secondary
- Western blot reagents: SDS-PAGE gel, PVDF membrane, ECL substrate
Steps:
- Cell Culture and Treatment:
- Seed HeLa cells at 70% confluence in 6-well plates.
- Treat with 1 μM staurosporine (or DMSO vehicle for control) for 6 hours at 37°C.
- Include a caspase inhibitor control (e.g., 20 μM Z-VAD-FMK pre-treatment for 1 hour).
Protein Extraction:
- Wash cells with PBS and lyse in 100 μL RIPA buffer per well on ice for 30 minutes.
- Centrifuge at 14,000 × g for 15 minutes at 4°C; collect supernatant.
- Quantify protein using Bradford assay; adjust to 2 μg/μL.
Western Blot:
- Load 25 μg protein per lane on 8% SDS-PAGE gel.
- Run at 120 V for 90 minutes, then transfer to PVDF membrane at 100 V for 60 minutes (wet transfer).
- Block with 5% non-fat milk in TBST for 1 hour.
- Incubate with primary antibody (anti-PARP-1, 1:1000) overnight at 4°C.
- Wash 3x with TBST, incubate with HRP-secondary (1:5000) for 1 hour.
- Detect using ECL substrate and image with chemiluminescence system.
Analysis:
- Normalize cleaved PARP-1 (89 kDa) to β-actin (42 kDa) using densitometry.
- Confirm apoptosis with caspase-3/7 activity assay.
Protocol 2: Caspase-3/7 Activity Assay Fluorometric method using DEVD-AMC substrate.
Materials:
- Caspase-3/7 assay kit (e.g., with Ac-DEVD-AMC substrate)
- Cell lysates from treated cells
- Fluorometer
Steps:
- Prepare lysates as above; use 50 μg protein per reaction.
- Incubate with 50 μM DEVD-AMC substrate in assay buffer at 37°C for 1 hour.
- Measure fluorescence at Ex/Em 380/460 nm.
- Calculate activity relative to control using a standard curve.
Diagrams
Diagram 1: Caspase-3/7 Pathway to PARP-1 Cleavage Title: Caspase-3/7 Cleaves PARP-1
Diagram 2: Western Blot Workflow for Cleaved PARP-1 Detection Title: WB for Cleaved PARP-1
Diagram 3: Troubleshooting Logic for Weak PARP-1 Signal Title: Troubleshoot Weak PARP-1 Signal
The Scientist's Toolkit: Research Reagent Solutions
Table 3: Essential Reagents for Caspase-3/7 and PARP-1 Cleavage Studies
| Reagent | Function | Example Product | Notes |
|---|---|---|---|
| Apoptosis Inducer | Triggers caspase activation | Staurosporine, Etoposide | Titrate for cell line; use DMSO solvent control |
| Caspase-3/7 Assay Kit | Measures caspase activity | Fluorometric DEVD-AMC kit | Confirm apoptosis before western blot |
| Anti-PARP-1 Antibody | Detects full-length and cleaved PARP-1 | Rabbit monoclonal anti-PARP-1 | Validate for 89 kDa fragment specificity |
| HRP-Conjugated Secondary Antibody | Amplifies signal in western blot | Goat anti-rabbit IgG-HRP | Use at 1:5000 dilution; avoid freeze-thaw |
| RIPA Lysis Buffer | Extracts total protein | Commercial RIPA with inhibitors | Add fresh PMSF to prevent degradation |
| Protease Inhibitor Cocktail | Prevents protein degradation | EDTA-free cocktail | Essential for preserving cleaved fragments |
| PVDF Membrane | Binds proteins for blotting | 0.45 μm pore size | Activate with methanol before use |
| ECL Substrate | Chemiluminescent detection | Enhanced ECL kits | High-sensitivity for weak signals |
| Loading Control Antibody | Normalizes protein load | Anti-β-actin or GAPDH | Ensure linear range for quantification |
FAQ: Understanding PARP-1 and Its Cleavage
Q1: What are the specific molecular weights of full-length and cleaved PARP-1, and why is this important for antibody specificity?
The distinct molecular weights of full-length and cleaved PARP-1 are a primary characteristic used to distinguish them in a western blot.
- Full-length PARP-1: The theoretical molecular weight is approximately 113 to 116 kDa [11] [2].
- Cleaved PARP-1: During apoptosis, caspases-3 and -7 cleave full-length PARP-1 at the DEVD214 site, generating two primary fragments [2]. The larger C-terminal fragment is 89 kDa (often observed at ~85 kDa on western blots), and the smaller N-terminal fragment is 24 kDa [11] [2]. Antibodies specific for cleaved PARP-1 are often designed to detect the 85-89 kDa fragment, a key marker of apoptosis [11].
Understanding this size difference is fundamental for selecting the correct antibody and interpreting your western blot results accurately. The table below summarizes these key differences.
Table 1: Characteristics of Full-length and Cleaved PARP-1
| Parameter | Full-Length PARP-1 | Cleaved PARP-1 (89 kDa fragment) |
|---|---|---|
| Theoretical Molecular Weight | 113 - 116 kDa [11] [2] | 89 kDa [2] |
| Observed Band Size in WB | ~116 kDa | ~85-89 kDa [11] |
| Biological Context | DNA repair, cell survival [12] [2] | Apoptosis (programmed cell death) [11] [2] |
| Primary Antibody Target | Epitope on full-length protein | Epitope encompassing the caspase cleavage site (e.g., N-terminus after Asp214) [11] |
Q2: What is the primary biological significance of PARP-1 cleavage?
PARP-1 cleavage is a widely recognized hallmark of apoptosis [2]. The cleavage event serves two critical functions:
- It inactivates the DNA repair function of PARP-1, preventing the cell from repairing its DNA during the execution of apoptosis and thereby facilitating cell death [2].
- The cleavage fragments themselves may play active regulatory roles. Research indicates that the 89 kDa fragment (PARP-189) can be cytotoxic and promote inflammatory responses, while the 24 kDa fragment (PARP-124) may, paradoxically, be cytoprotective under certain conditions [2].
The following diagram illustrates the PARP-1 cleavage process and its functional consequences.
Troubleshooting Guide: Weak or No Signal for Cleaved PARP-1
Q3: My western blot shows a strong signal for full-length PARP-1 but a weak or absent signal for the cleaved form. What could be the cause?
A weak or absent cleaved PARP-1 signal is a common challenge. The issue can originate from multiple points in your experimental workflow. The following troubleshooting flowchart will help you systematically diagnose the problem.
Q4: How can I experimentally validate that my experimental conditions are inducing apoptosis and PARP-1 cleavage?
Detailed Protocol: Inducing and Confirming Apoptosis
To ensure you are generating a positive signal, follow this validated experimental protocol.
Cell Treatment:
Sample Preparation:
- Prepare cell lysates using a RIPA buffer or similar, supplemented with a protease inhibitor cocktail to prevent protein degradation [13] [9].
- Keep samples on ice and avoid repeated freeze-thaw cycles to maintain protein integrity [14] [9].
- Determine protein concentration using a reliable assay (e.g., BCA assay).
Western Blot Analysis:
- Load 20-40 µg of total protein from both treated and untreated samples onto an SDS-PAGE gel [11].
- Perform a standard wet transfer to a PVDF or nitrocellulose membrane.
- Probe the membrane with a cleavage-site specific anti-PARP-1 antibody (e.g., ab4830). A successful experiment should show:
- A band at ~85-89 kDa in the treated sample (cleaved PARP-1).
- A potential decrease in the ~116 kDa band (full-length PARP-1) in the treated sample compared to the control.
Q5: What are the specific solutions for the most common causes of a weak cleaved PARP-1 signal?
The table below details the specific causes and proven solutions for a weak or absent cleaved PARP-1 signal, based on the troubleshooting flowchart.
Table 2: Troubleshooting Weak or No Signal for Cleaved PARP-1
| Problem Area | Possible Cause | Recommended Solution |
|---|---|---|
| Apoptosis Induction | Insufficient apoptotic stimulus; incorrect cell model. | Optimize treatment dose and duration [11]. Use a positive control cell line (e.g., Etoposide-treated Jurkat cells) [11] [14]. |
| Antibody Specificity | Antibody recognizes only full-length PARP-1; poor antibody affinity. | Use a validated antibody specific for the cleaved form (e.g., against the N-terminus after Asp214) [11]. Titrate the antibody to find the optimal concentration [13] [15] [14]. |
| Sample & Transfer | Low abundance of cleaved protein; inefficient transfer. | Load more total protein (e.g., 40-60 µg) [13] [14]. Confirm transfer efficiency by staining the membrane with Ponceau S or a reversible protein stain [15] [14]. |
| Detection System | Inactive detection reagents; sodium azide inhibition. | Use fresh detection reagents [13] [15]. Ensure no sodium azide is present in buffers when using HRP-conjugated antibodies, as it inhibits HRP activity [15] [14]. |
The Scientist's Toolkit: Essential Research Reagents
A successful experiment requires the right tools. The following table lists key reagents and their functions for studying PARP-1 cleavage.
Table 3: Essential Reagents for PARP-1 Cleavage Research
| Reagent | Function/Application | Example & Notes |
|---|---|---|
| Cleaved PARP-1 Specific Antibody | Specifically detects the 85-89 kDa apoptotic fragment in western blot. | Anti-Cleaved PARP1 (ab4830): Rabbit polyclonal, specific for the N-terminus after cleavage at Asp214 [11]. |
| Apoptosis Inducing Agents | Positive control treatments to trigger caspase-mediated PARP-1 cleavage. | Etoposide (Topoisomerase II inhibitor) [11].Staurosporine (Broad-spectrum kinase inhibitor) [11]. |
| Protease Inhibitor Cocktail | Prevents non-specific protein degradation during sample preparation, preserving the cleaved fragment. | Add to lysis buffer to maintain sample integrity [13] [9]. |
| Positive Control Cell Lysate | Provides a reliable positive control for the cleaved PARP-1 band. | Lysate from Jurkat or HeLa cells treated with Etoposide [11]. |
| HRP-Conjugated Secondary Antibody | Required for chemiluminescent detection of the primary antibody. | Use an anti-rabbit IgG HRP conjugate for a rabbit primary antibody. Ensure buffers are sodium azide-free [15] [14]. |
Biological and Technical Pitfalls Leading to Failed Detection
Detecting cleaved PARP-1 is a cornerstone assay for confirming apoptosis in cellular research. The cleavage of full-length PARP-1 (116 kDa) by caspases into its characteristic 89 kDa fragment during programmed cell death serves as a definitive biochemical marker for this process. However, researchers frequently encounter challenges with weak or absent signals in Western blot experiments, potentially obscuring critical experimental outcomes. This technical support guide addresses the biological and technical pitfalls that compromise successful cleaved PARP-1 detection, providing targeted troubleshooting strategies for scientists and drug development professionals. Understanding these factors is essential for ensuring data accuracy in studies involving DNA damage response, cancer therapeutics, and cell death mechanisms.
Understanding PARP-1 Cleavage and Its Detection
Biological Context of PARP-1 Cleavage
Poly(ADP-ribose) polymerase 1 (PARP1) is a 116 kDa nuclear protein that plays a critical role in DNA repair and maintenance of genomic integrity [16] [17]. During apoptosis, caspase-3 and related caspases cleave PARP-1 at the conserved DEVD214 site, separating the N-terminal DNA-binding domain (24 kDa) from the C-terminal catalytic domain (89 kDa) [17] [18]. This cleavage event serves as an important regulatory mechanism, inactivating PARP-1's DNA repair function and preventing cellular energy depletion during programmed cell death.
The detection of the 89 kDa fragment has become a gold standard biomarker for apoptosis in various research contexts, including studies of cancer therapy efficacy, DNA damage response, and cellular stress pathways. The biological significance of this cleavage is highlighted by research showing that mutation of the caspase cleavage site (DEVD214 to DEVN214) creates a noncleavable PARP-1 protein that affects cellular responses to inflammatory stimuli and ischemia-reperfusion injury [18].
Standard Detection Methodology
Conventional detection of cleaved PARP-1 relies on Western blot analysis using antibodies that recognize the 89 kDa fragment. The PARP Antibody #9542 from Cell Signaling Technology exemplifies such reagents, specifically detecting both full-length PARP1 (116 kDa) and the large cleavage fragment (89 kDa) resulting from caspase activity [17]. This antibody, raised against a synthetic peptide corresponding to the caspase cleavage site in PARP, has been validated for Western blot applications across human, mouse, rat, and monkey samples.
Troubleshooting Guide: Weak or No Cleaved PARP-1 Signal
Biological Pitfalls and Solutions
Biological factors can significantly impact cleaved PARP-1 detection, independent of technical assay performance. The table below summarizes common biological pitfalls and recommended solutions.
Table 1: Biological Pitfalls and Solutions for Cleaved PARP-1 Detection
| Pitfall Category | Specific Issue | Recommended Solution | Supporting Evidence |
|---|---|---|---|
| Apoptosis Induction | Insufficient or excessive apoptosis induction | Optimize treatment conditions (concentration, duration); use positive control inducers (e.g., staurosporine) | [18] |
| Alternative Cell Death Pathways | Cells undergoing non-apoptotic death (e.g., necrosis, autophagy) | Confirm apoptosis with complementary assays (caspase activation, Annexin V) | [18] |
| PARP-1 Regulation | Post-translational modifications affecting cleavage | Consider upstream regulators (USP10 stabilizes PARP1 [16]; FTO inhibits PARP1 [19]) | [16] [19] |
| Caspase Inhibition | Impaired caspase activity despite apoptotic stimuli | Verify caspase function with specific activity assays | [18] |
| Cell-Type Specificity | Variable cleavage kinetics across different cell lines | Establish cell line-specific timing for PARP-1 cleavage | [20] |
Technical Pitfalls and Solutions
Technical aspects of Western blotting present numerous potential failure points that can compromise cleaved PARP-1 detection. The following table addresses key technical challenges and appropriate remedies.
Table 2: Technical Pitfalls and Solutions for Cleaved PARP-1 Detection
| Technical Area | Common Pitfalls | Recommended Solutions | Expected Outcome |
|---|---|---|---|
| Sample Preparation | Protein degradation; inadequate apoptosis induction; improper lysis | Use fresh protease inhibitors; include apoptosis positive control; optimize lysis buffer | Preservation of 89 kDa fragment; clear differentiation between full-length and cleaved PARP-1 |
| Gel Electrophoresis | Overloading or underloading protein; inappropriate gel percentage | Load 20-50 μg protein/lane; use 8-12% gels for optimal 89 kDa separation | Proper band resolution and separation of cleaved fragment |
| Transfer Efficiency | Incomplete transfer of 89 kDa fragment; air bubbles | Use wet transfer method; verify transfer with Ponceau S staining | Efficient transfer of cleaved PARP-1 to membrane |
| Antibody Issues | Inadequate antibody validation; improper dilution; lot variability | Use validated antibodies (e.g., #9542 [17]); titrate antibody (1:1000 starting point [17]); test new lots | Specific detection of cleaved PARP-1 with minimal background |
| Detection Method | Insensitive detection reagent; insufficient exposure time | Use high-sensitivity ECL; optimize film exposure or imager settings | Clear detection of even low-abundance cleaved PARP-1 |
Experimental Protocols for Reliable Detection
Validated Protocol for Cleaved PARP-1 Western Blot
The following protocol, adapted from methodologies cited in the search results, provides a robust framework for detecting cleaved PARP-1:
Sample Preparation:
- Harvest cells during logarithmic growth phase or at optimal time points after apoptosis induction.
- Lyse cells using IP lysis buffer (50 mM Tris-HCl pH 7.4, 150 mM NaCl, 1% Triton X-100, 1% NP-40, 0.25% sodium deoxycholate) supplemented with fresh protease inhibitor cocktail [16].
- Incubate on ice for 30 minutes, then centrifuge at 13,500 rpm for 20 minutes at 4°C.
- Collect supernatant and quantify protein concentration using Bradford or BCA assay.
- Prepare samples with Laemmli buffer, heat at 95°C for 5 minutes.
Gel Electrophoresis and Transfer:
- Load 20-50 μg of protein per lane on 8-12% SDS-PAGE gel.
- Run gel at 100-120V until proper separation is achieved (tracking dye reaches bottom).
- Activate PVDF membrane in methanol and assemble transfer stack.
- Transfer using wet transfer system at 100V for 60-90 minutes or 30V overnight at 4°C.
Immunoblotting:
- Block membrane with 5% non-fat dry milk in TBST for 1 hour at room temperature.
- Incubate with primary anti-PARP antibody (e.g., #9542 at 1:1000 dilution [17]) in blocking buffer overnight at 4°C.
- Wash membrane 3×10 minutes with TBST.
- Incubate with HRP-conjugated secondary antibody (1:2000-1:5000) in blocking buffer for 1 hour at room temperature.
- Wash membrane 3×10 minutes with TBST.
- Develop with enhanced chemiluminescence substrate and image.
Antibody Validation Protocol
Proper antibody validation is crucial for reliable cleaved PARP-1 detection:
- Specificity Testing: Include a positive control lysate from cells treated with a known apoptosis inducer (e.g., staurosporine, camptothecin) to verify detection of the 89 kDa fragment [20].
- Genetic Controls: When possible, use PARP-1 knockout cells or siRNA-mediated knockdown to confirm antibody specificity [20].
- Competition Assay: Pre-incubate antibody with the immunogen peptide (if available) to demonstrate loss of signal.
- Multi-Species Validation: Test antibody performance across relevant species in your experimental system [17].
- Lot-to-Lot Comparison: Compare new antibody lots with previous validated lots using standardized control lysates.
Visualizing PARP-1 Cleavage in Apoptosis
The following diagram illustrates the relationship between apoptosis induction, caspase activation, and PARP-1 cleavage, highlighting key regulatory points that can affect detection.
Diagram 1: PARP-1 Cleavage Pathway in Apoptosis. This pathway illustrates the sequence from apoptotic stimulus to cleaved PARP-1 detection, highlighting key regulatory factors that can influence experimental outcomes.
Advanced Technical Considerations
Optimizing Detection of Low-Abundance Cleaved PARP-1
When working with limited apoptotic cells or low-cleavage systems, consider these advanced strategies:
- Protein Enrichment: Immunoprecipitate PARP-1 using specific antibodies prior to Western blotting to concentrate the target protein [16].
- Fractionation: Isolate nuclear fractions to enrich for PARP-1, as it is primarily nuclear localized.
- High-Sensitivity Detection: Utilize modern fluorescence-based or chemiluminescent detection systems with superior sensitivity compared to traditional ECL.
- Signal Amplification: Implement tyramide-based amplification systems for exceptional sensitivity when needed.
Addressing Alternative PARP-1 Modifications
Beyond caspase cleavage, PARP-1 undergoes other modifications that can impact detection:
- ADP-ribosylation: PARP-1 catalyzes poly(ADP-ribose) chains on itself and other proteins, potentially affecting antibody accessibility [21] [22].
- Ubiquitination: PARP1 is targeted by multiple E3 ubiquitin ligases, and deubiquitination by USP10 stabilizes PARP1 [16], potentially influencing cleavage kinetics.
- Phosphorylation: DNA damage-responsive kinases can phosphorylate PARP-1, potentially creating additional epitopes or masking existing ones.
Research Reagent Solutions
The table below summarizes essential reagents for successful cleaved PARP-1 detection, with specific references to validated products.
Table 3: Essential Research Reagents for Cleaved PARP-1 Detection
| Reagent Category | Specific Product/Type | Application Notes | Validation |
|---|---|---|---|
| Primary Antibodies | PARP Antibody #9542 (Cell Signaling) | Detects both full-length (116 kDa) and cleaved (89 kDa) PARP-1; recommended dilution 1:1000 for WB [17] | Validated for human, mouse, rat, monkey; specificity confirmed by knockout/knockdown [17] [20] |
| Positive Controls | Apoptosis Inducers (Staurosporine, Camptothecin) | Generate control lysates with confirmed PARP-1 cleavage | Essential for protocol validation and antibody performance verification [20] |
| Cell Lines | HeLa, HCT116, MCF7 | Well-characterized models for apoptosis studies; known PARP-1 expression and cleavage patterns | Used in multiple PARP-1 studies [16] [19] |
| Inhibitors/Modulators | USP10 inhibitors (Spautin-1) | Modulate PARP1 stability [16] | Useful for investigating regulation of PARP-1 levels |
| Detection Systems | High-sensitivity ECL substrates | Critical for detecting low-abundance cleaved PARP-1 | Recommended for optimal signal-to-noise ratio [23] |
Frequently Asked Questions (FAQs)
Q1: I see only the full-length PARP-1 band but no cleaved fragment, despite using apoptosis inducers. What could be wrong?
A: This common issue can stem from several factors:
- Insufficient apoptosis: Optimize inducer concentration and treatment duration. Use a positive control apoptosis inducer.
- Inadequate caspase activation: Verify caspase activity using specific assays.
- Wrong time point: PARP-1 cleavage is transient; perform a time-course experiment.
- Technical issues: Ensure proper protein transfer and antibody specificity.
Q2: My cleaved PARP-1 signal is weak even with strong apoptosis induction. How can I enhance detection?
A: Consider these approaches:
- Increase protein loading (up to 50-60 μg per lane).
- Use immunoprecipitation to concentrate PARP-1 before Western blotting [16].
- Switch to high-sensitivity detection reagents.
- Extend film exposure or imager acquisition time.
- Verify antibody binding capacity with a dot blot assay [23].
Q3: I see multiple bands in addition to the expected 116 kDa and 89 kDa bands. What do these represent?
A: Additional bands may indicate:
- Protein degradation: Use fresh protease inhibitors during sample preparation.
- Alternative cleavage products: Some caspases or proteases may generate atypical fragments.
- Post-translational modifications: PARP-1 undergoes ADP-ribosylation and other modifications that affect migration.
- Nonspecific binding: Validate antibody specificity using knockout controls or peptide competition [20].
Q4: How does the USP10-PARP1 axis affect my cleaved PARP-1 detection?
A: USP10 deubiquitinates and stabilizes PARP1 [16], potentially increasing the pool of full-length PARP-1 available for cleavage. In systems with high USP10 activity, you might detect stronger cleaved PARP-1 signals following apoptosis induction. Conversely, USP10 inhibition could reduce both full-length and cleaved PARP-1 detection.
Q5: What are the best positive and negative controls for cleaved PARP-1 detection?
A: Ideal controls include:
- Positive control: Lysate from cells treated with 1μM staurosporine for 4-6 hours.
- Negative control: Lysate from untreated healthy cells.
- Specificity control: PARP-1 knockout cells (if available) or lysate pre-absorbed with immunogen peptide.
- Loading control: Antibodies for housekeeping proteins (β-actin, GAPDH, tubulin).
Optimized Protocols for Robust Cleaved PARP-1 Detection
Validated Antibody Selection and Optimal Dilution for the 89 kDa Fragment
Poly (ADP-ribose) polymerase 1 (PARP1) is a 116 kDa nuclear enzyme essential for DNA repair. During caspase-dependent apoptosis, PARP1 is cleaved by caspases-3 and -7 into two characteristic fragments: a 24 kDa DNA-binding fragment and an 89 kDa catalytic domain fragment [24]. The appearance of the 89 kDa fragment serves as a well-established biochemical marker for apoptosis, making its reliable detection crucial for researchers studying cell death mechanisms in cancer research and drug development.
This technical guide addresses the common challenge of obtaining a weak or absent signal for the 89 kDa PARP1 fragment in Western blot experiments. We provide validated antibody selection criteria, optimized protocols, and troubleshooting methodologies to ensure reliable detection of this important apoptotic marker.
Validated Antibodies for 89 kDa PARP1 Fragment Detection
Several commercially available antibodies have been experimentally validated for detecting the 89 kDa PARP1 cleavage fragment. The table below summarizes key antibodies and their documented performance characteristics.
Table 1: Validated Antibodies for Detecting the 89 kDa PARP1 Fragment
| Antibody Clone/Name | Host Species | Reactivities | Applications | Recommended Dilution | Validation Data |
|---|---|---|---|---|---|
| PARP1 Polyclonal (13371-1-AP) [25] | Rabbit | Human, Mouse, Rat | WB, IHC, IF/ICC, IP | 1:1000-1:8000 (WB) | Detects endogenous full-length (113-116 kDa) and cleaved 89 kDa fragment [25] |
| PARP Antibody (#9542) [26] | Rabbit | Human, Mouse, Rat, Monkey | Western Blotting | 1:1000 (WB) | Specifically detects full-length (116 kDa) and large cleavage fragment (89 kDa); does not cross-react with other PARP isoforms |
| PARP1 Monoclonal (C-2-10) (MA3-950) [27] | Mouse | Human, Mouse, Rat, Bovine | WB, ICC/IF, IHC | Assay-dependent | Recognizes a 116 kDa protein and the 85 kDa apoptosis-induced cleavage product; epitope in DNA-binding domain (aa 216-375) |
| Anti-PARP1 (ab137653) [28] | Rabbit | Human, Rat | WB, IHC-P, ChIP, ICC/IF | 1:500 - 1:3000 (WB) | Suitable for Western blot; immunogen within aa 150-450 of human PARP1 |
The Scientist's Toolkit: Essential Reagents
Table 2: Key Research Reagent Solutions for PARP1 Cleavage Detection
| Item | Function/Description | Example Use Case |
|---|---|---|
| PARP1 Antibodies | Detect full-length and cleaved PARP1 fragments | Primary detection of 89 kDa fragment in Western blot |
| Caspase-3 Inducers | Activate apoptotic pathway to induce PARP1 cleavage | Staurosporine, Actinomycin D treatment as positive control [24] |
| HRP-conjugated Secondary Antibodies | Enable chemiluminescent detection of primary antibody | Use with ECL substrate for signal development |
| PARP Inhibitors | Control for PARP1-specific effects | PJ34, ABT-888 to confirm PARP1-dependent cell death [24] |
| Caspase Inhibitors | Inhibit PARP1 cleavage to confirm specificity | zVAD-fmk to prevent cleavage and 89 kDa fragment formation [24] |
Experimental Protocols for Reliable Detection
Sample Preparation for Apoptosis Induction
To ensure detectable levels of the 89 kDa fragment, researchers must first induce apoptosis in their experimental systems. Below is a validated protocol for inducing PARP1 cleavage:
- Positive Control Setup: Treat cells (e.g., HeLa, Jurkat) with 0.5-1 μM Staurosporine or 1-5 μM Actinomycin D for 4-6 hours to induce caspase-mediated apoptosis [24].
- Inhibition Controls: Include samples pre-treated with 20-50 μM zVAD-fmk (pan-caspase inhibitor) for 1 hour prior to apoptosis induction to confirm the specificity of PARP1 cleavage [24].
- Sample Lysis: Lyse cells in RIPA buffer supplemented with protease inhibitors. Maintain samples at 4°C throughout preparation to prevent protein degradation.
- Protein Quantification: Quantify protein concentration using a Bradford or BCA assay. Load 20-50 μg of total protein per lane for Western blot analysis to ensure sufficient target protein without overloading [29] [15].
Optimized Western Blot Protocol
- Gel Electrophoresis: Use 7.5-10% SDS-PAGE gels for optimal separation of the 89 kDa fragment from the full-length 116 kDa PARP1 [28].
- Transfer Conditions: For wet transfer, use standard Tris-glycine buffer with 20% methanol. Transfer high molecular weight proteins at 100V for 60-90 minutes on ice [15].
- Blocking: Block membranes with 5% non-fat dry milk or BSA in TBST for 1 hour at room temperature. For phosphoprotein detection, BSA is preferred over milk [15].
- Antibody Incubation:
- Incubate with primary antibody diluted in blocking buffer overnight at 4°C with gentle agitation (see Table 1 for recommended dilutions).
- Wash membrane 3-5 times for 5 minutes each with TBST.
- Incubate with appropriate HRP-conjugated secondary antibody (1:2000-1:10000) for 1 hour at room temperature.
- Wash membrane 3-5 times for 5 minutes each with TBST.
- Detection: Use enhanced chemiluminescence (ECL) substrate. For weak signals, consider using high-sensitivity ECL substrates and longer exposure times (from 30 seconds to 30 minutes) [15].
Troubleshooting Guide: Weak or No 89 kDa Signal
FAQ: Common Experimental Challenges
Q: I've induced apoptosis with staurosporine but see no 89 kDa fragment. What could be wrong? A: Several factors could cause this issue:
- Insufficient Apoptosis Induction: Verify apoptosis induction by checking caspase-3 activation using a caspase-3 activity assay or cleaved caspase-3 Western blot.
- Protein Loading: Load more protein (up to 50-75 μg) if your target is low abundance. Always include a loading control such as β-actin or GAPDH [29].
- Transfer Efficiency: For the 89 kDa fragment, ensure efficient transfer by using a smaller pore size membrane (0.2 μm) and verifying transfer with reversible protein stains like Ponceau S [15].
Q: My positive control shows the 89 kDa fragment, but my experimental samples do not. How should I proceed? A: This suggests your experimental conditions may not be inducing sufficient apoptosis:
- Time Course: Perform a time-course experiment, as PARP1 cleavage is time-dependent. Peak 89 kDa fragment detection typically occurs 4-6 hours after staurosporine treatment [24].
- Alternative Apoptosis Inducers: Try different apoptosis inducers relevant to your experimental system.
- Cellular Context: Confirm that your cell type expresses PARP1 and undergoes caspase-dependent apoptosis in response to your treatment.
Q: I see high background that obscures my 89 kDa band. How can I reduce it? A: High background is often due to antibody-related issues:
- Antibody Concentration: Titrate your primary antibody. Too high concentration causes nonspecific binding. Try 2-5X lower concentrations than recommended [30].
- Blocking Conditions: Extend blocking time to 2 hours or try different blocking agents (BSA instead of milk, especially for phosphoproteins) [15].
- Washing Stringency: Increase wash frequency and duration (5-6 washes for 5-10 minutes each) with TBST containing 0.05% Tween-20 [31].
Q: What are the specific steps to confirm my 89 kDa band is specific? A: To confirm specificity:
- Inhibitor Control: Use caspase inhibitors like zVAD-fmk (20-50 μM) which should prevent the appearance of the 89 kDa fragment [24].
- Knockdown Validation: Use PARP1 shRNA to knock down PARP1 expression, which should eliminate both full-length and cleaved fragments [24].
- Multiple Antibodies: Confirm results with antibodies targeting different PARP1 epitopes.
Troubleshooting Flowchart
The following diagram outlines a systematic approach to diagnose and resolve issues with detecting the 89 kDa PARP1 fragment:
Technical Notes and Additional Considerations
- Multiple Cleavage Forms: Besides the classic 89 kDa caspase cleavage fragment, note that other proteases (calpains, cathepsins, granzymes) can generate PARP1 fragments ranging from 42-89 kDa [25]. Using caspase inhibitors helps distinguish caspase-specific cleavage.
- Alternative Methodologies: If Western blot continues to be challenging, consider alternative detection methods such as immunofluorescence or immunocytochemistry, which can provide spatial information about PARP1 cleavage and cellular localization [25] [27].
- Buffer Incompatibilities: Avoid sodium azide in buffers when using HRP-conjugated secondary antibodies, as it inhibits HRP activity [15]. Use alternative preservatives like thimerosal if needed.
Successful detection of the 89 kDa PARP1 cleavage fragment requires careful antibody selection, appropriate positive controls, and systematic optimization of Western blot conditions. The protocols and troubleshooting guidelines provided here address the most common challenges researchers face when studying this important apoptotic marker. By implementing these evidence-based recommendations, scientists can improve the reliability and reproducibility of their apoptosis detection assays, advancing their research in cell death mechanisms and therapeutic development.
Why might I see a weak or no cleaved PARP-1 signal on my western blot, even when my apoptosis induction seems successful?
A weak or absent cleaved PARP-1 (cPARP-1) signal, despite successful apoptosis induction, is a common challenge. The issue can stem from problems at various stages of your experiment, from cell treatment to final detection. The table below summarizes the core components of the PARP-1 signaling pathway you are targeting.
Table 1: Key Components of the PARP-1 Apoptosis Signaling Pathway
| Component | Type | Role in Apoptosis Detection |
|---|---|---|
| Full-length PARP-1 | Protein (116 kDa) | The inactive, uncleaved form of the protein. Its degradation is a marker of apoptosis. |
| Cleaved PARP-1 | Protein (~89 kDa fragment) | The caspase-generated fragment, serving as a direct biochemical marker of apoptosis. |
| Caspases (e.g., Caspase-3) | Enzyme | Executioner caspases that directly cleave PARP-1. Their activation confirms apoptosis progression. |
The following diagram illustrates the logical troubleshooting workflow to diagnose this problem systematically.
How can I optimize my sample preparation to ensure I capture the cleaved PARP-1 signal?
Optimal sample preparation is critical for preserving the often-transient cPARP-1 signal. The key is to work rapidly and keep samples cold to prevent protein degradation and dephosphorylation.
Table 2: Optimized Sample Preparation Protocol for Apoptosis Detection
| Step | Protocol Detail | Rationale & Tips |
|---|---|---|
| 1. Cell Harvesting | Wash cells with cold PBS. Scrape cells on ice. | Preserves post-translational modifications and prevents further enzymatic activity. |
| 2. Cell Lysis | Use RIPA buffer supplemented with protease and phosphatase inhibitors. Keep lysate cold. | Protease inhibitors prevent PARP-1 cleavage by non-apoptotic proteases. Phosphatase inhibitors preserve other signaling markers. |
| 3. Protein Quantification | Perform BCA assay to determine protein concentration. | Ensures equal loading across all wells, which is essential for accurate quantification. |
| 4. Sample Preparation | Dilute lysate in Laemmli buffer. Denature at 95°C for 5-10 minutes. | Denatures proteins and inactivates enzymes, "freezing" the apoptotic state at the time of lysis. |
| 5. Storage | Aliquot and store at -70°C if not used immediately. Avoid repeated freeze-thaw cycles. Pre-cast gels (8-12%) are suitable. | Prevents protein degradation and loss of antigenicity over time. |
What are the best practices for running and detecting my western blot to maximize signal and minimize background?
After ensuring your samples are of high quality, the western blot process itself must be optimized for sensitivity. A major cause of weak signal is using too high a concentration of your primary antibody, which leads to high background and masks your specific signal.
Table 3: Troubleshooting Western Blot Detection for cPARP-1
| Problem Area | Best Practice | Explanation |
|---|---|---|
| Gel Electrophoresis | Use an appropriate acrylamide gel (8-12%) for resolving PARP-1 (116 kDa) and cPARP-1 (~89 kDa). Include a molecular weight marker. | Ensures clear separation of the full-length and cleaved fragments. |
| Protein Transfer | Confirm efficient transfer to the membrane (nitrocellulose or PVDF) using Ponceau S staining or reversible protein stains like Amido Black [32]. | Incomplete transfer is a common reason for lack of signal. |
| Blocking | Block membrane with 5% BSA or non-fat dry milk in TBST for 1-2 hours at room temperature. For phospho-proteins, BSA is preferred. | Prevents non-specific antibody binding, reducing background noise [33]. |
| Antibody Incubation | Titrate your primary antibody to find the optimal dilution. Consider incubation at 4°C overnight for better sensitivity. | Using too high an antibody concentration is a classic mistake that causes high background [33]. |
| Antibody Conservation | Use the "sheet protector (SP)" strategy to incubate with a minimal volume (20-150 µL) of antibody solution, which can provide comparable sensitivity to conventional methods while saving reagent [34]. | Efficiently distributes antibody over the membrane, allowing for incubation without agitation and faster detection. |
| Washing | Perform adequate washing (3-5 times for 10-15 min each) with TBST after both primary and secondary antibody incubations. | Removes unbound and non-specifically bound antibodies, which is crucial for reducing background [33]. |
| Detection | Use a high-sensitivity chemiluminescent substrate. If background is high, try a shorter exposure time. | Ensures the cPARP-1 band is visible without being obscured by background noise. |
What controls should I include to confidently interpret my results?
Including the correct controls is non-negotiable for validating your experimental outcome and troubleshooting failed blots.
- Positive Control for Apoptosis: Use a lysate from cells treated with a known apoptosis inducer (e.g., Staurosporine). This confirms that your antibodies and detection system are working and shows what a true cPARP-1 band looks like.
- Loading Control: Probe for housekeeping proteins like GAPDH, β-actin, or α-tubulin. This verifies equal protein loading and transfer across all lanes, allowing for accurate normalization during quantification [35].
- Specificity Control: For siRNA or knockout experiments, include a lysate from PARP-1 deficient cells to confirm antibody specificity.
The Scientist's Toolkit: Key Research Reagent Solutions
Table 4: Essential Materials for Apoptosis Detection via Western Blot
| Reagent / Material | Function | Example & Notes |
|---|---|---|
| Apoptosis Inducer | Positive control to trigger programmed cell death. | Staurosporine, Camptothecin. |
| Protease Inhibitor Cocktail | Prevents non-specific protein degradation during sample prep. | Added fresh to lysis buffer. Essential for preserving cleaved fragments. |
| Primary Antibodies | Specifically binds to target protein. | Anti-PARP-1 (for full-length), Anti-cleaved PARP-1 (Asp214). Must be validated for WB. |
| Antibody Cocktails | Pre-mixed antibodies for detecting multiple apoptosis markers. | Contains antibodies for cPARP-1, caspases, actin [35]. Increases efficiency and reproducibility. |
| Chemiluminescent Substrate | Generates light signal for HRP-conjugated secondary antibodies. | WesternBright Quantum; use high-sensitivity variants for low-abundance targets. |
| Sheet Protector | Enables minimal-volume antibody incubation. | Common stationery item; used to distribute 20-150 µL of antibody over membrane [34]. |
Frequently Asked Questions (FAQs)
Q1: My full-length PARP-1 signal is strong, but I see no cleaved band, even with a positive control. What should I do? This strongly suggests an issue with your cleaved PARP-1 antibody. Verify the antibody's specificity using a PARP-1 knockout lysate if available. Ensure you are using the correct recommended dilution and that the antibody is capable of detecting the cleaved fragment in your specific species.
Q2: What does a "bad" western blot for apoptosis look like? A bad blot can have several signs: high background (a dark, hazy film across the membrane), no signal at all, very faint bands, non-specific bands (multiple unexpected bands), or smeared bands indicating protein degradation [33].
Q3: How can I save my blot if I already have high background? Before discarding the membrane, try washing it with TBST for an extended period (e.g., overnight at 4°C) to wash away non-specifically bound antibodies. If that fails, you can use a stripping buffer to remove the antibodies and then re-probe the membrane with optimized conditions [33].
Q4: How do I quantify my cPARP-1 signal? Use densitometry software like ImageJ or commercial systems to measure the intensity of the cPARP-1 band and the loading control band. The signal for cPARP-1 is often presented as a ratio to the loading control or as a ratio of cleaved to full-length PARP-1 to indicate the level of apoptosis activation [32] [35].
Detecting cleaved PARP-1 via western blot is a critical method for confirming apoptosis in experimental models, including cancer drug development research. However, this essential technique often faces a significant practical challenge: the consumption of large volumes of precious primary antibodies. Traditional western blot methods typically require 10-15 mL of antibody solution to fully submerge and incubate a membrane, making work with rare, expensive, or custom-made antibodies particularly costly and limiting [34].
The "Sheet Protector Strategy" (SP strategy) presents an innovative solution to this problem. This approach utilizes common stationery sheet protectors to create a minimal-volume incubation system, drastically reducing antibody consumption while maintaining, and in some cases enhancing, detection quality [34]. For researchers troubleshooting weak or absent cleaved PARP-1 signals, this method offers a practical way to optimize antibody usage without compromising experimental integrity.
Experimental Protocol: Implementing the Sheet Protector Method
Materials and Reagent Setup
Key Research Reagent Solutions
| Item | Function in Protocol | Specification Notes |
|---|---|---|
| Sheet Protector | Creates incubation chamber | Standard office quality, transparent |
| Nitrocellulose Membrane | Protein immobilization | 0.2 μm pore size used in validation [34] |
| Primary Antibody | Target protein detection | Diluted in 5% skim milk/TBST |
| Secondary Antibody | Signal generation | HRP-conjugated, species-matched |
| TBST Buffer | Washing and dilution | Tris-buffered saline with 0.1% Tween-20 |
| Skim Milk | Blocking agent | 5% solution in TBST |
| Chemiluminescent Substrate | Signal detection | HRP-compatible |
Step-by-Step Workflow
Post-Transfer Membrane Preparation:
- Following standard protein transfer, block the membrane in 5% skim milk for 1 hour with gentle rocking [34].
- Briefly immerse the blocked membrane in TBST to remove excess milk.
- Thoroughly blot the membrane on a clean paper towel to absorb residual moisture, achieving a semi-dried state [34].
Antibody Application and Incubation:
- Place the prepared membrane on a leaflet of a cropped sheet protector.
- Apply the minimally volume primary antibody solution directly to the membrane surface. The required volume (μL) can be estimated for a 4.5 cm-long membrane using the formula: Volume (μL) = 8.9 × Number of Lanes [34].
- Gently overlay the upper leaflet of the sheet protector, allowing the antibody solution to disperse as a thin, even layer across the membrane surface through surface tension [34].
- For incubations exceeding 2 hours, place the sealed SP unit on a moist paper towel inside a zipper bag to prevent evaporation [34].
- Complete the protocol with standard washing, secondary antibody incubation, and detection steps.
Key Technical Advantages
- Antibody Volume Reduction: Uses only 20-150 μL versus conventional 10 mL, representing 98.5% reduction [34].
- Flexible Incubation Conditions: Effective at room temperature without agitation [34].
- Rapid Detection: Enables quality results on the order of minutes rather than hours [34].
Troubleshooting Guide: PARP-1 Detection & SP Strategy
Frequently Asked Questions
Q1: Why is my cleaved PARP-1 signal weak or absent even when using the SP strategy?
- Insufficient Antigen: Cleaved PARP-1 may be low abundance. Increase protein load (20-50 μg per lane) or induce stronger apoptosis [30] [36].
- Inefficient Transfer: High molecular weight proteins (like full-length PARP-1) may not transfer completely. Confirm transfer efficiency with Ponceau S staining [34] [30]. Add 0.05% SDS to transfer buffer to assist movement of large proteins [37].
- Antibody Issues: Verify antibody specificity for cleaved epitope. Titrate antibody concentration; SP strategy may require slightly higher antibody concentration than conventional method to compensate for lack of bulk reservoir [34] [36].
Q2: How does antibody concentration in the SP strategy compare to conventional method for optimal PARP-1 detection?
- Initial testing for common proteins showed that SP strategy with 0.2 μg/mL antibody concentration produced signal intensity comparable to conventional method with 0.1 μg/mL [34].
- For low-abundance targets like cleaved PARP-1, begin with twice the conventional antibody concentration, then titrate to find optimal dilution [34] [36].
Q3: The SP method is producing high background; how can I resolve this?
- Incomplete Blocking: Ensure membrane is fully blocked before SP incubation [38] [9].
- Excessive Antibody: Reduce primary antibody concentration [15] [36].
- Insufficient Washing: Increase wash frequency and duration post-incubation [9].
- Membrane Drying: Prevent membrane drying by ensuring proper sealing of SP unit [30].
Q4: Can I use the SP strategy for other apoptosis markers besides PARP-1?
- Yes, the methodology has been successfully validated for multiple protein targets including housekeeping proteins (GAPDH, α-tubulin, β-actin) and time-series apoptosis samples [34].
- The principles apply universally to any antibody-based membrane detection.
Quantitative Comparison: Conventional vs. SP Method
Performance Metrics for Western Blot Methods
| Parameter | Conventional Method | Sheet Protector Strategy |
|---|---|---|
| Typical Antibody Volume | 10 mL [34] | 20-150 μL [34] |
| Incubation Time | Overnight (18 hours) [34] | As little as 15 minutes to several hours [34] |
| Incubation Temperature | 4°C [34] | Room temperature [34] |
| Agitation Requirement | Yes (60 RPM) [34] | No [34] |
| Signal Specificity | Standard | Comparable to conventional [34] |
Visualization: Workflow and Apoptosis Signaling
SP Strategy Western Blot Workflow
PARP-1 Cleavage in Apoptosis Pathway
The Sheet Protector Strategy represents a significant advancement in western blot methodology, particularly valuable for apoptosis research requiring detection of low-abundance cleavage products like PARP-1. By dramatically reducing antibody consumption while maintaining detection sensitivity, this technique addresses both economic and practical challenges in the laboratory. For drug development professionals and researchers, adopting this innovative approach can enhance experimental efficiency without compromising data quality, enabling more sustainable and cost-effective research practices.
Electrophoresis and Transfer Conditions for High Molecular Weight Proteins
A weak or absent signal for cleaved PARP-1 is a common challenge in apoptosis research. For the 89 kDa cleaved fragment, this often stems from inefficient transfer out of the gel during western blotting, a problem exacerbated for proteins above 150 kDa. This guide provides targeted troubleshooting and optimized protocols to ensure reliable detection of high molecular weight (HMW) proteins like cleaved PARP-1.
Core Problem: Inefficient Transfer of High Molecular Weight Proteins
The primary obstacle in detecting cleaved PARP-1 (89 kDa) and full-length PARP-1 (116 kDa) is their slow migration through and out of the polyacrylamide gel matrix during electrophoresis and transfer [39] [40]. Standard western blot conditions are designed for average-sized proteins and often fail to fully elute HMW proteins, leading to weak or no signal. Key factors contributing to this include:
- Suboptimal Gel Chemistry: Standard Tris-glycine gels can compact HMW proteins, preventing resolution and transfer [39].
- Insufficient Transfer Time & Voltage: HMW proteins require more time and energy to migrate from the gel onto the membrane [39] [40].
- Inefficient Membrane Binding: Without proper optimization, HMW proteins may not bind effectively to the membrane [15].
Systematic Workflow for HMW Protein Detection
The following diagram outlines a logical troubleshooting pathway for weak or no cleaved PARP-1 signal, from initial verification to specific optimization steps.
Optimized Experimental Protocols
Gel Electrophoresis for HMW Protein Separation
Choosing the correct gel chemistry is critical for separating HMW proteins and facilitating their subsequent transfer.
- Recommended Gel Type: Use 3–8% Tris-acetate gels for optimal separation of proteins >150 kDa [39]. The more open matrix of these gels allows HMW proteins to migrate farther, reducing compaction and improving transfer efficiency.
- Gel Comparison: The table below summarizes the performance of different gel types for HMW proteins.
| Gel Type | Recommended Use | Separation of HMW Proteins | Transfer Efficiency |
|---|---|---|---|
| Tris-Acetate (e.g., 3-8%) | Proteins >150 kDa | Excellent | High |
| Low % Bis-Tris | Proteins >150 kDa | Good | Moderate to High |
| Tris-Glycine (e.g., 4-20%) | Broad range (20-200 kDa) | Poor (compaction at top of gel) | Low |
Detailed Protocol:
- Gel Preparation: Prepare a low-percentage separation gel (e.g., 5-7.5% acrylamide) to create a more open pore structure [40].
- Sample Loading: Load at least 20 µg of total protein per lane to ensure sufficient target antigen is present [40].
- Electrophoresis: Run the gel at 150 V for approximately 1.5 hours. For longer run times, surround the tank with ice packs to prevent overheating, which can cause protein aggregation and smearing [40] [15].
Protein Transfer from Gel to Membrane
This is the most critical step for successful HMW protein detection. The following table compares transfer method parameters.
| Transfer Method | Recommended Conditions for HMW Proteins | Voltage/Current | Time |
|---|---|---|---|
| Rapid Dry Transfer | Use preprogrammed methods (e.g., P0, P3) with extended time [39] | 20-25 V | 8-10 min |
| Wet Transfer | Pre-chill buffer, include SDS, use high current [40] | 500 mA | 60 min |
| Rapid Semi-Dry Transfer | Use high ionic strength buffers, extend time [39] [41] | 1.5 mA/cm² | 10-12 min |
Detailed Protocol for Wet Transfer (Recommended for HMW Proteins):
- Gel Equilibration: After electrophoresis, immerse the gel in 1X transfer buffer for 40 minutes. For gels other than Tris-acetate, a 5-10 minute equilibration in 20% ethanol can help shrink the gel and remove salts, improving transfer efficiency [39] [40].
- Membrane Activation: Activate a PVDF membrane by soaking it in 99.5% methanol for 15 seconds, then immerse it in transfer buffer for 30 minutes [40].
- Transfer Stack Assembly: Assemble the transfer stack in the following order (cathode to anode):
- Sponge
- Filter paper (pre-soaked in transfer buffer)
- Gel
- Activated PVDF membrane
- Filter paper (pre-soaked in transfer buffer)
- Sponge Ensure no air bubbles are trapped between the gel and membrane by rolling a test tube or gel roller over the stack [15].
- Transfer Execution: Perform the transfer at 500 mA for 1 hour at 4°C using pre-chilled buffer. Adding 0.01–0.05% SDS to the transfer buffer can help pull large proteins out of the gel [40] [15].
Post-Transfer Verification and Immunodetection
- Confirm Transfer Efficiency: After transfer, stain the gel with a coomassie-based or dedicated protein stain to confirm the HMW proteins have left the gel. Alternatively, stain the membrane with a reversible protein stain (e.g., Ponceau S) to visualize the transferred proteins [15].
- Antibody Incubation: Use a validated PARP-1 antibody that specifically detects the 89 kDa cleaved fragment, such as PARP Antibody #9542 [42]. Follow the recommended dilution (e.g., 1:1000) and incubate overnight at 4°C for optimal results [42].
Troubleshooting FAQs
1. I see a strong full-length PARP-1 (116 kDa) signal but no cleaved (89 kDa) signal. What is wrong? This is a classic sign of inefficient transfer. The smaller 89 kDa fragment may transfer more easily, but if conditions are not optimized for HMW proteins, it can still be retained in the gel. Solution: Increase your transfer time and use a low-percentage or Tris-acetate gel as outlined in the protocols above [39] [40].
2. My high molecular weight protein bands are smeared. How can I fix this? Smearing is often caused by overheating during electrophoresis or an over-loaded gel. Solution: Ensure the electrophoresis system is cooled with ice packs or run in a cold room. Also, reduce the amount of total protein loaded per lane and ensure your samples are not viscous or contaminated with genomic DNA [15].
3. After transfer, I see high background on my membrane. What should I do? High background is typically related to immunodetection conditions. Solution:
- Decrease the concentration of your primary and/or secondary antibodies.
- Ensure sufficient blocking (1 hour at room temperature or overnight at 4°C) using a compatible blocking buffer like BSA or specialty commercial blockers.
- Increase the number and duration of washes with TBST containing 0.05% Tween-20 [15].
4. My transfer seems inconsistent with semi-dry blotting. What are the common pitfalls? Semi-dry transfers are prone to uneven pressure and buffer exhaustion. Solution:
- Ensure filter papers are fully soaked in fresh transfer buffer for at least 5 minutes before assembly.
- Apply moderate, uniform pressure across the entire gel area.
- Limit run time to prevent overheating and replace anode/cathode buffers every 2-3 runs [41].
The Scientist's Toolkit: Essential Reagents and Materials
| Item | Function / Rationale | Example |
|---|---|---|
| Tris-Acetate Gels | Optimal gel matrix for separating HMW proteins; prevents compaction. | NuPAGE 3–8% Tris-Acetate Gels [39] |
| PARP-1 Antibody | Primary antibody that specifically detects full-length (116 kDa) and cleaved (89 kDa) PARP-1. | PARP Antibody #9542 [42] |
| PVDF Membrane | Robust membrane for protein retention; requires methanol activation for high binding capacity. | iBlot 2 NC/Regular Stacks [39] |
| Transfer Buffer Additives | SDS aids HMW protein elution; Methanol promotes membrane binding. | 0.01-0.05% SDS, 20% Methanol [40] [15] |
| Pre-stained HMW Markers | Visual benchmarks for tracking electrophoresis and transfer efficiency. | MagicMark XP Western Standard [39] |
| Reversible Protein Stain | Validates successful protein transfer from gel to membrane post-transfer. | Pierce Reversible Protein Stain Kit [15] |
Troubleshooting Pathway for Weak or No Signal
The following decision tree helps diagnose the most likely cause of a weak or absent cleaved PARP-1 signal and directs you to the appropriate solution.
Step-by-Step Diagnostic and Optimization Guide for Signal Enhancement
Poly (ADP-ribose) polymerase-1 (PARP-1) is a nuclear enzyme with a well-established role in DNA repair. During the early stages of apoptosis, caspase-3 and caspase-7 cleave PARP-1 into specific signature fragments, which serves as a biochemical hallmark of programmed cell death. The cleavage of full-length PARP-1 (116 kDa) generates a 89-kD catalytic fragment and a 24-kD DNA-binding domain fragment. Detecting these fragments, particularly the 89-kD band, via western blotting provides crucial confirmation that apoptosis has been initiated in your experimental system. However, the absence of an expected cleaved PARP-1 signal is a common challenge that requires systematic troubleshooting [1].
Frequently Asked Questions (FAQs) and Troubleshooting Guides
Q1: My western blot shows no signal for cleaved PARP-1, even though I expect apoptosis. What are the primary causes?
A weak or absent cleaved PARP-1 signal can stem from issues at multiple stages of your experiment. The most common causes are:
- Insufficient Apoptosis Induction: The most straightforward explanation is that your treatment did not induce enough apoptosis to generate a detectable level of cleaved PARP-1.
- Low Abundance of Target Protein: The cleaved fragment may be present at levels below the detection threshold of your system [43].
- Problems with Antibodies: The primary or secondary antibody may be inactive, used at a sub-optimal concentration, or incompatible with your species [30].
- Inefficient Protein Transfer: Proteins may not have transferred efficiently from the gel to the membrane during the blotting process [44] [43].
- Protein Degradation: If samples were not handled properly, proteases may have degraded the target protein [44].
- Incorrect Lysis Buffer: The lysis buffer may not be effective for extracting nuclear proteins like PARP-1 [43].
Q2: What are the specific molecular weights of PARP-1 fragments I should look for?
PARP-1 is cleaved by different proteases during various cell death programs, resulting in distinct signature fragments. The table below summarizes the key fragments.
Table 1: PARP-1 Cleavage Fragments as Biomarkers of Cell Death
| Protease | Cleavage Fragment Sizes | Associated Cell Death Process | Key Characteristics |
|---|---|---|---|
| Caspase-3/7 | 89 kDa and 24 kDa [1] | Apoptosis (Hallmark) | The 24-kD DNA-binding fragment remains nucleus-bound; the 89-kD fragment is liberated into the cytosol [1]. |
| Calpain | 50-62 kDa fragments | Necrosis, Excitotoxicity | Associated with calcium-dependent cell death pathways. |
| Granzyme A | ~50 kDa fragment | Immune-mediated killing | A specific signature of lymphocyte-induced apoptosis. |
| Cathepsins | Variable fragments | Lysosomal cell death | Associated with pathological conditions. |
| Matrix Metalloproteinases (MMPs) | Variable fragments | Inflammation, Pathology |
Note: The 89 kDa fragment generated by caspase-3/7 is the most widely used and reliable indicator of apoptosis.
Q3: How can I systematically troubleshoot a weak or absent cleaved PARP-1 signal?
Follow this logical troubleshooting workflow to diagnose and resolve the issue.
Detailed Troubleshooting Steps:
- Confirm Apoptosis Induction: Always include a positive control lysate from cells treated with a known apoptosis inducer (e.g., staurosporine, camptothecin). This verifies that your antibodies and detection system are working and that your experimental treatment is capable of inducing apoptosis [44] [43].
- Verify Sample Integrity:
- Prevent Degradation: Use fresh protease inhibitors in your lysis buffer and keep samples on ice during preparation to prevent non-specific cleavage by other proteases [44].
- Check for Degradation Signs: Examine the entire blot for a "smear" of lower molecular weight bands, which indicates generalized protein degradation.
- Check Transfer Efficiency:
- Stain Membranes: After transfer, stain your membrane with Ponceau S to confirm that proteins have been transferred uniformly from the gel [43] [30].
- Stain Gels: Alternatively, stain the gel post-transfer with Coomassie Brilliant Blue to see if proteins remain in the gel, indicating an incomplete transfer [44].
- Troubleshoot Antibodies:
- Titrate Antibodies: The dilution on the datasheet is a starting point. Perform a gradient dilution of your primary and secondary antibodies to find the optimal signal-to-noise ratio for your specific setup [43] [30].
- Test Antibody Functionality: Perform a dot blot with a positive control lysate to confirm the primary antibody is active [43].
- Check Specificity: Ensure the primary antibody is validated to detect the cleaved (89 kDa) fragment of PARP-1, not just the full-length protein.
- Confirm Secondary Antibody: Verify that the host species of your secondary antibody matches the primary antibody (e.g., anti-rabbit secondary for a rabbit primary) [30].
- Optimize Detection:
- Enrich for the Target Protein:
- Increase Protein Load: Load more total protein (e.g., 20–50 µg per lane) to increase the amount of target protein [43] [30].
- Concentrate Your Sample: Use protein concentration methods if the protein is naturally low in abundance.
- Use Nuclear Fractionation: Since PARP-1 is nuclear, preparing a nuclear extract can enrich for the protein and its fragments, enhancing your signal [44] [43].
Q4: My blot has a high background or non-specific bands. How can I improve the clarity?
A high background or extra bands can obscure your specific cleaved PARP-1 signal.
- Optimize Blocking: Extend blocking time or switch blocking agents. For example, if using milk, switch to BSA, especially when detecting phosphoproteins or if background is high [44] [30].
- Reduce Antibody Concentration: High concentrations of primary or secondary antibody are a common cause of high background. Titrate to find the lowest effective concentration [44].
- Increase Washing Stringency: Perform more frequent and longer washes (e.g., 5-6 washes for 5-10 minutes each) with TBST after antibody incubations [30].
- Include Controls: Run a secondary antibody-only control lane to identify non-specific binding from the secondary antibody [30].
Experimental Protocols for Key Scenarios
Protocol 1: Standard Western Blotting for Cleaved PARP-1
This protocol is optimized for detecting cleaved PARP-1, based on consolidated best practices [44] [43] [30].
- Sample Preparation:
- Lyse cells in RIPA buffer supplemented with fresh protease inhibitors.
- Keep samples on ice at all times.
- Determine protein concentration using a BCA assay.
- Prepare samples in Laemmli buffer, boil for 5 minutes, and load 20-50 µg of total protein per lane.
- Gel Electrophoresis:
- Use an 8-12% SDS-PAGE gel to resolve proteins.
- Run gel at a constant voltage until the dye front reaches the bottom.
- Protein Transfer:
- Use wet transfer for higher resolution, especially for proteins of different sizes.
- Transfer for 1-2 hours at constant current (e.g., 300 mA) or overnight at lower current.
- Critical Step: After transfer, stain the membrane with Ponceau S to confirm efficient and even transfer.
- Blocking and Antibody Incubation:
- Block the membrane with 5% BSA or non-fat milk in TBST for 1 hour at room temperature with agitation.
- Incubate with primary antibody (e.g., anti-cleaved PARP-1) diluted in blocking buffer overnight at 4°C with gentle agitation [44].
- Wash membrane 3 times for 10 minutes each with TBST.
- Incubate with HRP-conjugated secondary antibody diluted in blocking buffer for 1 hour at room temperature.
- Wash membrane 3-5 times for 10 minutes each with TBST.
- Detection:
- Incubate membrane with fresh ECL substrate according to the manufacturer's instructions.
- Image using a chemiluminescence imager, testing a range of exposure times.
Protocol 2: The Sheet Protector (SP) Strategy for Antibody Conservation
A recent innovation allows for high-quality western blots using minimal antibody volumes, which is ideal for conserving precious antibody stocks [34].
- Follow Steps 1-3 from the standard protocol for sample prep, gel electrophoresis, and transfer.
- After Blocking:
- Wash the blocked membrane briefly in TBST and blot it gently on a paper towel to remove excess moisture. The membrane should be semi-dry.
- Antibody Probing with SP:
- Place the semi-dried membrane on a leaflet of a cropped sheet protector.
- Apply a small volume of primary antibody working solution directly onto the membrane (20-150 µL, depending on membrane size).
- Gently place the upper leaflet of the sheet protector over the membrane, allowing the antibody solution to spread evenly as a thin layer by surface tension.
- Incubate the "SP unit" at room temperature for several hours or seal it in a zipper bag with a damp paper towel to prevent evaporation for longer incubations.
- Continue with Steps 4-5 from the standard protocol for washing, secondary antibody incubation, and detection. This method has been validated to produce sensitivity and specificity comparable to conventional methods while drastically reducing antibody consumption [34].
The Scientist's Toolkit: Essential Research Reagents
Table 2: Key Reagents for Cleaved PARP-1 Detection
| Reagent | Function | Key Considerations |
|---|---|---|
| Positive Control Lysate | Lysate from cells undergoing confirmed apoptosis (e.g., staurosporine-treated). | Essential for validating your entire workflow and confirming antibody performance [44]. |
| Protease Inhibitor Cocktail | Prevents non-specific protein degradation during sample preparation. | Must be added fresh to the lysis buffer [44] [43]. |
| PARP-1 (Cleaved Specific) Antibody | Primary antibody that specifically recognizes the 89 kDa caspase-cleaved fragment. | Must be validated for western blot. Titration is crucial for optimal results [43]. |
| HRP-conjugated Secondary Antibody | Enzyme-linked antibody for chemiluminescent detection. | Must be specific to the host species of the primary antibody. Avoid buffers containing sodium azide, which inhibits HRP [44] [30]. |
| Chemiluminescent (ECL) Substrate | Enzyme substrate that produces light upon reaction with HRP. | Use fresh substrate for maximum sensitivity. More sensitive substrates are available for low-abundance targets [43] [30]. |
| Ponceau S Stain | Reversible stain for total protein on PVDF or nitrocellulose membranes. | A quick and cheap method to confirm successful and even protein transfer after blotting [43] [30]. |
| Nuclear Extraction Kit | For preparing subcellular fractions enriched with nuclear proteins like PARP-1. | Can significantly enhance signal for low-abundance nuclear targets by reducing contaminating cytoplasmic proteins [44] [43]. |
PARP-1 Signaling and Cleavage Pathway
The following diagram illustrates the role of PARP-1 in DNA repair and its cleavage during apoptosis, providing context for its use as a biomarker.
For researchers investigating apoptosis, particularly in cancer and drug development studies, detecting cleaved PARP-1 via Western blot is a critical assay. A weak or absent signal for this key marker can jeopardize data interpretation and project timelines. This guide provides a systematic, troubleshooting-focused approach to two of the most powerful optimization levers in immunodetection: antibody titration and buffer selection, framed within the specific context of obtaining a robust cleaved PARP-1 signal.
Frequently Asked Questions (FAQs)
1. Why might I get no signal for cleaved PARP-1 even when my apoptosis positive control is effective?
A weak or absent signal can stem from issues at multiple stages. For a low-abundance, transient target like cleaved PARP-1, the most common culprits are insufficient antigen loaded on the gel or suboptimal antibody binding conditions [45] [15] [46]. This includes using an antibody concentration that is too low, an incompatible antibody dilution buffer, or a blocking agent that masks the epitope.
2. How does sodium azide affect my Western blot results?
Sodium azide is a potent inhibitor of Horseradish Peroxidase (HRP), the enzyme conjugated to most secondary antibodies [45] [15] [30]. If your wash buffer, antibody storage buffer, or blocking buffer contains sodium azide, it can quench the HRP activity, leading to a weak or nonexistent signal. Always use sodium azide-free buffers for all steps involving HRP-conjugated antibodies.
3. My blot has a high background. How is this related to my antibody and buffer choices?
High background is frequently a direct result of excessive antibody concentration or insufficient blocking [47] [15] [30]. Too much primary or secondary antibody increases non-specific binding. Similarly, an inadequate blocking step fails to prevent antibodies from sticking to the membrane everywhere. Switching from milk to BSA can be particularly helpful for detecting phospho-proteins or reducing background caused by biotin in milk [47] [46].
4. What is the single most important step I can take to optimize a new antibody?
Antibody Titration is the most critical and universally recommended step for optimization [48] [47] [30]. The dilution suggested on the datasheet is a starting point; the optimal concentration for your specific experimental conditions (e.g., sample type, transfer efficiency, detection system) must be determined empirically through a dilution series.
The table below summarizes the core problems, their causes, and specific corrective actions related to antibody and buffer optimization.
| Problem | Primary Cause | Corrective Action |
|---|---|---|
| Weak/No Signal | Antibody concentration too low [15] | Titrate primary antibody; Increase concentration or extend incubation (4°C overnight) [45] [30]. |
| Low antigen abundance [45] [46] | Load more protein (20–50 µg per lane is a start); enrich via IP for low-abundance targets [45] [30]. | |
| Incompatible buffer/blocker [46] | Use recommended diluent (BSA vs. milk); for phospho-targets, BSA is preferred [47] [46]. | |
| Sodium azide contamination [45] [30] | Prepare fresh, sodium azide-free buffers for all steps involving HRP-conjugated antibodies [15] [30]. | |
| High Background | Antibody concentration too high [47] [15] | Titrate to find lower optimal concentration of primary and/or secondary antibody [48] [47]. |
| Inadequate blocking [47] | Increase blocking agent concentration (e.g., to 5%) or time; switch blocking reagent (e.g., milk to BSA) [47] [15]. | |
| Insufficient washing [48] [47] | Increase wash number, duration, and volume; use TBST with 0.05% Tween-20 [15]. | |
| Non-Specific Bands | Non-specific antibody binding [15] [30] | Titrate antibody; ensure antibody is validated for WB in your species; check for isoforms/PTMs [46]. |
| Protein degradation [46] | Use fresh protease inhibitors; prepare samples on ice; avoid repeated freeze-thaw cycles [46]. |
Experimental Protocols
Protocol 1: Antibody Titration to Optimize Signal-to-Noise Ratio
This protocol is essential for balancing strong specific signal with low background [48] [47].
- Prepare the Membrane: Run a gel with your positive control and experimental samples and transfer to a membrane. Cut the membrane into strips, each containing a full set of lanes (e.g., marker, control, experimental).
- Dilution Series: Prepare a series of primary antibody dilutions. A typical range is to start with the manufacturer's recommendation and create 2X, 5X, and 10X higher and lower dilutions [30]. For example, if the suggested dilution is 1:1000, test 1:500, 1:1000, 1:2000, and 1:5000.
- Incubate: Incubate each membrane strip with a different antibody dilution in the recommended blocking buffer (e.g., 5% BSA in TBST) for 1 hour at room temperature or overnight at 4°C with gentle agitation.
- Wash and Detect: Wash all strips identically (e.g., 3 x 5 mins with TBST). Incubate with the same dilution of HRP-conjugated secondary antibody for all strips. Wash again and detect using your chemiluminescent substrate.
- Analyze: Image the blots with the same exposure time. The optimal dilution is the one that yields the strongest specific signal for your target (e.g., cleaved PARP-1) with the cleanest background and minimal non-specific bands.
Protocol 2: Blocking Buffer Comparison
The choice of blocking agent can dramatically impact results, especially for modified targets [47] [46].
- Prepare Membranes: As in Protocol 1, prepare identical membrane strips from the same gel.
- Block: Block each strip with a different, freshly prepared blocking buffer for 1 hour at room temperature. Common options include:
- 5% Non-Fat Dry Milk in TBST
- 3-5% Bovine Serum Albumin (BSA) in TBST
- Commercial protein-free blocking buffers
- Probe: Incubate all strips with the same, pre-optimized dilution of your primary and secondary antibodies, using the same blocking buffer to dilute the antibodies.
- Analyze: Compare the signal intensity and background across the strips. BSA is often superior for detecting phosphorylated epitopes and can reduce background [47] [46].
The Scientist's Toolkit: Research Reagent Solutions
The table below lists essential reagents for troubleshooting antibody and buffer issues in cleaved PARP-1 detection.
| Reagent | Function & Rationale |
|---|---|
| Bovine Serum Albumin (BSA) | A preferred blocking agent and antibody diluent for phosphorylated proteins and to reduce background caused by biotin/casein in milk [47] [46]. |
| HRP-Conjugated Secondary Antibodies | Enzymes for chemiluminescent detection. Must be matched to the host species of the primary antibody (e.g., anti-rabbit for rabbit primary) [30]. |
| Protease Inhibitor Cocktail | Prevents protein degradation during sample preparation, preserving the cleaved PARP-1 fragment and preventing smearing or loss of signal [46]. |
| Chemiluminescent Substrate | A sensitive substrate is crucial for detecting low-abundance targets like cleaved PARP-1. Consider high-sensitivity formulations for faint signals [45] [15]. |
| Ponceau S Stain | A reversible total protein stain used after transfer to verify successful and even protein transfer to the membrane before proceeding with immunodetection [45] [30]. |
| PVDF or Nitrocellulose Membrane | The solid support for transfer. PVDF offers higher binding capacity, while nitrocellulose can sometimes yield lower background. Use 0.2 µm pore size for low MW proteins [45] [15]. |
Theoretical Framework: The Biophysics of Antibody Binding
Understanding the principles behind antigen-antibody interactions provides a rational basis for troubleshooting. The binding is a dynamic equilibrium governed by thermodynamics and kinetics [49].
The strength of the interaction is defined by the dissociation constant (KD), where a lower KD means higher affinity. KD is the ratio of the dissociation rate constant (koff) to the association rate constant (kon). This is directly related to the Gibbs free energy (ΔG) of binding; a more negative ΔG indicates a more stable, favorable interaction [49]. Specific antibody-antigen binding has a highly negative ΔG, while non-specific binding is characterized by a ΔG near zero.
This framework explains why optimization works:
- Antibody Titration directly affects the mass action principle, driving the equilibrium toward complex formation by increasing [Ab] [49].
- Buffer and Blocking Optimization works by creating an environment that maximizes the ΔG difference between specific and non-specific binding. Effective blocking agents adsorb to the membrane, making non-specific binding entropically and enthalpically unfavorable (ΔG ≈ 0), while the specific interaction remains strongly favorable (highly negative ΔG) [49].
Optimizing Membrane Blocking and Washing to Reduce Background
In the context of researching cleaved PARP-1, a key marker of apoptosis, high background noise on a Western blot can obscure critical results and lead to misinterpretation. Effective blocking and washing are fundamental to minimizing this background, ensuring that the specific signal of the cleaved fragment is clear and detectable. This guide provides targeted troubleshooting and optimized protocols to achieve a high signal-to-noise ratio, which is especially crucial for detecting lower-abundance cleaved proteins like PARP-1.
Troubleshooting Guide: High Background
| Problem Description | Primary Cause | Recommended Solutions |
|---|---|---|
| High Uniform Background | Insufficient blocking or incompatible blocking agent [50] [30] [51] | Increase blocking time/temperature; increase blocker concentration to 5-10%; switch from milk to BSA for phospho-proteins or biotin systems [50] [52] [53]. |
| Excessive antibody concentration [30] [52] | Titrate primary and secondary antibodies to find optimal dilution; include a secondary-only control [52] [54] [55]. | |
| Inadequate washing [30] [55] | Increase wash number, duration, and volume; use 0.1% Tween-20 in buffers [50] [51]. | |
| Speckled or Blotchy Background | Membrane mishandling or dried membrane [30] [52] | Ensure membrane remains wet; handle with clean tools [52]. |
| Buffer contamination or antibody aggregates [30] [52] | Prepare fresh buffers; filter antibodies and buffers with a 0.2 µm filter before use [30] [52]. | |
| Air bubbles during transfer [52] | Remove all air bubbles between gel and membrane during transfer setup [52]. |
Optimization Protocols
Selecting and Using a Blocking Buffer
The choice of blocking buffer is critical and depends on your target protein and detection system.
Comparison of Common Blocking Agents:
| Blocking Agent | Recommended Concentration | Ideal Use Cases | Contraindications |
|---|---|---|---|
| Non-Fat Dry Milk | 3-5% (w/v) in TBST [50] [51] | General purpose, low-cost blocking [50] [56]. | Phosphoprotein detection (e.g., phosphorylated signaling proteins); avidin-biotin systems; primary antibodies raised in cow, goat, or sheep [50] [51] [53]. |
| Bovine Serum Albumin (BSA) | 2-5% (w/v) in TBST [50] [53] | Detecting phosphoproteins; biotin-streptavidin detection; offers higher sensitivity for low-abundance targets [50] [52] [53]. | Weaker blocking can lead to higher background; not for use with anti-bovine secondary antibodies [51] [56]. |
| Normal Serum | 5% (v/v) in buffer [51] | When using secondary antibodies raised against bovine species; can reduce specific background [51]. | Never use serum from the primary antibody host species [51]. |
Standard Blocking Protocol:
- Preparation: Dissolve your chosen blocking agent at the desired concentration in Tris-buffered saline (TBS) or phosphate-buffered saline (PBS). For most applications, adding 0.1% Tween-20 (making TBST or PBST) is recommended to reduce non-specific binding [50] [51]. Filter the solution to remove particulates.
- Incubation: Immerse the membrane completely in the blocking buffer. Incubate for 1 hour at room temperature with gentle agitation [50] [51]. For stubborn background, incubation can be extended overnight at 4°C.
- Post-Blocking Wash: Briefly rinse the membrane with TBST to remove excess blocker before adding the primary antibody. This can improve antibody access to the antigen [51].
Optimizing Washing Steps
Thorough washing is equally important for reducing background.
Standard Washing Protocol:
- Buffer: Use Tris-buffered saline (TBS) or phosphate-buffered saline (PBS) with 0.1% Tween-20 (TBST/PBST) [50] [34].
- Procedure: Perform 3-5 washes for 5-10 minutes each with gentle rocking or agitation [50] [30]. Use a sufficient volume of buffer to cover the membrane completely.
- Optimization: If background persists, increase the number of washes, the duration of each wash, or the volume of wash buffer [55].
The following diagram summarizes the key decision points in the blocking and washing optimization workflow.
Research Reagent Solutions
| Item | Function | Key Considerations |
|---|---|---|
| Nitrocellulose/PVDF Membrane | Solid support for transferred proteins. | Nitrocellulose is generally preferred for its lower background and binding capacity [30]. |
| Blocking Agent (BSA, Milk, Casein) | Saturates unused protein-binding sites on the membrane to prevent non-specific antibody binding [50] [53]. | Choice is critical (see table above). BSA is often preferred for cleaved PARP-1 to maximize sensitivity [52] [53]. |
| Tris-Buffered Saline (TBS) | Standard buffer for diluents and washes; maintains stable pH and ionic strength [50]. | Preferred over PBS for fluorescent detection and phosphoprotein work [50] [51]. |
| Tween 20 | Non-ionic detergent added to buffers (0.05-0.1%) to reduce hydrophobic interactions and minimize background [50] [51]. | Higher concentrations may disrupt antibody-antigen binding [53]. |
| Primary Antibody | Binds specifically to the target protein (e.g., cleaved PARP-1). | Always titrate for optimal concentration; high concentrations cause background [54] [55]. |
| HRP-Conjugated Secondary Antibody | Binds to the primary antibody for chemiluminescent detection. | Must be raised against the host species of the primary antibody [52]. |
Frequently Asked Questions (FAQs)
Q1: Why should I use BSA instead of milk when detecting cleaved PARP-1? While cleaved PARP-1 itself is not a phosphoprotein, the apoptosis signaling pathways it is involved in often are. Using BSA eliminates the risk of background caused by phosphoproteins (casein) and endogenous biotin present in milk, which can interfere with sensitive detection systems. BSA often provides a cleaner background for low-abundance targets like cleaved fragments [50] [52] [53].
Q2: My blot has a high background even after blocking with BSA and thorough washing. What should I check next? First, perform a secondary-only control (omit the primary antibody). If background remains, the secondary antibody is the culprit. Try diluting it further or filter it to remove aggregates [30] [52]. If the control is clean, the primary antibody concentration may be too high, and titration is needed [54] [55]. Also, ensure the membrane never dried out during the process, as this can permanently cause high, blotchy background [30] [52].
Q3: Can I block my membrane for too long? Yes, over-blocking can sometimes mask the epitope your primary antibody needs to bind to, leading to a weak or absent signal. It can also promote bacterial growth in the buffer. For most applications, 1 hour at room temperature or overnight at 4°C is sufficient. If you suspect over-blocking, try reducing the incubation time [51] [52].
Q4: Is it necessary to include Tween 20 in all my buffers? Including 0.1% Tween 20 in your blocking and wash buffers is highly recommended, as it effectively reduces non-specific binding. However, if you are working with a low-affinity antibody that washes off easily, you may consider reducing the Tween concentration to 0.05% or omitting it from the antibody incubation buffer [53].
Enhancing Signal-to-Noise Ratio with Advanced Chemiluminescent Substrates
Core Concepts: PARP-1 and Apoptosis Detection
What is the significance of cleaved PARP-1 in western blotting?
Cleaved PARP-1 is a well-established biomarker for apoptosis. During programmed cell death, executioner caspases (such as caspase-3) cleave the full-length PARP-1 protein (116 kDa) into a characteristic 89 kDa fragment. This cleavage event is a definitive indicator that the apoptotic cascade is active within the cells. Therefore, detecting the cleaved 89 kDa band via western blot is a crucial method for confirming apoptosis in research models, particularly in cancer research and drug development studies [35].
Why is optimizing the signal-to-noise ratio critical for cleaved PARP-1 detection?
A high signal-to-noise ratio is essential because it allows for the clear distinction of the specific cleaved PARP-1 band from non-specific background staining. A weak or absent target signal can easily be lost in a noisy background, leading to false negative conclusions. This is especially pertinent for cleaved PARP-1, as its expression can be transient or limited in certain experimental conditions. Advanced chemiluminescent substrates are key tools that enhance the specific signal while minimizing background, thereby improving the reliability and sensitivity of your apoptosis detection assay [57].
Troubleshooting FAQs: Weak or No Cleaved PARP-1 Signal
Q: My western blot shows a strong signal for my loading control but no band for cleaved PARP-1. What could be wrong?
A: A missing cleaved PARP-1 signal despite a positive loading control suggests an issue specific to the target protein or its detection. The following table summarizes the common causes and solutions.
| Possible Cause | Recommended Solution |
|---|---|
| Low Apoptotic Induction | Include a positive control (e.g., cells treated with a known apoptosis-inducing drug) to verify your experimental conditions successfully trigger apoptosis [58] [59]. |
| Inefficient Transfer | Verify transfer efficiency by staining the membrane with Ponceau S or a reversible protein stain after blotting. For the 89 kDa fragment, ensure your transfer time and current are appropriate for its molecular weight [58] [15]. |
| Antibody Issues | Titrate your primary antibody to find the optimal concentration. Perform a dot blot to confirm antibody activity. Ensure the antibody is specific for the cleaved form of PARP-1 and is validated for western blotting [59]. |
| Insufficient Antigen | The amount of cleaved PARP-1 may be below the detection limit. Load more protein per lane or concentrate your sample. Use protease inhibitors during sample preparation to prevent degradation [58] [59]. |
| Substrate Depletion | The chemiluminescent signal may decay before imaging. Use advanced, long-lasting substrates and image the blot promptly after adding substrate. Try multiple exposure times to capture the optimal signal [57]. |
Q: I get a high background that obscures my cleaved PARP-1 band. How can I reduce it?
A: High background is often due to non-specific antibody binding or suboptimal blocking. The table below outlines specific remedies.
| Possible Cause | Recommended Solution |
|---|---|
| Antibody Concentration Too High | Decrease the concentration of your primary and/or secondary antibody. Perform a gradient dilution to find the ideal concentration that maximizes signal and minimizes background [58] [15] [10]. |
| Insufficient Blocking or Washing | Extend blocking time to at least 1 hour at room temperature or overnight at 4°C. Increase the number and volume of washes, and include 0.05% Tween 20 in your wash buffer [58] [15]. |
| Incompatible Blocking Buffer | For phospho-proteins or certain antibodies, avoid milk. Switch to BSA-based blocking buffers. Also, ensure you are not using sodium azide (which inhibits HRP) in your antibody buffers [15] [59]. |
| Overexposure During Detection | Reduce film exposure time or digitally adjust the exposure settings on your imager. For digital imagers, ensure you are not over-saturating the detector [58] [57]. |
| Contaminated Reagents or Membranes | Prepare fresh buffers. Always wear gloves and use clean forceps when handling membranes to prevent contamination [15]. |
Experimental Protocol for Robust Cleaved PARP-1 Detection
Optimized Western Blot Workflow for Apoptosis Markers
The following diagram illustrates the key steps in a western blot protocol tailored for detecting cleaved PARP-1, highlighting critical optimization points to enhance signal-to-noise ratio.
Step-by-Step Methodology
Sample Preparation
- Lysis: Lyse cells or tissues in a suitable RIPA or NP-40 buffer, supplemented with a fresh protease inhibitor cocktail to prevent protein degradation [60].
- Homogenization: For tissues, use a Dounce homogenizer or a high-throughput bead mill for efficient disruption [60].
- Quantification: Accurately measure protein concentration using a compatible assay (e.g., BCA assay). Load 20-50 µg of total protein per lane for cleaved PARP-1 detection [15] [35].
Gel Electrophoresis and Transfer
- Perform SDS-PAGE using a standard 8-12% polyacrylamide gel to optimally resolve the 89 kDa cleaved PARP-1 fragment.
- Use a wet transfer system for higher resolution, especially for proteins around 100 kDa. Ensure no air bubbles are trapped in the gel-membrane sandwich [59].
- After transfer, confirm efficiency and even transfer by staining the membrane with Ponceau S [15].
Immunoblotting
- Blocking: Block the membrane for 1-2 hours at room temperature with 5% BSA in Tris-Buffered Saline (TBS). BSA is often preferred over milk for phospho-specific and some antibodies [15].
- Primary Antibody: Incubate with the primary antibody against cleaved PARP-1 diluted in blocking buffer overnight at 4°C. This lower temperature incubation enhances specific binding and reduces background [58] [59].
- Washing: Wash the membrane 3 times for 5 minutes each with TBST (TBS with 0.1% Tween-20) to remove unbound antibody [15].
- Secondary Antibody: Incubate with an HRP-conjugated secondary antibody, diluted to the manufacturer's recommended concentration, for 1 hour at room temperature. Avoid using sodium azide in any buffers, as it inhibits HRP activity [15] [59].
Detection with Chemiluminescent Substrates
- Use an advanced, enhanced chemiluminescent (ECL) substrate that offers a strong, long-lasting signal. These substrates are formulated for high sensitivity and a wide linear dynamic range, which is crucial for quantitative analysis [57].
- Incubate the membrane with the substrate mixture for approximately 5 minutes as per the manufacturer's instructions.
- Image promptly using a digital CCD imager. Digital imagers provide a larger dynamic range than film and allow for multiple exposure captures to ensure the optimal signal is acquired without saturation [57].
The Scientist's Toolkit: Essential Research Reagents
| Reagent / Material | Function in Cleaved PARP-1 Detection |
|---|---|
| Protease Inhibitor Cocktail | Prevents degradation of the cleaved PARP-1 fragment and other proteins during sample preparation [58] [60]. |
| BSA (Bovine Serum Albumin) | A preferred blocking agent for many antibodies, helps reduce non-specific background binding [15]. |
| Anti-Cleaved PARP-1 Antibody | Primary antibody that specifically recognizes the caspase-generated 89 kDa fragment, not the full-length protein [35]. |
| HRP-Conjugated Secondary Antibody | Conjugate that binds the primary antibody and catalyzes the chemiluminescent reaction. Must be specific to the host species of the primary antibody [58] [57]. |
| Advanced ECL Substrate | A enhanced chemiluminescent reagent that produces a bright, sustained light signal upon reaction with HRP, enabling sensitive detection [57]. |
| PVDF or Nitrocellulose Membrane | Porous membrane that binds proteins after transfer. PVDF is known for its high binding capacity and mechanical strength [15] [59]. |
| Ponceau S Stain | Reversible stain used to quickly visualize total protein on the membrane after transfer, confirming efficiency and even loading [15]. |
Pathway Visualization: PARP-1 Cleavage in Apoptosis
Understanding the biological context of your target is key. This diagram illustrates the position of PARP-1 cleavage within the intrinsic apoptosis pathway, a common mechanism activated by chemotherapeutic drugs.
Ensuring Specificity and Reproducibility in Your Results
■ FAQs: Resolving Weak or No Cleaved PARP-1 Signal
Why is a positive control critical for detecting cleaved PARP-1?
A positive control lysate confirms that your antibodies and detection method are working. For cleaved PARP-1, this means using a sample from cells known to be undergoing apoptosis, where PARP-1 is cleaved by caspases from its full-length form (116 kDa) into the characteristic 89 kDa and 24 kDa fragments. A positive result with this control, even if your experimental samples show no signal, verifies that your protocol is functional and any negative results are valid. Conversely, a negative result in the positive control lane indicates a failure in your procedure or reagents [61] [62].
Experimental Protocol: Generating a Positive Control
- Cell Line: Use a common, easy-to-culture cell line like HeLa or HEK293.
- Apoptosis Induction: Treat cells with 1 µM Staurosporine for 4-6 hours. Alternatively, other inducers like actinomycin D or anti-FAS antibody can be used.
- Validation: Confirm apoptosis induction and PARP-1 cleavage by analyzing the lysate with your anti-PARP-1 antibody. You should observe a strong band at ~89 kDa (cleaved fragment) and a potential decrease in the ~116 kDa (full-length) band. This validated lysate can be aliquoted and stored at -80°C for future use.
My positive control works, but my experimental samples show no cleaved PARP-1 signal. What should I check?
This situation suggests your experimental conditions may not be inducing apoptosis to a detectable level. First, verify that your sample loading is even and sufficient by checking your loading control. If the loading control is consistent, consider the following:
- Increase Protein Load: Load more protein per lane (e.g., 30-50 µg) to detect low-abundance cleaved fragments [63] [64].
- Confirm Apoptosis Induction: Re-optimize the dose and duration of your apoptosis-inducing treatment.
- Prevent Degradation: Ensure your lysis buffer contains fresh protease inhibitors (e.g., PMSF, leupeptin) and phosphatase inhibitors to preserve the cleaved protein fragments [65].
- Optimize Transfer: For the 89 kDa fragment, ensure efficient transfer from gel to membrane. Staining the membrane with Ponceau S after transfer can help you check transfer efficiency and overall protein loading [30] [66].
How does a negative control help confirm the specificity of my cleaved PARP-1 signal?
A negative control lysate comes from a sample known not to express the target protein. For cleaved PARP-1, the ideal negative control is a PARP-1 knockout cell line [61] [62]. When you run this control on your blot, you should see no bands at 116 kDa or 89 kDa. This confirms that the bands you see in your experimental samples are specific to PARP-1 and not due to non-specific antibody binding. If you observe bands in the negative control lane, your primary antibody may be non-specific and require optimization or replacement.
Why is a loading control necessary even if I quantified my protein before loading?
Loading controls are essential for normalizing protein levels across lanes after all steps of the western blot process are complete. Pre-loading quantification methods (like Bradford or BCA assays) do not account for inconsistencies in gel loading, transfer efficiency, or membrane staining [66] [62]. A loading control—a ubiquitously expressed housekeeping protein—verifies that an observed change in your target protein (like cleaved PARP-1) is real and not due to uneven protein loading or transfer. This is critical for accurate quantification and data interpretation.
Choosing a Loading Control for Cleaved PARP-1: Select a loading control with a molecular weight distinct from both full-length (116 kDa) and cleaved (89 kDa) PARP-1 to avoid overlap.
The table below summarizes common loading controls and key considerations for their use.
Table 1: Selecting an Appropriate Loading Control
| Protein | Molecular Weight | Primary Use | Key Considerations |
|---|---|---|---|
| GAPDH | ~36 kDa | Whole cell lysate | Expression can vary under certain conditions like hypoxia or diabetes [61]. |
| Beta-Actin | ~42 kDa | Whole cell lysate | Not suitable for skeletal muscle samples; can be affected by cell growth conditions [61]. |
| Alpha-/Beta-Tubulin | ~50-55 kDa | Whole cell lysate | Expression may vary with use of antimicrobial or antimitotic drugs [61]. |
| Vinculin | ~125 kDa | Whole cell lysate | Good choice due to clear separation from cleaved and full-length PARP-1. |
| Lamin B1 | ~66 kDa | Nuclear fraction | Not suitable if the nuclear envelope is removed [61]. |
| COX IV | ~16 kDa | Mitochondrial fraction | Ensure your target protein's fragments do not run at a similar size [61]. |
What other controls can I use to troubleshoot my western blot?
- No Primary Antibody Control: Incubate the membrane with only the secondary antibody. This control identifies any non-specific binding or high background caused by the secondary antibody itself [66] [62].
- Isotype Control: Use an antibody of the same species and isotype as your primary antibody but with an irrelevant specificity. This helps identify non-specific binding through the constant (Fc) region of the primary antibody, which is especially useful for lysates rich in Fc receptors [66].
■ Experimental Workflow for Control Implementation
The following diagram outlines the logical workflow for incorporating controls into your experimental design to validate results and troubleshoot issues.
■ The Scientist's Toolkit: Essential Research Reagents
Table 2: Key Reagent Solutions for Cleaved PARP-1 Detection
| Reagent | Function | Example & Notes |
|---|---|---|
| Apoptosis Inducer | Generates positive control lysate with cleaved PARP-1. | Staurosporine (1 µM, 4-6 hr treatment) [30]. |
| Protease Inhibitors | Prevents protein degradation, preserving the cleaved PARP-1 fragment. | PMSF, Leupeptin, Aprotinin. Use a commercial cocktail for best results [64] [65]. |
| Phosphatase Inhibitors | Preserves protein phosphorylation states, which can be important for upstream signaling in apoptosis. | Sodium orthovanadate, β-glycerophosphate [64] [65]. |
| Chemiluminescent Substrate | Detects the antibody-bound protein on the membrane. | Use a high-sensitivity ECL substrate for low-abundance targets like cleaved PARP-1 [63] [30]. |
| Validated Primary Antibody | Specifically binds to the cleaved fragment of PARP-1. | Anti-PARP1 Antibody (e.g., HPA045168). Ensure it is validated for Western blotting [20] [67]. |
| HRP-conjugated Secondary Antibody | Binds to the primary antibody and enables detection. | Anti-rabbit or Anti-mouse HRP. Ensure it matches the host species of your primary antibody [63] [30]. |
Validating Antibody Specificity with PARP-1 Knockout Cell Lysates
Core Principle: Why Knockout Lysates are the Gold Standard
Antibody validation is the experimental proof and documentation that an antibody is specific for its intended target in the intended assay [20]. In Western blotting, this means proving the antibody binds specifically to its target antigen (e.g., PARP-1 or cleaved PARP-1) when bound to a membrane and can selectively identify this target within a complex sample like a cell lysate [20].
A single, distinct protein band at the expected molecular weight does not automatically confirm antibody specificity, as it could represent the desired target, a cross-reactive protein, or a mixture of proteins [20]. Knockout (KO) validation is widely considered the accepted "gold standard" for confirming antibody specificity in Western blot [20] [68] [69]. The principle is straightforward: if an antibody is specific, its signal should be absent or dramatically reduced in a cell line where the gene encoding the target protein has been knocked out, compared to the wild-type control.
This method directly addresses the challenge of off-target binding. Without such genetic controls, additional bands or a single band at the wrong molecular weight can easily be misinterpreted, leading to incorrect conclusions [20] [69].
PARP-1 Biology and Antibody Targets
PARP-1 is a nuclear enzyme with a central role in DNA repair and apoptosis. The full-length protein has a calculated molecular weight of approximately 113 kDa and is often observed between 113-116 kDa on Western blots [68] [70]. During apoptosis, caspases cleave PARP-1 into a characteristic 89 kDa C-terminal fragment and a 24 kDa N-terminal fragment; the appearance of the 89 kDa fragment is a classic biochemical marker of apoptosis [71] [70]. Other proteases can generate different cleavage fragments.
Antibodies targeting different PARP-1 forms include:
- Total PARP-1 Antibodies: Recognize both full-length and cleaved protein, often targeting the N-terminal region [70].
- Cleaved PARP-1 Antibodies: Specifically designed to detect the neo-epitopes exposed after caspase cleavage, such as the 89 kDa fragment or a 27 kDa fragment [71].
Figure 1: PARP-1 Cleavage Pathway During Apoptosis
Experimental Protocol for KO Validation
Step 1: Acquire Wild-Type and PARP-1 KO Cell Lysates
- Wild-type lysates: Use cell lines known to express PARP-1 (e.g., A549, HEK-293T, HAP1) as positive controls [68] [71].
- KO lysates: Use genetically engineered PARP-1 knockout versions of the same cell lines. These are available commercially or can be generated via CRISPR-Cas9 technology [68] [71].
- Treatment: To induce apoptosis and generate cleaved PARP-1, treat cells with an apoptotic inducer like staurosporine (e.g., 1-3 µM for 3-24 hours) [68] [71]. Include untreated controls to show the full-length protein.
Step 2: Western Blot Execution
- Load 20-30 µg of total protein from both wild-type and KO lysates on the same gel for direct comparison [68] [71].
- Include a molecular weight marker in every gel to confirm the size of observed bands [72] [69].
- Run positive and negative controls on the same blot. A positive control (e.g., lysate from staurosporine-treated cells) validates the protocol, while the KO lysate is the critical negative control for specificity [20] [69].
Step 3: Immunodetection and Analysis
- Primary Antibody Incubation: Follow the datasheet recommendations for dilution and conditions. For example, anti-PARP1 [E102] (ab32138) is used at 1/1000 dilution with overnight incubation at 4°C [68].
- Expected Results:
- Validated Specific Antibody: A band at the expected molecular weight (e.g., 113-116 kDa for full-length; ~89 kDa or ~27 kDa for cleaved) in wild-type lanes, with a clear loss of signal in the KO lanes [68] [71].
- Non-Specific Antibody: Bands present at similar intensities in both wild-type and KO lanes, indicating off-target binding.
Troubleshooting Guide: FAQs and Solutions
FAQ 1: My antibody shows no signal in both wild-type and KO lysates. What should I check?
- Verify Antibody Compatibility: Confirm the antibody is validated for Western blot and for the species of your cell lines (e.g., human, mouse) [68] [71].
- Check Experimental Conditions: Review sample preparation. Ensure lysis buffer contains appropriate protease inhibitors to prevent protein degradation [69].
- Optimize Antibody Dilution: Titrate the antibody. A recommended starting dilution is 1/1000 for total PARP-1 and 1/100 for cleaved PARP-1 antibodies [68] [71].
- Confirm Apoptosis Induction: If detecting cleaved PARP-1, verify apoptosis was successfully induced in your treated samples using a positive control lysate.
FAQ 2: I see extra bands in both wild-type and KO lysates. What does this mean?
- Multiple Cleavage Products: PARP-1 can be cleaved by proteases other than caspases (e.g., calpains, cathepsins), producing fragments of different sizes (e.g., 42-89 kDa) [70].
- Non-Specific Binding: Persistent bands in the KO lysate indicate antibody cross-reactivity with unknown proteins. Consider using a different antibody or additional validation methods [20].
FAQ 3: The KO lysate shows a faint band, but the wild-type is strong. Is my antibody still usable?
- Partial Specificity: This indicates some cross-reactivity. The antibody may still be usable if the specific band is predominant and the cross-reactive band is consistently identifiable at a different molecular weight. However, for precise quantification, a more specific antibody is recommended [20].
FAQ 4: My band is at the wrong molecular weight. What are the possible reasons?
- Post-Translational Modifications: PARP-1 undergoes heavy ADP-ribosylation, which can significantly alter its apparent molecular weight on an SDS-PAGE gel, making it run higher than the calculated 113 kDa [73].
- Protein Isoforms or Splice Variants: Alternative splicing can produce protein isoforms of different sizes [20].
- Non-Specific Binding: The band may represent a different protein altogether. KO validation is essential to rule this out.
Essential Research Reagent Solutions
The table below lists key reagents used in the featured validation experiments.
| Reagent / Material | Function in Experiment | Example Product / Specification |
|---|---|---|
| PARP-1 Knockout Cell Line | Negative control to confirm antibody specificity by absence of target protein. | A549 PARP1 KO, HEK-293T PARP1 KO [68] [71] |
| Anti-PARP1 Primary Antibody | Binds specifically to PARP-1 protein (full-length or cleaved). | Rabbit monoclonal [E102] for total PARP1; [SP276] for cleaved PARP1 [68] [71] |
| Apoptosis Inducer | Triggers caspase activation to generate cleaved PARP-1 for assay validation. | Staurosporine (1-3 µM for 3-24 hours) [68] [71] |
| HRP or Fluorescent Secondary Antibody | Conjugated to an enzyme or fluorophore for signal detection after binding to primary antibody. | Goat anti-Rabbit IgG H&L (IRDye 800CW), used at 1/20,000 dilution [68] [71] |
| Loading Control Antibody | Detects a constitutively expressed protein to normalize for sample loading errors. | Anti-Alpha Tubulin [DM1A] or Anti-GAPDH [6C5] [68] [71] |
| Membrane Blocking Agent | Reduces non-specific antibody binding to the membrane. | 5% non-fat milk or BSA in TBST [68] [69] |
Validation Workflow Diagram
Figure 2: PARP-1 Antibody Specificity Validation Workflow
Cross-Validation with Complementary Apoptosis Assays
The detection of cleaved Poly(ADP-ribose) polymerase-1 (PARP-1) serves as a cornerstone biochemical marker for apoptosis. During programmed cell death, caspase-3 and caspase-7 cleave the 116 kDa full-length PARP-1 into characteristic 89 kDa and 24 kDa fragments. This cleavage event inactivates PARP-1's DNA repair function and facilitates the dismantling of the cell. Consequently, the presence of the 89 kDa fragment is considered a definitive indicator of apoptotic commitment. However, researchers frequently encounter experimental challenges when attempting to detect this cleaved form via western blotting. Weak or absent signals can stem from numerous factors spanning the entire western blot workflow, from sample preparation to final detection. This technical guide provides comprehensive troubleshooting strategies to resolve these issues, ensuring reliable detection of cleaved PARP-1 and accurate interpretation of apoptosis experimental data.
Frequently Asked Questions (FAQs) on Cleaved PARP-1 Detection
Q1: My western blots show strong full-length PARP-1 but no cleaved band at 89 kDa, even in my positive control. What could be wrong?
This common issue often relates to sample integrity, transfer efficiency, or antibody specificity. First, verify that your apoptosis-inducing treatment is effective and that you are harvesting cells at the appropriate time point—cleavage is a dynamic process. Second, ensure efficient transfer of the 89 kDa fragment to the membrane; over-transfer can cause low molecular weight proteins to pass through the membrane. Using a 0.2 µm pore size membrane instead of 0.45 µm can prevent this. Finally, confirm that your primary antibody specifically recognizes the cleaved epitope. Not all PARP-1 antibodies are suitable for detecting the cleaved fragment [74] [75].
Q2: Why do I see multiple non-specific bands in my PARP-1 western blot?
PARP-1 is subject to extensive post-translational modifications (PTMs) including ubiquitination, SUMOylation, phosphorylation, and ADP-ribosylation (PARylation), which can alter its electrophoretic mobility and create multiple bands [16] [76] [77]. Sample degradation from protease activity is another common cause. Implement the following solutions: (1) Use fresh protease inhibitors during sample preparation and keep samples on ice; (2) Titrate your primary antibody to reduce non-specific binding; (3) Review literature to understand expected PARP-1 PTMs in your experimental system [74] [75].
Q3: What are the optimal positive and negative controls for cleaved PARP-1 detection?
Appropriate controls are essential for validating your results. For a positive control, use lysates from cells treated with a known apoptosis inducer (e.g., staurosporine, camptothecin) for 4-16 hours. Many researchers maintain a stock of staurosporine-treated Jurkat or HeLa cell lysates as a reliable positive control. For a negative control, use lysates from healthy, untreated cells where PARP-1 should be predominantly full-length. Including a caspase inhibitor in your treatment conditions can also serve as an excellent negative control, as it should prevent PARP-1 cleavage [74].
Comprehensive Troubleshooting Guide for Weak or No Cleaved PARP-1 Signal
The following table provides a systematic approach to diagnosing and resolving issues with cleaved PARP-1 detection, organized by workflow stage.
Table 1: Troubleshooting Guide for Weak or No Cleaved PARP-1 Signal
| Workflow Stage | Potential Issue | Suggested Solutions | Experimental Notes |
|---|---|---|---|
| Sample Preparation | Low levels of apoptosis or incorrect timing [74] | - Optimize apoptosis induction time course- Use a positive control (e.g., staurosporine-treated cells)- Confirm apoptosis with complementary assays (e.g., caspase activity) | Cleavage is transient; harvest at multiple time points (e.g., 2, 4, 8, 16h post-treatment) |
| Protein degradation [74] [75] | - Use fresh protease inhibitors cocktail- Keep samples on ice during processing- Avoid repeated freeze-thaw cycles | Include broad-spectrum caspase inhibitors if measuring basal cleavage in negative controls | |
| Gel Electrophoresis & Transfer | Inefficient transfer of the 89 kDa fragment [30] [75] | - For low MW proteins: Reduce transfer time, use 0.2 µm pore membrane, add 20% methanol to transfer buffer- Confirm transfer with Ponceau S staining or reversible membrane stain | High methanol concentration can shrink gel pores; 20% is optimal for low MW protein retention |
| Antibody & Detection | Primary antibody specificity or concentration [74] [75] [15] | - Use an antibody validated for cleaved PARP-1 detection- Perform antibody titration (e.g., 1:500 to 1:2000)- Extend incubation (overnight at 4°C) | Many PARP-1 antibodies are raised against the N-terminus and should recognize the 89 kDa fragment |
| Insensitive detection method [30] | - Use high-sensitivity ECL substrates- Increase exposure time (test multiple durations)- Ensure fresh detection reagents | For very low abundance, consider fluorescent detection for greater linear range | |
| Blocking & Washing | Over-blocking masking the epitope [75] [15] | - Reduce blocking time (1 hr at RT vs overnight)- Switch blocking agent (e.g., from milk to BSA)- Ensure sodium azide is absent with HRP-conjugated antibodies | BSA is generally preferred over milk for phospho-specific antibodies; test both |
Experimental Protocols for Validating Apoptosis and PARP-1 Cleavage
Protocol: Optimization of Apoptosis Induction for PARP-1 Cleavage Detection
Purpose: To establish a reliable positive control for cleaved PARP-1 detection by treating cells with a known apoptosis inducer.
Reagents and Materials:
- Cell line of interest (e.g., Jurkat, HeLa, or your primary cells)
- Apoptosis inducer (e.g., 1 µM Staurosporine, 2 µM Camptothecin, or other relevant agent)
- Complete cell culture medium
- Lysis buffer (RIPA buffer) supplemented with fresh protease inhibitors
- PBS (ice-cold)
Procedure:
- Seed cells at an appropriate density (e.g., 50-70% confluency) and allow to adhere overnight.
- Prepare a fresh working solution of your apoptosis inducer in DMSO or according to manufacturer's instructions.
- Treat cells with the inducer for a time-course experiment (e.g., 0, 2, 4, 8, and 16 hours). Include a vehicle control (DMSO only).
- Harvest cells at each time point:
- For adherent cells: Collect supernatant (may contain detached apoptotic cells), trypsinize, and combine with supernatant. Centrifuge at 500 × g for 5 minutes at 4°C.
- For suspension cells: Centrifuge directly at 500 × g for 5 minutes at 4°C.
- Wash cell pellet with ice-cold PBS and centrifuge again.
- Lyse cell pellet in an appropriate volume of ice-cold RIPA buffer with protease inhibitors for 30 minutes on ice.
- Centrifuge at 13,500 × g for 15 minutes at 4°C to pellet insoluble material.
- Transfer supernatant to a new tube and determine protein concentration.
- Analyze by western blot (see protocol below) to identify the optimal time point for maximal PARP-1 cleavage.
Troubleshooting Notes: If no cleavage is observed, confirm apoptosis induction using an alternative method such as flow cytometry for Annexin V/PI staining or a caspase-3/7 activity assay [74].
Protocol: Western Blot Analysis for PARP-1 Cleavage
Purpose: To reliably detect both full-length (116 kDa) and cleaved (89 kDa) PARP-1 by western blotting.
Reagents and Materials:
- SDS-PAGE gel (8-10% acrylamide suitable for 80-120 kDa proteins)
- PVDF or nitrocellulose membrane (0.2 µm pore size recommended)
- Transfer buffer (add 20% methanol for low MW protein retention)
- Blocking buffer: 5% BSA in TBST for phospho-specific antibodies, or 5% non-fat milk in TBST for others
- Primary antibody: Anti-PARP-1 (rabbit or mouse monoclonal recommended)
- Secondary antibody: HRP-conjugated anti-rabbit or anti-mouse
- ECL detection reagent
Procedure:
- Prepare samples: Mix 20-40 µg of total protein with SDS sample buffer. Do not over-boil samples; heating at 70°C for 10 minutes is sufficient to avoid proteolysis and protein aggregation [15].
- Load samples and molecular weight marker onto SDS-PAGE gel. Include a positive control (e.g., staurosporine-treated cell lysate) and negative control (untreated cells).
- Run gel at constant voltage (e.g., 100-120V) until the dye front reaches the bottom.
- Transfer proteins to membrane using wet transfer system:
- For cleaved PARP-1 (89 kDa): 60-90 minutes at 100V or overnight at 30V on ice
- For full-length PARP-1 (116 kDa): 90-120 minutes at 100V
- Block membrane in blocking buffer for 1 hour at room temperature with gentle agitation.
- Incubate with primary antibody diluted in blocking buffer overnight at 4°C with gentle agitation.
- Wash membrane 3-5 times for 5 minutes each with TBST.
- Incubate with HRP-conjugated secondary antibody diluted in blocking buffer for 1 hour at room temperature.
- Wash membrane 3-5 times for 5 minutes each with TBST.
- Detect using ECL reagent according to manufacturer's instructions. Try multiple exposure times (e.g., 30 seconds, 2 minutes, 5 minutes) to ensure optimal detection of both strong full-length and weaker cleaved bands.
Validation: Always include a loading control such as GAPDH, β-actin, or α-tubulin on the same membrane to normalize protein loading [75] [78].
PARP-1 Cleavage in Apoptosis Signaling Pathway
The diagram below illustrates the central role of PARP-1 cleavage in the apoptosis signaling cascade, highlighting key regulatory steps and potential points of failure in detection.
Diagram 1: PARP-1 Cleavage in Apoptosis. This pathway illustrates how apoptotic stimuli activate caspase cascades that cleave full-length PARP-1, generating characteristic 89 kDa and 24 kDa fragments that commit the cell to irreversible apoptosis. Common detection challenges are highlighted in red dashed lines.
The Scientist's Toolkit: Essential Reagents for PARP-1 Research
Table 2: Key Research Reagents for PARP-1 Cleavage Detection
| Reagent/Category | Specific Examples | Function & Application Notes |
|---|---|---|
| Apoptosis Inducers | Staurosporine (1 µM), Camptothecin (2 µM), Etoposide (50-100 µM) | Generate positive controls for cleaved PARP-1; use in time-course experiments (typically 4-16 hours) [74] |
| PARP-1 Antibodies | Anti-PARP-1 (N-terminal specific), Cleaved PARP-1 (Asp214) specific antibodies | Detect full-length (116 kDa) and/or cleaved (89 kDa) PARP-1; must be validated for western blot [75] [78] |
| Caspase Inhibitors | Z-VAD-FMK (pan-caspase inhibitor), DEVD-FMK (caspase-3 inhibitor) | Negative controls to confirm caspase-dependent cleavage; use 20-50 µM during apoptosis induction [74] |
| Specialized Buffers | Protease inhibitor cocktails, Phosphatase inhibitors, PARP lysis buffer | Preserve post-translational modifications and prevent degradation during sample preparation [16] [76] |
| Detection Enhancers | High-sensitivity ECL substrates, Signal enhancers | Improve detection of low-abundance cleaved PARP-1 fragment; essential for weak signals [30] [15] |
Successfully detecting cleaved PARP-1 requires careful attention to experimental details throughout the entire western blot workflow. When weak or absent signals persist, implement a systematic troubleshooting approach: First, verify your apoptosis induction is working using positive controls and complementary assays. Second, optimize your western blot conditions specifically for the 89 kDa fragment, paying special attention to transfer efficiency and antibody compatibility. Finally, always include appropriate controls to validate your results. By following these comprehensive guidelines and utilizing complementary apoptosis assays, researchers can overcome the common challenges associated with cleaved PARP-1 detection and generate robust, reproducible data in their apoptosis studies.
Troubleshooting Weak or No Cleaved PARP-1 Signal in Western Blot Research
Core Concepts: PARP-1 Cleavage in Research Contexts
What does PARP-1 cleavage signify in experimental models? Cleavage of PARP-1 is a well-established hallmark of apoptosis. During programmed cell death, caspases (primarily caspase-3 and -7) cleave the 113 kDa PARP-1 protein into characteristic 89 kDa and 24 kDa fragments. This cleavage inactivates PARP-1's DNA repair function and facilitates cellular disassembly [79]. Detection of the 89 kDa fragment via Western blot is a standard method for confirming apoptosis induction in experimental systems.
How is PARP-1 cleavage different in other cell death pathways? In necrosis, PARP-1 is processed differently, generating a major 50 kDa fragment through the action of lysosomal proteases such as cathepsins B and G. This necrotic cleavage is not inhibited by broad-spectrum caspase inhibitors like zVAD-fmk [79]. Furthermore, in non-lethal cellular stress conditions, non-canonical processing of caspase-7 can occur, which modulates PARP1 activity without triggering full apoptosis [80]. Understanding these differential cleavage patterns is crucial for accurate experimental interpretation.
Troubleshooting Guide: Weak or Absent Cleaved PARP-1 Signal
FAQ: My Western blot shows weak or no cleaved PARP-1 signal despite apoptosis induction. What could be wrong?
This common issue can arise from multiple factors spanning experimental design, sample preparation, and detection methodology. The following table organizes potential causes and solutions.
Table: Troubleshooting Weak or Absent Cleaved PARP-1 Signal
| Category | Potential Issue | Recommended Solution |
|---|---|---|
| Biological System | Non-apoptotic cell death (e.g., necrosis, autophagy) | Confirm apoptosis using additional markers (e.g., Annexin V, caspase-3 activation). Check for the 50 kDa necrotic PARP-1 fragment [79]. |
| Cell type-specific caspase expression | Assess baseline levels of caspase-3/7. In CASP3/CASP7 DKO cells, stress adaptation pathways are altered, which can affect PARP1 cleavage [80]. | |
| Inefficient apoptosis induction | Optimize treatment dose and duration. Include a positive control (e.g., cells treated with a known apoptosis inducer like staurosporine). | |
| Sample Preparation | Protein degradation | Always perform lysis with fresh, chilled protease inhibitors. Keep samples on ice and freeze at -80°C for long-term storage. |
| Improper protein quantification | Use a consistent, reliable assay (e.g., BCA). Re-run gels with equal protein loading confirmed by a loading control. | |
| Incomplete lysis or protein extraction | Use a vigorous, validated lysis buffer suitable for nuclear proteins. Briefly sonicate samples if needed. | |
| Western Blot Process | Low antibody sensitivity or specificity | Validate antibody using a PARP-1 knockout cell lysate or a caspase-3/7 DKO line where cleavage is impaired [80]. |
| Inefficient transfer | Verify transfer efficiency with a reversible protein stain (e.g., Ponceau S) on the membrane after transfer. | |
| Suboptimal antigen retrieval | For strongly cross-linked gels, consider a brief, mild antigen retrieval step on the membrane. |
FAQ: The PARP-1 cleavage signal is present but weak. How can I enhance detection sensitivity?
To enhance the sensitivity and reliability of your cleaved PARP-1 detection, implement these optimized experimental protocols.
Detailed Protocol: Optimized Sample Preparation for PARP-1 Cleavage Detection
- Cell Lysis: After treatment, wash cells with cold PBS. Lyse cells directly in a pre-heated (95°C) 1X Laemmli SDS sample buffer (62.5 mM Tris-HCl, pH 6.8, 2% SDS, 10% glycerol, 0.002% bromophenol blue) containing 5% β-mercaptoethanol. This method instantly denatures all proteins and inactivates proteases, preserving the cleavage state.
- DNA Shearing: Pass the lysate through a 25-gauge needle several times or sonicate briefly (10-15 seconds) to shear genomic DNA, which will reduce sample viscosity and ensure even gel loading.
- Protein Denaturation: Heat samples at 95-100°C for 5-10 minutes.
- Gel Electrophoresis: Load 20-30 µg of total protein per well on a 7.5-10% SDS-PAGE gel. Run the gel at a constant voltage until the dye front reaches the bottom.
Detailed Protocol: Enhanced Immunoblotting for Cleaved PARP-1
- Membrane Transfer: Perform wet or semi-dry transfer to a PVDF membrane. PVDF is recommended for its high protein-binding capacity. Confirm transfer and equal loading with Ponceau S staining.
- Antibody Incubation:
- Primary Antibody: Use a well-validated anti-PARP-1 antibody that specifically recognizes the 89 kDa cleavage fragment. Dilute the antibody in TBST with 5% BSA. Incubate overnight at 4°C with gentle agitation.
- Secondary Antibody: Use a high-sensitivity HRP-conjugated secondary antibody. Incubate for 1 hour at room temperature.
- Detection: Use a high-sensitivity chemiluminescent substrate. Optimize exposure time to capture a strong signal without saturation.
Signaling Pathways & Experimental Workflows
The following diagram illustrates the key apoptotic pathway leading to PARP-1 cleavage and highlights points where experimental variables can interfere with detection.
The Scientist's Toolkit: Key Research Reagent Solutions
Table: Essential Reagents for PARP-1 Cleavage Analysis
| Reagent / Material | Critical Function | Technical Notes |
|---|---|---|
| Validated PARP-1 Antibody | Specifically detects full-length (113 kDa) and cleaved (89 kDa) PARP-1. | Choose an antibody validated for apoptosis. Lot-to-lot variability should be checked. |
| Caspase-3/7 Antibodies | Confirms the upstream activation of the apoptotic executioner caspases. | Provides orthogonal validation for the apoptosis pathway. |
| Caspase Inhibitor (zVAD-fmk) | Broad-spectrum caspase inhibitor used as a negative control to confirm caspase-dependent cleavage. | Prevents PARP-1 cleavage, confirming the signal is apoptosis-specific [79]. |
| Protease Inhibitor Cocktail | Prevents non-specific protein degradation during sample preparation. | Must be added fresh to lysis buffer to preserve the native cleavage state. |
| Chemiluminescent Substrate | For sensitive detection of the target protein on Western blots. | High-sensitivity substrates are crucial for detecting low-abundance cleaved fragments. |
| CASP3/CASP7 DKO Cell Lines | Essential negative control for antibody validation and pathway studies. | In these lines, caspase-dependent PARP-1 cleavage is abolished, confirming antibody specificity [80]. |
| Known Apoptosis Inducer | Positive control for the experimental setup (e.g., Staurosporine, Etoposide). | Verifies that your system is capable of inducing apoptosis and PARP-1 cleavage. |
Conclusion
Successfully detecting cleaved PARP-1 requires an integrated approach that combines a deep understanding of its biological context with meticulous technical optimization. By systematically addressing common pitfalls—from confirming apoptosis induction and validating antibody specificity to implementing protocol innovations like the sheet protector method—researchers can achieve reliable and reproducible results. As research advances, particularly in areas like PARP inhibitor resistance and novel cell death pathways such as ferroptosis-apoptosis crosstalk, robust cleaved PARP-1 detection remains a cornerstone for validating therapeutic efficacy and understanding fundamental disease mechanisms in cancer and beyond.
References
- 1. PARP-1 cleavage fragments: signatures of cell-death ... [https://biosignaling.biomedcentral.com/articles/10.1186/1478-811X-8-31]
- 2. Poly(ADP-ribose) polymerase-1 and its cleavage products ... [https://pmc.ncbi.nlm.nih.gov/articles/PMC4013233/]
- 3. Cleaved PARP (Asp214) Antibody #9541 [https://www.cellsignal.com/products/primary-antibodies/cleaved-parp-asp214-antibody/9541?srsltid=AfmBOooSUGRuwTZJoyyUyua8N-lK0rGdVvQojN3yoVRWFiBR0YwBHaRZ]
- 4. PARP1 (cleaved Asp214, Asp215) Polyclonal Antibody [https://www.thermofisher.com/antibody/product/PARP1-cleaved-Asp214-Asp215-Antibody-Polyclonal/44-698G]
- 5. Cleaved PARP1 antibody (60555-1-PBS) [https://www.ptglab.com/products/Cleaved-PARP1-Antibody-60555-1-PBS.htm?srsltid=AfmBOoo7nd2Itbx9Ht5U0rlqQUzOvmsHd5MCVNOf8H4hTmst8dTlxQB6]
- 6. Common Troubleshooting Tips for Western Blot Results [https://www.bosterbio.com/blog/post/common-troubleshooting-tips-for-western-blot-results-part-1?srsltid=AfmBOordgkjifBbvA-GkrJ9k6Y-ooHT6TB2sFr7QzcXY53jNsuX0TKic]
- 7. 2.10. PARP-1 Cleavage [https://bio-protocol.org/exchange/minidetail?id=622538&type=30]
- 8. Western Blot Troubleshooting: Weak/No Signal & Other [https://www.ptglab.com/support/western-blot-protocol/western-blot-troubleshooting-weak-no-signal-other/?srsltid=AfmBOopMfGIINM7hbtPGkqmvlutCletQQj9muUmPreHEiq7fwW5srm2G]
- 9. Western Blotting Troubleshooting [https://www.southernbiotech.com/troubleshooting-tips-for-western-blotting/]
- 10. What went wrong? A Western Blot Troubleshooting Guide [https://precisionbiosystems.com/western-blot-troubleshooting-guide/]
- 11. Anti-Cleaved PARP1 antibody (ab4830) [https://www.abcam.com/en-us/products/primary-antibodies/cleaved-parp1-antibody-ab4830]
- 12. Regulation of poly(ADP-ribose) polymerase-1 (PARP-1) gene ... [https://pmc.ncbi.nlm.nih.gov/articles/PMC2175517/]
- 13. Common Troubleshooting Tips for Western Blot Results [https://www.bosterbio.com/blog/post/common-troubleshooting-tips-for-western-blot-results-part-1?srsltid=AfmBOoq-NZIbiIPdmJ_e97JyTmlm80bXRQ6O2YiSfOgXde_rD8FbRA_C]
- 14. Western Blot Troubleshooting: Weak/No Signal & Other [https://www.ptglab.com/support/western-blot-protocol/western-blot-troubleshooting-weak-no-signal-other/?srsltid=AfmBOoqiIbSz_Ialbye5DsAlPbRiCe7YwZFe8yDxzaL79XHdhKhkGYaX]
- 15. Western Blot Troubleshooting [https://www.thermofisher.com/us/en/home/life-science/protein-biology/protein-biology-learning-center/protein-gel-electrophoresis-information/western-blot-troubleshooting.html]
- 16. The deubiquitination-PARylation positive feedback loop of ... [https://www.nature.com/articles/s41388-025-03428-7]
- 17. PARP Antibody #9542 [https://www.cellsignal.com/products/primary-antibodies/parp-antibody/9542?srsltid=AfmBOoqo7p4KayAvqyOSaKjfk-r05VD3yG9mGR3-s-tDYPPfVNSRXpQS]
- 18. Noncleavable poly(ADP-ribose) polymerase-1 regulates ... [https://pmc.ncbi.nlm.nih.gov/articles/PMC522248/]
- 19. FTO suppresses DNA repair by inhibiting PARP1 [https://www.nature.com/articles/s41467-025-58309-0]
- 20. Antibody validation for Western blot: By the user, for the user [https://pmc.ncbi.nlm.nih.gov/articles/PMC6983856/]
- 21. PARP1 auto-modification promotes faithful Okazaki ... [https://www.sciencedirect.com/science/article/pii/S1097276525007476]
- 22. PARPs and ADP-ribosylation: Deciphering the complexity ... [https://www.sciencedirect.com/science/article/pii/S1097276523002538]
- 23. Western Blot Troubleshooting: Weak/No Signal & Other [https://www.ptglab.com/support/western-blot-protocol/western-blot-troubleshooting-weak-no-signal-other/?srsltid=AfmBOoqxhpruCD2YG9-GNSvGZunaQNWvul1n0MSxpDJ9dIpCot_nCa9q]
- 24. The 89-kDa PARP1 cleavage fragment serves as a ... [https://pmc.ncbi.nlm.nih.gov/articles/PMC7948984/]
- 25. PARP1 antibody (13371-1-AP) [https://www.ptglab.com/products/PARP1-Antibody-13371-1-AP.htm?srsltid=AfmBOopsVyrjSCGNkgg6vnjACC2PKgauA2KajE7ZmM8EKka5wSgH3JZd]
- 26. PARP Antibody #9542 [https://www.cellsignal.com/products/primary-antibodies/parp-antibody/9542?srsltid=AfmBOoqBwWV-nQuvnxEG2FC9gBXOs-R72WSHeJbWHvC72TSGKCIkylpU]
- 27. PARP1 Monoclonal Antibody (C-2-10) (MA3-950) [https://www.thermofisher.com/antibody/product/PARP1-Antibody-clone-C-2-10-Monoclonal/MA3-950]
- 28. Anti-PARP1 antibody (ab137653) [https://www.abcam.com/en-us/products/primary-antibodies/parp1-antibody-ab137653]
- 29. Western Blot Troubleshooting: Weak/No Signal & Other [https://www.ptglab.com/support/western-blot-protocol/western-blot-troubleshooting-weak-no-signal-other/?srsltid=AfmBOopc2lNMGyQvVQdQOhdMVTg9M0M9q3D6dmlcaJ0P_GIGKXK5I3YX]
- 30. The 8 Western Blot Failures and How to Prevent Them (2025 ... [https://wildtypeone.substack.com/p/the-8-western-blot-failures-and-how?utm_campaign=post&triedRedirect=true]
- 31. What's Your Western Blot Success Rate? [https://www.bosterbio.com/blog/post/whats-your-western-blot-success-rate?srsltid=AfmBOoqN4SZWFZfwOXTFPwxPiq3EUynoSChOuu-nD5NBMc8WZ66fd6Kr]
- 32. Quantification of ADPR signal intensities and PARP-1 ... [https://bio-protocol.org/exchange/minidetail?id=7521885&type=30]
- 33. A Scientist's Guide to Conquering High Background in ... - clyte [https://www.clyte.tech/post/guide-to-conquering-high-background-in-western-blotting?srsltid=AfmBOoqfpmhd9IvcC17h2GRvYXpJJ7b-t1Xu-QwkKwNaWsY0h0kN2bxe]
- 34. Sheet Protector Strategy for Western Blot to Reduce ... [https://pmc.ncbi.nlm.nih.gov/articles/PMC12462392/]
- 35. Apoptosis western blot guide [https://www.abcam.com/en-us/knowledge-center/western-blot/western-blot-analysis-of-apoptosis]
- 36. Western Blot Troubleshooting: Weak/No Signal & Other [https://www.ptglab.com/support/western-blot-protocol/western-blot-troubleshooting-weak-no-signal-other/?srsltid=AfmBOorZKt6qu-wj27wT-i-UsU4AH8Q0megQDDcgTBxvS-8UxUzoxr1Q]
- 37. Western Blot Troubleshooting [https://www.antibodies.com/applications/western-blotting/western-blot-troubleshooting]
- 38. Common Troubleshooting Tips for Western Blot Results [https://www.bosterbio.com/blog/post/common-troubleshooting-tips-for-western-blot-results-part-1?srsltid=AfmBOophBTrQXa6RFZGRLIHZfqY94-WJUZyRTLJ_0IZLSMtcAxzwRXxQ]
- 39. Successful Transfer High Molecular Weight Proteins during ... [https://www.thermofisher.com/us/en/home/life-science/protein-biology/protein-biology-learning-center/protein-biology-resource-library/protein-biology-application-notes/successful-transfer-high-mw-proteins-western-blotting.html]
- 40. Western blot protocol for high molecular weight proteins [https://www.abcam.com/en-us/technical-resources/protocols/western-blot-for-high-molecular-weights]
- 41. Troubleshooting Blotting Common Problems and Solutions ... [https://hoeferinc.com/pages/troubleshooting-blotting-common-problems-and-solutions-semi-dry-transfer?srsltid=AfmBOoofgESsxmuG81VNaCbc2-ralbGzWzRVda6e0RdDlDTQwiNEG_Y3]
- 42. PARP Antibody #9542 [https://www.cellsignal.com/products/primary-antibodies/parp-antibody/9542?srsltid=AfmBOop0qdoBON3z2sGVbeC9VPmYgXyNGRvNk224NrE2kRC692Va_E9K]
- 43. Western Blot Troubleshooting: Weak/No Signal & Other [https://www.ptglab.com/support/western-blot-protocol/western-blot-troubleshooting-weak-no-signal-other/?srsltid=AfmBOoow_Ley5hZpSaanLFpcJsSnIg_6gg9HgkEUWDRzzKL4MpcCJQy-]
- 44. Common Troubleshooting Tips for Western Blot Results [https://www.bosterbio.com/blog/post/common-troubleshooting-tips-for-western-blot-results-part-1?srsltid=AfmBOoqRmWIS8MhrPlZp52-vJ2M1S3u_rRsAjQIEjYEkYCKoxl9ytKHx]
- 45. Western Blot Troubleshooting: Weak/No Signal & Other [https://www.ptglab.com/support/western-blot-protocol/western-blot-troubleshooting-weak-no-signal-other/?srsltid=AfmBOop8ReuKVis0ovC8vm8Uxnd61cQdUt4KKSjbjb2lnyNu_Q3ywfrj]
- 46. Western Blotting Troubleshooting Guide [https://www.cellsignal.com/learn-and-support/troubleshooting/western-blot-troubleshooting-guide?srsltid=AfmBOoqSR8ibFd2Wao9mTZDbTvyQ2dL8vc6-4LNHvvAe__r77uk5kR9B]
- 47. A Scientist's Guide to Conquering High Background in ... - clyte [https://www.clyte.tech/post/guide-to-conquering-high-background-in-western-blotting?srsltid=AfmBOoqLClgRIGDGhue3ukAhFa0QowEyjcIvzOWUxrcB7Uk6IPX_Sz0G]
- 48. How To Optimize Your Western Blot [https://www.ptglab.com/support/western-blot-protocol/how-to-optimize-your-western-blot/?srsltid=AfmBOopEOVv3762aiZIf_vz0nHxgNfXFFTFAufaifg3k9tuMoCK4GYIY]
- 49. Integrating thermodynamics and molecular kinetics into ... [https://pmc.ncbi.nlm.nih.gov/articles/PMC12390805/]
- 50. Western blot blocking: Best practices [https://www.abcam.com/en-us/knowledge-center/western-blot/western-blot-blocking-methods]
- 51. Western blotting guide: Part 4, Membrane blocking [https://www.jacksonimmuno.com/secondary-antibody-resource/immuno-techniques/western-blotting-guide-part-4/]
- 52. Western blot troubleshooting guide [https://www.novusbio.com/support/support-by-application/western-blot/troubleshooting.html?srsltid=AfmBOop1KMwNUYR-a86MXNq78ZfptYnJ5ESXvP66MZA5R5LlOPr8Aztk]
- 53. Blocking Buffers for Western Blot and ELISA [https://www.thermofisher.com/us/en/home/life-science/protein-biology/protein-biology-learning-center/protein-biology-resource-library/pierce-protein-methods/blocking-buffers-western-blot-elisa.html]
- 54. Western Blot Troubleshooting: Weak/No Signal & Other [https://www.ptglab.com/support/western-blot-protocol/western-blot-troubleshooting-weak-no-signal-other/?srsltid=AfmBOoqukKG61g5L8EK4V2pEAynU5W2i2gwD6p_dLBn3fGIrC4NHkXPb]
- 55. How To Optimize Your Western Blot [https://www.ptglab.com/support/western-blot-protocol/how-to-optimize-your-western-blot/?srsltid=AfmBOoqZVzp6AblC_ajPWgnCbaZ3QaBg1OhCjWCphtA-RdjGvrKxWdq0]
- 56. Western Blot Blocking Buffer Optimization | Boster Bio [https://www.bosterbio.com/protocol-and-troubleshooting/western-blotting-optimization/blocking?srsltid=AfmBOopAHWvXp2pQ8xqaBE3AYB2sfzE1poXxqyj1QR6t9y6uSzEuSeNO]
- 57. How to Optimize Your Chemiluminescent Western Blots [https://azurebiosystems.com/blog/beginning-chemiluminescent-western-blotting/]
- 58. Common Troubleshooting Tips for Western Blot Results [https://www.bosterbio.com/blog/post/common-troubleshooting-tips-for-western-blot-results-part-1?srsltid=AfmBOop_keWOLws2i4vtuwexxbmrL_10CI4OLKyv1B88ctPOT9Ku5Zr4]
- 59. Western Blot Troubleshooting: Weak/No Signal & Other [https://www.ptglab.com/support/western-blot-protocol/western-blot-troubleshooting-weak-no-signal-other/?srsltid=AfmBOopBDak84hfkaGgqvUitf8E19NNDvHECo9ZXKu8IY_FofeYEmaus]
- 60. Protein purification and analysis: next generation Western ... [https://pmc.ncbi.nlm.nih.gov/articles/PMC6810642/]
- 61. Recommended controls for western blot [https://www.abcam.com/en-us/technical-resources/guides/western-blot-guide/recommended-controls-for-western-blot]
- 62. Western Blot Controls [https://www.antibodies.com/applications/western-blotting/western-blot-controls]
- 63. Western Blot Troubleshooting: Weak/No Signal & Other [https://www.ptglab.com/support/western-blot-protocol/western-blot-troubleshooting-weak-no-signal-other/?srsltid=AfmBOopnSkfQJP5ORqqpHwhJCFZenw2gkDAUzcbsNYKRE_fnw0Kh-zdV]
- 64. Western Blotting Troubleshooting Guide [https://www.cellsignal.com/learn-and-support/troubleshooting/western-blot-troubleshooting-guide?srsltid=AfmBOopygwpYqrZYSAnzqszrTzSGKCh28cifZVl0mvkRIpr9_jf6xZOG]
- 65. Western Blot: The Complete Guide [https://www.antibodies.com/applications/western-blotting]
- 66. Loading controls and antibody validation for Western blot ... [https://azurebiosystems.com/blog/loading-controls-antibody-validation-western-blot-quantification/]
- 67. Anti-PARP1 Antibody [https://www.atlasantibodies.com/products/primary-antibodies/triple-a-polyclonals/anti-parp1-antibody-hpa045168/]
- 68. Anti- PARP antibody [E102] (ab32138) | Abcam 1 [https://www.abcam.com/en-us/products/primary-antibodies/parp1-antibody-e102-ab32138]
- 69. A brief guide to good practices in pharmacological ... [https://pmc.ncbi.nlm.nih.gov/articles/PMC8209196/]
- 70. PARP1 antibody (66520-1-PBS) [https://www.ptglab.com/products/PARP1-Antibody-66520-1-PBS.htm?srsltid=AfmBOoqrf2mlOGP-I7dRA6Q8BJyHT40KBuqJKVnO0blNEhzpvQaDdDBL]
- 71. Anti-Cleaved PARP1 antibody [SP276] (ab225715) [https://www.abcam.com/en-us/products/primary-antibodies/cleaved-parp1-antibody-sp276-ab225715]
- 72. 2024 Scientific Publication Requirements for Western Blots ... [https://azurebiosystems.com/blog/publication-requirements-for-western-blots-and-gels/]
- 73. Global remodeling of ADP-ribosylation by PARP1 ... [https://pmc.ncbi.nlm.nih.gov/articles/PMC11430048/]
- 74. Common Troubleshooting Tips for Western Blot Results [https://www.bosterbio.com/blog/post/common-troubleshooting-tips-for-western-blot-results-part-1?srsltid=AfmBOoqbhTDwLJys0iaQSZNFWH2A5g2cSYn-PUKU9uubvqhWVayvMKRh]
- 75. Western blot troubleshooting guide [https://www.novusbio.com/support/support-by-application/western-blot/troubleshooting.html?srsltid=AfmBOoqx9jIrM9xpDsMxeCW_zhqKoZOD2TCTDd_i2evXHEw7S5ERoZtM]
- 76. Coilin and SUMOylation influence PARP1 dynamics and the ... [https://pmc.ncbi.nlm.nih.gov/articles/PMC12148040/]
- 77. Western Blot Troubleshooting: Why Does The Observed ... [https://www.ptglab.com/support/western-blot-protocol/western-blot-troubleshooting-why-does-the-observed-protein-molecular-weight-mw-differ-from-the-calculated-one/?srsltid=AfmBOooQhdfMrdLAb5oBFNeUhPVrcCfZucWDV4DuplRSitLRUkfbur9B]
- 78. Activation of Poly(ADP)-ribose Polymerase (PARP-1) ... [https://pmc.ncbi.nlm.nih.gov/articles/PMC3140953/]
- 79. Characterization of the necrotic cleavage of poly(ADP- ... [https://www.nature.com/articles/4400851]
- 80. Caspase 3 and caspase 7 promote cytoprotective autophagy ... [https://pmc.ncbi.nlm.nih.gov/articles/PMC11882052/]